ChevyParts
My Garage
My Account
Cart
OEM Chevrolet Aveo Clutch Disc
Friction Disc- Select Vehicle by Model
- Select Vehicle by VIN
Select Vehicle by Model
orMake
Model
Year
Select Vehicle by VIN
For the most accurate results, select vehicle by your VIN (Vehicle Identification Number).
1 Clutch Disc found

Chevrolet Aveo Disc Part Number: 96468826
$143.67 MSRP: $226.05You Save: $82.38 (37%)Ships in 1-3 Business Days
Chevrolet Aveo Clutch Disc
Want to cut long-term maintenance and repair costs? Choose OEM Clutch Disc. Those parts deliver top durability you can trust. On our site, you'll find a huge catalog of genuine Chevrolet Aveo parts. Prices are unbeatable, so you can keep more in your pocket. Every OEM Chevrolet Aveo Clutch Disc includes a manufacturer's warranty. You can also get an easy return policy that keeps buying risk free. Fast delivery, get your car on the road quickly. It's simple to search, compare, and order. Stop guessing about quality or fit. Order today and save with parts that last.
Chevrolet Aveo Clutch Disc Parts Questions & Experts Answers
- Q: How to replace the Clutch Disc, pressure plate, and pilot bearing on Chevrolet Aveo?A:Implementing the replacement of clutch and Pressure Plate along with Pilot Bearing begins with disconnecting the negative battery cable. Appliy transaxle removal procedures compatible with either d16 or y4m transaxles and then extract the transaxle from the vehicle. When removing the Pressure Plate bolts you must support the Pressure Plate throughout the process especially with the last bolt. The Clutch Disc must be extracted from the Flywheel during this process. Check the Clutch Disc under visible light for signs of contamination, damage to torsion springs and any warping. Check the depth of rivet heads against Clutch Disc surface. A replacement Clutch Disc is necessary when the rivet head depth falls below either 1.2 mm (0.047 in) specification or reaches the 0.5 mm (0.020 in) maximum limit. When measuring Clutch Disc runout using a dial gage it must be replaced if measurement exceeds 0.7 mm (0.028 in). The Pressure Plate needs replacement when inspecting for worn diaphragm spring fingers, oil contamination or visible cracks. The spline on the Clutch Disc requires application of multi-purpose grease before you can align the Pressure Plate and Clutch Disc onto the Flywheel using the clutch center guide (DT 46551). Screw in Pressure Plate bolts according to specifications of 15 n.m (11 lb ft) for hydraulic clutches or 18 n.m (13 lb ft) for cable clutches. End your work by taking out the clutch center guide (DT 46551) before putting the transaxle into the vehicle then reconnecting the negative battery cable.
Related Chevrolet Aveo Parts
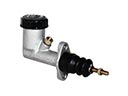 Chevrolet Aveo Clutch Master Cylinder
 Chevrolet Aveo Automatic Transmission Filter
 Chevrolet Aveo Automatic Transmission Shift Levers
 Chevrolet Aveo Automatic Transmission Shifter
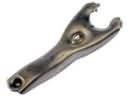 Chevrolet Aveo Clutch Fork
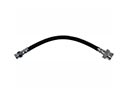 Chevrolet Aveo Clutch Hose
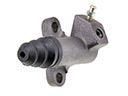 Chevrolet Aveo Clutch Slave Cylinder
 Chevrolet Aveo Flywheel
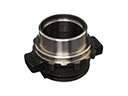 Chevrolet Aveo Release Bearing
 Chevrolet Aveo Shift Cable
 Chevrolet Aveo Torque Converter
 Chevrolet Aveo Transmission Assembly