ChevyParts
My Garage
My Account
Cart
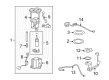
OEM Chevrolet Corvette Fuel Injector
Gas Injector- Select Vehicle by Model
- Select Vehicle by VIN
Select Vehicle by Model
orMake
Model
Year
Select Vehicle by VIN
For the most accurate results, select vehicle by your VIN (Vehicle Identification Number).
29 Fuel Injectors found


Chevrolet Corvette Injector Part Number: 19244618
$94.47 MSRP: $177.41You Save: $82.94 (47%)Ships in 1 Business Day

Chevrolet Corvette Injector Part Number: 19420316
$78.14 MSRP: $139.52You Save: $61.38 (44%)Ships in 1 Business Day


Chevrolet Corvette Injector Part Number: 12576341
$83.30 MSRP: $173.41You Save: $90.11 (52%)Ships in 1-2 Business Days


Chevrolet Corvette Injector Part Number: 12482704
$191.35 MSRP: $346.34You Save: $154.99 (45%)Ships in 1-2 Business Days


Chevrolet Corvette Injector Part Number: 12598646
$73.19 MSRP: $148.66You Save: $75.47 (51%)Ships in 1-2 Business Days
Chevrolet Corvette Injector Part Number: 12690934
$38.83 MSRP: $109.30You Save: $70.47 (65%)Ships in 1-2 Business DaysChevrolet Corvette Injector Part Number: 89017586
$38.01 MSRP: $121.56You Save: $83.55 (69%)Ships in 1-2 Business Days
Chevrolet Corvette Injector Part Number: 12732623
$60.77 MSRP: $108.52You Save: $47.75 (44%)
Chevrolet Corvette Injector Part Number: 19420334
$75.26 MSRP: $152.86You Save: $77.60 (51%)Ships in 1-2 Business DaysChevrolet Corvette Injector Part Number: 12721341
$83.93 MSRP: $149.88You Save: $65.95 (44%)Ships in 1-3 Business Days
Chevrolet Corvette Injector Part Number: 12686278
$49.85 MSRP: $140.38You Save: $90.53 (65%)Ships in 1-2 Business Days
Chevrolet Corvette Injector Part Number: 19420317
$68.92 MSRP: $139.99You Save: $71.07 (51%)Chevrolet Corvette Injector Part Number: 17111418
Chevrolet Corvette Injector Part Number: 17069648
Chevrolet Corvette Injector Part Number: 17069647

Chevrolet Corvette Injector Part Number: 12533952
Chevrolet Corvette Injector Part Number: 17111961
Chevrolet Corvette Injector Part Number: 17078846
Chevrolet Corvette Injector Part Number: 17110870
Chevrolet Corvette Injector Part Number: 17078827
| Page 1 of 2 |Next >
1-20 of 29 Results
Chevrolet Corvette Fuel Injector
Want to cut long-term maintenance and repair costs? Choose OEM Fuel Injector. Those parts deliver top durability you can trust. On our site, you'll find a huge catalog of genuine Chevrolet Corvette parts. Prices are unbeatable, so you can keep more in your pocket. Every OEM Chevrolet Corvette Fuel Injector includes a manufacturer's warranty. You can also get an easy return policy that keeps buying risk free. Fast delivery, get your car on the road quickly. It's simple to search, compare, and order. Stop guessing about quality or fit. Order today and save with parts that last.
The Fuel Injector installed in all Chevrolet Corvette automobiles is a component of the vehicle that injects fuel directly in the engine cylinders and at the same time accomplishes precisely the controlled air fuel mixture depending on what the engine load is. This we know as an electronic system operates by the engine control unit and performs the duty of a carburetor that help in boosting up the performance of the engine. Misfiring of the injectors results in poor idle quality, lack of power, and bad fuel economy; therefore, a timely replacement is necessary to avoid further deterioration. Over time, Chevrolet Corvette Fuel Injector systems have changed, with there being different types to include the direct injection type and the indirect injection type each and every type designed in order to deliver the fuel in a different manner and with different efficiencies to the engine of the car.
Chevrolet Corvette Fuel Injector Parts Questions & Experts Answers
- Q: What tools are required to service and repair the fuel injector on Chevrolet Corvette?A:Recipients of Fuel Injector service and repair must obtain a fuel pressure gauge (J 34730-1A) along with its tool set combined with the fuel line quick connect separator (J 37088-A). Start the repair by removing the connector which leads to the negative battery terminal. The service requires one to reduce fuel system pressure while unmounting the Fuel Rail assembly before both connector pins and nozzles get damaged. A spread operation on the injector retainer clip frees the component from the Fuel Rail before removing the Fuel Injector while discarding the clip. Discard both o-ring seals from the ends of the injector because you will remove them from their housing. Choose the appropriate Fuel Injector during purchase while checking the stampings on the assembly for part number and plant number along with manufacturing date and week code. Place engine oil on the new injector o-ring seals before putting them on the injector and then add a new retainer clip. Relocate the Fuel Injector into the Fuel Rail injector socket and orientate its electrical connector towards the outside while installing the Fuel Rail system followed by fuel filler cap tightening. An inspection for leaks should be performed by first turning the Ignition Switch on for 2 seconds then off for 10 seconds and finally turning it on again while checking for fuel leaks. Next, reconnect the negative Battery Cable. End the procedure by setting up transmitters followed by an idle learn operation.

Related Chevrolet Corvette Parts
 Chevrolet Corvette Air Filter
 Chevrolet Corvette Air Intake Coupling
 Chevrolet Corvette Fuel Injector O-Ring
 Chevrolet Corvette Fuel Pressure Regulator
 Chevrolet Corvette Fuel Pump Gasket
 Chevrolet Corvette Fuel Pump Seal
 Chevrolet Corvette Fuel Pump Wiring Harness
 Chevrolet Corvette Fuel Tank Lock Ring
 Chevrolet Corvette Idle Control Valve
 Chevrolet Corvette Throttle Body
 Chevrolet Corvette Throttle Body Gasket
 Chevrolet Corvette Vapor Pressure Sensor