ChevyParts
My Garage
My Account
Cart
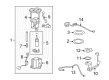
OEM Chevrolet Corvette Fuel Rail
Engine Fuel Rail- Select Vehicle by Model
- Select Vehicle by VIN
Select Vehicle by Model
orMake
Model
Year
Select Vehicle by VIN
For the most accurate results, select vehicle by your VIN (Vehicle Identification Number).
12 Fuel Rails found


Chevrolet Corvette Fuel Rail Part Number: 12633513
$203.42 MSRP: $382.00You Save: $178.58 (47%)Ships in 1-2 Business Days
Chevrolet Corvette Fuel Rail Part Number: 12633511
$275.12 MSRP: $558.78You Save: $283.66 (51%)Ships in 1-2 Business Days
Chevrolet Corvette Fuel Rail Part Number: 12719352
$131.16 MSRP: $235.26You Save: $104.10 (45%)
Chevrolet Corvette Fuel Rail Part Number: 12665549
$445.38 MSRP: $733.69You Save: $288.31 (40%)Ships in 1-2 Business Days
Chevrolet Corvette Fuel Rail Part Number: 12729466
$117.50 MSRP: $238.66You Save: $121.16 (51%)Chevrolet Corvette Fuel Rail Part Number: 12729464
$117.50 MSRP: $238.66You Save: $121.16 (51%)Ships in 1-2 Business DaysChevrolet Corvette Fuel Rail Part Number: 12721343
$209.80 MSRP: $376.32You Save: $166.52 (45%)Ships in 1-3 Business DaysChevrolet Corvette Fuel Rail Part Number: 12721342
$215.33 MSRP: $386.24You Save: $170.91 (45%)Ships in 1-3 Business DaysChevrolet Corvette Fuel Rail Part Number: 12665159
$440.87 MSRP: $824.72You Save: $383.85 (47%)Ships in 1-2 Business Days


Chevrolet Corvette Fuel Rail Part Number: 12602070

Chevrolet Corvette Fuel Rail Part Number: 12561858
Chevrolet Corvette Fuel Rail Part Number: 12556705
Chevrolet Corvette Fuel Rail
Want to cut long-term maintenance and repair costs? Choose OEM Fuel Rail. Those parts deliver top durability you can trust. On our site, you'll find a huge catalog of genuine Chevrolet Corvette parts. Prices are unbeatable, so you can keep more in your pocket. Every OEM Chevrolet Corvette Fuel Rail includes a manufacturer's warranty. You can also get an easy return policy that keeps buying risk free. Fast delivery, get your car on the road quickly. It's simple to search, compare, and order. Stop guessing about quality or fit. Order today and save with parts that last.
Chevrolet Corvette Fuel Rail Parts and Q&A
- Q: How to replace the fuel rail assembly on Chevrolet Corvette?A:A cargo truck should start by disconnecting the negative Battery Cable before beginning work to replace the Fuel Rail assembly. The first step opens up the engine sight covers along with a procedure to drain fuel system pressure. A compressed air system should clean the Fuel Injector while cleaning the Intake Manifold. Connectors should be marked to indicate the first Fuel Rail injector fitting relationship before disconnecting the fuel feed line from the Fuel Rail. Mark the Fuel Injector electrical connector position before completely disconnecting all electrical connectors. Detach the Intake Manifold bolts followed by the Fuel Rail mounting bolts before removing the Fuel Rail assembly from the Intake Manifold and extracting fuel injectors out of the rail. Install the fuel injectors into the Fuel Rail by applying a small amount of clean motor oil to their o-rings. The Fuel Rail must be installed onto the Intake Manifold while threadlock of gm p/n 12345382 (Canadian P/N 10953489) or its equivalent is applied to the Fuel Rail and Intake Manifold bolts threads. The Fuel Rail stop bracket should be properly mounted onto the engine assembly to stop fuel spray when the vehicle collides front-on. Fasten the intake bolts at 10 n.m (89 lb in) torque and proceed to secure the Fuel Rail mounting bolts using the same tightening value. Following Fuel Rail connecter reinstallations along with the fuel feed hose to Fuel Rail connections you must reattach the negative Battery Cable. A fuel leak check can be performed by turning the Ignition Switch on for 2 seconds followed by waiting for 10 seconds while off before turning it on again to check for leaks. Completion of the procedure requires installing engine sight covers while conducting transmitter programming. Procedures using the fuel pressure gage (J 34730-1A) combined with the tool set, fuel line quick connect separator (J 37088-A) serve to execute this task.
- Q: How to service the fuel rail on Chevrolet Corvette?A:The service process of the Fuel Rail requires fuel pressure gauge (J 34730-1A) and fuel line quick connect separator tool set (J 37088-A). When removing the Fuel Rail assembly disconnect the negative Battery Cable while supporting the rail to maintain its structure and avoid damaging both terminals and spray tips. Open pipelines should be protected from contaminants by applying fitting caps and pipe plugs. You should use gm x-30a spray type engine cleaner or its equivalent to clean Fuel Rail assembly by removing left and right Fuel Rail covers, relieving fuel system pressure, then repeat the cleaning process. The maintenance technician should first disconnect the fuel feed hose from the Fuel Rail and disconnect the electrical connectors from each fuel injector before noting the injector position for restoration. Be aware of the location of the ground strap which needs reinstallation when it is situated on the Intake Manifold. You need to take out the Fuel Rail attaching bolts followed by the removal of the Fuel Rail assembly but dispose of lower o-ring seals from each injector. The installation process requires clean engine oil lubrication of new lower injector o-ring seals before placing them onto each injector spray tip. A Fuel Rail stop bracket needs installation because it safeguards the Fuel Rail from frontal crashes. Threadlock gm p/n 12345382 with a 5 mm (0.020 in) band should be applied to Fuel Rail bolt threads before torquing each bolt to 10 n.m (89 lb in). Complete the electrical connection order of gas injectors and attach the fuel hose to the Fuel Rail before tightening the fuel cap and reconnecting the negative battery terminal. A leak inspection requires turning the ignition on for 2 seconds followed by 10 seconds off and then another activation of the ignition to verify fuel leaks. Before completing the installation you must put on right and left Fuel Rail covers and then program the transmitters and carry out an idle learn step.


Related Chevrolet Corvette Parts
 Chevrolet Corvette Air Charge Temperature Sensor
 Chevrolet Corvette Air Hose
 Chevrolet Corvette Air Intake Coupling
 Chevrolet Corvette Fuel Pressure Sensor
 Chevrolet Corvette Fuel Pump Gasket
 Chevrolet Corvette Fuel Pump Seal
 Chevrolet Corvette Fuel Pump Wiring Harness
 Chevrolet Corvette Fuel Tank Lock Ring
 Chevrolet Corvette Fuel Tank Sending Unit
 Chevrolet Corvette Mass Air Flow Sensor
 Chevrolet Corvette Throttle Body Gasket
 Chevrolet Corvette Vapor Pressure Sensor