ChevyParts
My Garage
My Account
Cart
OEM Chevrolet HHR A/C Clutch
Air Conditioning Clutch- Select Vehicle by Model
- Select Vehicle by VIN
Select Vehicle by Model
orMake
Model
Year
Select Vehicle by VIN
For the most accurate results, select vehicle by your VIN (Vehicle Identification Number).
2 A/C Clutches found

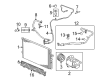
Chevrolet HHR Compressor Clutch Part Number: 25886926

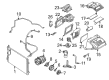
Chevrolet HHR Compressor Clutch Part Number: 15923803
Chevrolet HHR A/C Clutch
Want to cut long-term maintenance and repair costs? Choose OEM A/C Clutch. Those parts deliver top durability you can trust. On our site, you'll find a huge catalog of genuine Chevrolet HHR parts. Prices are unbeatable, so you can keep more in your pocket. Every OEM Chevrolet HHR A/C Clutch includes a manufacturer's warranty. You can also get an easy return policy that keeps buying risk free. Fast delivery, get your car on the road quickly. It's simple to search, compare, and order. Stop guessing about quality or fit. Order today and save with parts that last.
The Chevrolet HHR A/C Clutch is an important auto part that is associated with the air conditioning system, and this part has the reputation of being dependable, and powerful within the HHR models manufactured in between 2005-2011. This A/C Clutch effectively transmits the engine power to drive the A/C compressor, and actuates instantaneously at the cart's command. Through magnetizing a drum within the belt pulley, the Chevrolet HHR A/C Clutch locks the belt drive, helps to cool the automobile without exerting a huge force on the car's engine when the clutch is turned off. Besides, this functionality increases the performance of the Chevrolet HHR while preserving the comfort of the cabin and boosting the overall safety of any car. A/C Clutch works for modish HHR engines comprising 2.0 L, 2.2 L, 2.4 L Ecotec and customers loving their HHR car feels safe employing this part. One of the characteristics of A/C Clutch is it's heavily built, thus, it doesn't slip or stick; problems which reduce the efficiency of heat exchange and raise fuel consumption, respectively. It is always recommended that the A/C Clutch should be checked periodically and replaced as often as possible to maximize the life span of the air conditioning system. Therefore, the Chevrolet HHR A/C Clutch can be regarded as the key component in the contemporary automotive market list of demands contributed to the boosting of reliability, performance, and safety indicators in the car series of Chevrolet HHR.
Chevrolet HHR A/C Clutch Parts Questions & Experts Answers
- Q: How to replace the A/C Clutch Assembly (LNF) on Chevrolet HHR?A:Before installing the new compressor clutch assembly (LNF) users must remove the compressor and eliminate the three adjustable dowels from the j 37872 before adding three 5/16 x 1 inch bolts as replacements. Use j 37872 to hold the compressor clutch plate before using it to remove the assembly. First extract the compressor pulley snap ring with j 6083 before removing both the compressor pulley and the compressor clutch coil snap ring with j 6083. Use the j 6083 to remove the compressor clutch coil snap ring then extract the compressor clutch coil from the assembly. Clear the threads of the clutch plate bolt using a m6x1.0 tap then sweep away debris with compressed air before installing the compressor clutch coil. Use the j 6083 to position the clutch coil snap ring before setting the compressor pulley into place using this same tool. Place a 0.4 mm (0.016 in) air gap shim inside the clutch drive plate after it receives a small amount of oil and install the compressor clutch plate while checking for pulley-drag during rotation. Measure the pulley-drive plate distance using shims to create a 0.3 to 0.6 millimeter (0.012 to 0.024 inch) air gap. Use the j 37872 to hang the compressor clutch plate while you install the clutch drive plate bolt with a minimum of 5 threads covered by colored adhesive. Tighten the bolt to 12 n.m (9 lb ft). Reinstall the compressor followed by leak testing all fittings with tool number j 39400-a.

Related Chevrolet HHR Parts
 Chevrolet HHR Cabin Air Filter
 Chevrolet HHR A/C Compressor
 Chevrolet HHR A/C Compressor Cut-Out Switches
 Chevrolet HHR A/C Condenser
 Chevrolet HHR A/C Expansion Valve
 Chevrolet HHR A/C Hose
 Chevrolet HHR A/C Service Cap
 Chevrolet HHR A/C System Valve Core
 Chevrolet HHR Blend Door Actuator
 Chevrolet HHR Evaporator
 Chevrolet HHR HVAC Pressure Switch
 Chevrolet HHR Heater Core