ChevyParts
My Garage
My Account
Cart
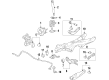
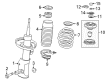
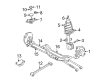
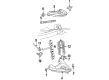
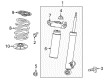
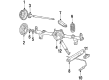
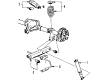
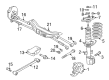
OEM Chevrolet Impala Shock Absorber
Suspension Shock Absorber- Select Vehicle by Model
- Select Vehicle by VIN
Select Vehicle by Model
orMake
Model
Year
Select Vehicle by VIN
For the most accurate results, select vehicle by your VIN (Vehicle Identification Number).
35 Shock Absorbers found


Chevrolet Impala Shock Absorber Part Number: 88945177
$58.76 MSRP: $104.92You Save: $46.16 (44%)Ships in 1-3 Business Days


Chevrolet Impala Shock Absorber, Rear Upper Driver Side Part Number: 84682962
$95.92 MSRP: $186.20You Save: $90.28 (49%)Ships in 1-2 Business Days
Chevrolet Impala Shock Absorber, Rear Upper Passenger Side Part Number: 84185490
$121.18 MSRP: $237.26You Save: $116.08 (49%)Ships in 1-2 Business Days
Chevrolet Impala Strut Part Number: 23269415
$71.82 MSRP: $197.43You Save: $125.61 (64%)Ships in 1-2 Business Days
Chevrolet Impala Strut, Driver Side Part Number: 84637385
$68.53 MSRP: $202.12You Save: $133.59 (67%)Ships in 1-2 Business Days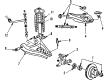
Chevrolet Impala Shock Absorber, Front Part Number: 4993745
$36.24 MSRP: $64.72You Save: $28.48 (44%)Ships in 1-3 Business Days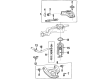
Chevrolet Impala Shock Absorber Part Number: 88945188
$48.44 MSRP: $86.50You Save: $38.06 (44%)Ships in 1-3 Business Days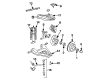
Chevrolet Impala Shock Absorber, Rear Part Number: 22065228
$51.66 MSRP: $96.40You Save: $44.74 (47%)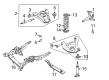
Chevrolet Impala Shock Absorber Part Number: 88986629
$56.22 MSRP: $104.92You Save: $48.70 (47%)Ships in 1-2 Business Days


Chevrolet Impala Strut, Rear Part Number: 23269417
Chevrolet Impala Shock Absorber Part Number: 22046423
Chevrolet Impala Shock, Rear Upper Driver Side Part Number: 22952906

Chevrolet Impala Shock Absorber, Rear Part Number: 22064425

Chevrolet Impala Shock Absorber, Rear Part Number: 22064426

Chevrolet Impala Shock Absorber, Rear Part Number: 22064040
Chevrolet Impala Strut, Front Part Number: 19257874

Chevrolet Impala Strut Part Number: 88965468
Chevrolet Impala Strut Part Number: 88965469
Chevrolet Impala Strut Part Number: 23269413
| Page 1 of 2 |Next >
1-20 of 35 Results
Chevrolet Impala Shock Absorber
Want to cut long-term maintenance and repair costs? Choose OEM Shock Absorber. Those parts deliver top durability you can trust. On our site, you'll find a huge catalog of genuine Chevrolet Impala parts. Prices are unbeatable, so you can keep more in your pocket. Every OEM Chevrolet Impala Shock Absorber includes a manufacturer's warranty. You can also get an easy return policy that keeps buying risk free. Fast delivery, get your car on the road quickly. It's simple to search, compare, and order. Stop guessing about quality or fit. Order today and save with parts that last.
The Shock Absorber of Chevrolet Impala automobiles is yet another key component that is involved in the suspension systems and which works hand in hand with the struts. Some of these components are useful in reducing bouncing and managing shock impulses which in turn enhance the ride quality as well as handling of the vehicle. Chevrolet Impala vehicles have had numerous shock absorbers over the years with types such as the twin-tube and mono-tube with dissimilar mechanisms of controlling the flows of hydraulic fluid to improve the vehicle's response to various driving conditions. PRV stands for Position Sensitive Damping and ASD for Acceleration Sensitive Damping, which go to the extent of refining the shock absorber's response under certain specific driving conditions; electrorheological, and magnetorheological dampers enables semi-active, adaptive suspension system for improved comfort and control in addition to comfort.
Chevrolet Impala Shock Absorber Parts Questions & Experts Answers
- Q: How should you safely handle gas charged shock absorbers during maintenance on Chevrolet Impala?A:Safety glasses must be worn for center punching and drilling a shock absorber tube because gas charged shock absorbers contain high pressure gas that can result in serious injury when the snap ring is removed from their top section due to extreme gas expulsion force. Safety glasses need to be worn throughout the process of center punching as well as drilling the shock absorber while you avoid any risks of puncturing the tube. Use a center punch to create a 10 mm (0.4 inch) indentation directly underneath the bottom of the tube. Secure the shock absorber horizontally in the vise while it is in its maximum extended position. After using a 5 mm (3/16 inch) drill bit to make holes at the center punch location, allow the gas or gas/oil mixture to escape through the holes while containing the oil with shop towels. A second indentation using a center punch should be placed in the middle of the tube before using the 5 mm (3/16 inch) drill bit to create a second hole while continuing to contain the escaping oil with shop towels. When ready to remove the shock absorber from the vise users should first drain the oil by holding it horizontally with the hole pointed downwards before performing rod movements in and out of the tube for full drainage completion.

Related Chevrolet Impala Parts
 Chevrolet Impala Air Suspension Compressor
 Chevrolet Impala Axle Beam Mount
 Chevrolet Impala Axle Pivot Bushing
 Chevrolet Impala Coil Spring Insulator
 Chevrolet Impala Control Arm Bolt
 Chevrolet Impala Control Arm Bracket
 Chevrolet Impala Control Arm Bushing
 Chevrolet Impala Crossmember Bushing
 Chevrolet Impala Shock and Strut Boot
 Chevrolet Impala Trailing Arm
 Chevrolet Impala Trailing Arm Bushing
 Chevrolet Impala Wheel Cover