ChevyParts
My Garage
My Account
Cart
OEM Chevrolet Lumina Brake Pad
Disc Brake Pad Set- Select Vehicle by Model
- Select Vehicle by VIN
Select Vehicle by Model
orMake
Model
Year
Select Vehicle by VIN
For the most accurate results, select vehicle by your VIN (Vehicle Identification Number).
2 Brake Pads found


Chevrolet Lumina Brake Pads Part Number: 19149251
$46.14 MSRP: $126.84You Save: $80.70 (64%)
Chevrolet Lumina Brake Pads, Front Part Number: 19167302
Chevrolet Lumina Brake Pad
Want to cut long-term maintenance and repair costs? Choose OEM Brake Pad. Those parts deliver top durability you can trust. On our site, you'll find a huge catalog of genuine Chevrolet Lumina parts. Prices are unbeatable, so you can keep more in your pocket. Every OEM Chevrolet Lumina Brake Pad includes a manufacturer's warranty. You can also get an easy return policy that keeps buying risk free. Fast delivery, get your car on the road quickly. It's simple to search, compare, and order. Stop guessing about quality or fit. Order today and save with parts that last.
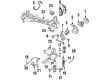
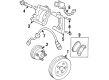
A worthy component of the brake assembly in vehicles belonging to Chevrolet Lumina, the Chevrolet Lumina Brake Pad is famous for its sturdiness and effectiveness. Intended to transform dynamic energy into thermal energy by rubbing on the brake rotors, brake pads guarantee that Lumina models may efficiently offer improved braking hence improving efficiency and safety levels. Designed for models of Lumina manufactured by Chevrolet between 1989 and 2013 the Chevrolet Lumina Brake Pad requires no special rretrofiting and is made from friction compounds pressed to metal backing plates, such that it can endure high temperatures that may go up to 400 degrees Fahrenheit. It is important for this to be the case since the costly parts require regular servicing and its brake pad for example can last only between 50,000 miles. It also has wear indicator that help the driver or owner to know when it is time to have new Chevrolet Lumina Brake Pad hire. Also, the correct fitting of subsidiary items, which include clips and springs, is important for the durability of brake pads. First of all, the Chevrolet Lumina Brake Pad is unique in the automotive market due to the fact it makes a car stop gently, without noisy breaks and jarring vibrations, and, at the same time, has a comparatively short cycle of wear and tear. Another part that has proven itself over time is the Chevrolet Lumina Brake Pad; making the car safer to be in and greatly improving the driving experience of the car, it can be considered a must-have for any owner of the Chevrolet Lumina.
Chevrolet Lumina Brake Pad Parts and Q&A
- Q: How to replace the front brake pads on Chevrolet Lumina?A:Begin Brake Pad replacement by taking out one-third of the master cylinder fluid then lift and stabilize the vehicle. Use wheel markings to set the wheel back to the hub and unmount the tire and wheel. Install two wheel nuts to keep the rotor stable. Position a large c-clamp over the caliper housing back surface and against the old outboard pad with the c-clamp handle. Continuously apply pressure until the Piston retracts enough to remove the caliper from the rotor. Turn the caliper upward to see the pads while gently taking out the lower bolt without harming the pin boot. Look for damage on all pad removal components then buy replacement pieces when units appear cut, torn, or poorly maintained including the bolt boots and Piston boot. Examine the caliper bolts for wear or rust and switch them if needed. Begin pad replacement by cleaning the outside part of the caliper boot with denatured alcohol then inserting the Piston completely down into the bore using a c-clamp and protective metal or wood pieces. To let trapped air escape lift the thin side of the caliper boot until it rests next to the Piston surface. Put the calibrated retainers over the caliper bracket with all-new brake pads or parallel position for safe caliper movement. Place the brake pads onto the caliper anchor bracket and lower the caliper over them before adding the bottom bolt. Fasten the bolt at 85 nm (63 ft. Lbs.). Put the wheels back on after removing the wheel nuts holding the rotor to the hub. Then place the vehicle on its marks and lower it to the ground. Add fresh brake fluid to the master cylinder while pressing Brake Pedal three times to let brake pads contact the rotor surface before gently rubbing the pads and rotors to break in the new parts.
Related Chevrolet Lumina Parts
 Chevrolet Lumina ABS Control Module
 Chevrolet Lumina ABS Sensor
 Chevrolet Lumina Brake Caliper Bracket
 Chevrolet Lumina Brake Caliper Piston
 Chevrolet Lumina Brake Calipers
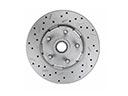 Chevrolet Lumina Brake Disc
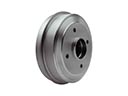 Chevrolet Lumina Brake Drum
 Chevrolet Lumina Brake Dust Shields
 Chevrolet Lumina Brake Line
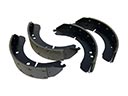 Chevrolet Lumina Brake Shoe
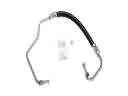 Chevrolet Lumina Hydraulic Hose
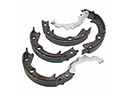 Chevrolet Lumina Parking Brake Shoe