ChevyParts
My Garage
My Account
Cart
OEM Chevrolet Lumina Brake Shoe
Brake Shoe Set- Select Vehicle by Model
- Select Vehicle by VIN
Select Vehicle by Model
orMake
Model
Year
Select Vehicle by VIN
For the most accurate results, select vehicle by your VIN (Vehicle Identification Number).
1 Brake Shoe found


Chevrolet Lumina Brake Shoes, Rear Part Number: 19152686
Chevrolet Lumina Brake Shoe
Want to cut long-term maintenance and repair costs? Choose OEM Brake Shoe. Those parts deliver top durability you can trust. On our site, you'll find a huge catalog of genuine Chevrolet Lumina parts. Prices are unbeatable, so you can keep more in your pocket. Every OEM Chevrolet Lumina Brake Shoe includes a manufacturer's warranty. You can also get an easy return policy that keeps buying risk free. Fast delivery, get your car on the road quickly. It's simple to search, compare, and order. Stop guessing about quality or fit. Order today and save with parts that last.
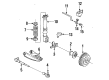
It is the Chevrolet Lumina Brake Shoe for the car's drum brake system, well-known for its work in cars of this brand made between 1989 to 2013. The above Brake Shoes are intended to produce enough friction to enable the vehicle slow down or stop as safely and as expeditiously as possible. The Lumina Brake Shoe has metal frames that support the friction linings that can be either riveted or bonded thus offering steady braking. In particular, the duo-servo design contributes to the improvement of the braking performance since the rotating drum can provide for stretching the shoe against it, and this is hardly reported in the automotive market. Compatibility with earlier and later generation Lumina models guarantees to drivers they are always able to brake very well despite their model. Chevrolet Lumina Brake Shoe requires constant examination to determine if they are worn or damaged; this is because it causes poor brake performance if worn. Changes of the Lumina over the years such as suspension and braking systems show the Chevrolet's dedication in safety and more so in performance. The Independent feature of the Lumina Brake Shoe not only provides more of stopping force to the vehicle but it also gives the smoother ride. In summary, the Chevrolet Lumina Brake Shoe is arguably a perfect reflection of the brand's reliability and innovation needed to propel Lumina owners to greater realms of safety on the roads.
Chevrolet Lumina Brake Shoe Parts and Q&A
- Q: How to service and repair the brake shoes on Chevrolet Lumina?A:The following tools are essential to service and repair brake shoes: the necessary tool for this task is j 38400 Brake Shoe spanner and spring remover. J 38400 Brake Shoe spanner and spring remover. The technician must raise the vehicle before marking the wheel-to-axle connection and then remove the wheel and tire. Mark the drum's position relative to the axle flange before removing the Brake Drum . Contact the Brake Drum replacement procedure when you experience difficulty in drum removal. Apply the j 38400 tool to pull the loop section of the adjuster spring free from the adjuster actuator before removing it from the Parking Brake Shoe web. Insert the j 38400 hook end underneath the return spring and adjuster shoe web to lift the spring's end out of its shoe web hole. Use the flat edge of the j 38400 to push the return spring end towards the axle until it breaks free from the shoe web area and settles on the backing plate. Proceed with adjuster actuator (6) disassembly from Brake Shoe and brake lining (4, 5) and adjusting screw and then remove the parking brake lever (7). Use the j 38400 tool to free the end of the lift spring at the Parking Brake Shoe and lining for removal from the backing plate. Thoroughly wash all parts using clear denatured alcohol while checking each component for damage or wear. Check the Wheel Cylinder for leakage and replace it if necessary and also inspect for damaged boots. Replace vehicle parts showing signs of heat discoloration or overstress damage. Replace parts showing wear. During installation apply gm p/n 1052196 or its equivalent brake lubricant to the six raised shoe pads of the backing plate along with its anchor surfaces. Install the hooking center spring section under the anchor tab before putting the Parking Brake Shoe and lining into position. The j 38400 tool will help raise the return spring end to insert it onto the Brake Shoe. Connect the parking brake lever to the Parking Brake Shoe and Parking Brake Cable when the cable had been disconnected. After lubricating and cleaning the adjusting screw you need to install all components beginning with the adjuster shoe followed by the adjusting screw and finally install the adjuster shoe lining. Use the adjuster nut end of the adjusting screw to interact with the Parking Brake Shoe web and lever and then position the return spring inside the adjuster shoe and lining by using the j 38400 tool. Use the j 38400 tool to spread the brake shoes while locating the adjuster actuator into position. Apply gm p/n 1052196 brake lubricant or its equivalent to both the pivot point and tab of the adjuster actuator before installation. Install the adjuster spring by placing its u-shaped end into the Parking Brake Shoe web hole before stretching it to wrap the loop end around the adjuster actuator tab. Before adjusting the brakes check that the adjuster actuator is in its correct position and operating properly. Install the brake drums while aligning the marks made during removal and then install tires and wheels followed by lowering the vehicle.

Related Chevrolet Lumina Parts
 Chevrolet Lumina Brake Backing Plate
 Chevrolet Lumina Brake Caliper Bracket
 Chevrolet Lumina Brake Caliper Piston
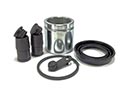 Chevrolet Lumina Brake Caliper Repair Kit
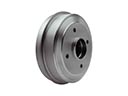 Chevrolet Lumina Brake Drum
 Chevrolet Lumina Brake Dust Shields
 Chevrolet Lumina Brake Master Cylinder
 Chevrolet Lumina Brake Pad
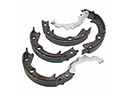 Chevrolet Lumina Parking Brake Shoe
 Chevrolet Lumina Wheel Bearing
 Chevrolet Lumina Wheel Cylinder
 Chevrolet Lumina Wheel Hub