ChevyParts
My Garage
My Account
Cart
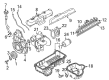
OEM Chevrolet Silverado 1500 Classic Intake Manifold
Engine Intake Manifold- Select Vehicle by Model
- Select Vehicle by VIN
Select Vehicle by Model
orMake
Model
Year
Select Vehicle by VIN
For the most accurate results, select vehicle by your VIN (Vehicle Identification Number).
3 Intake Manifolds found


Chevrolet Silverado 1500 Classic Intake Manifold Part Number: 17113542


Chevrolet Silverado 1500 Classic Intake Manifold Part Number: 19418186
Chevrolet Silverado 1500 Classic Intake Manifold
Our website offers an extensive catalog of genuine Chevrolet Silverado 1500 Classic Intake Manifold at unbeatable prices. Every OEM Chevrolet Silverado 1500 Classic Intake Manifold comes with a manufacturer's warranty, an easy return policy, and rapid delivery service. Don't miss out on this great opportunity!
Chevrolet Silverado 1500 Classic Intake Manifold Parts Questions & Experts Answers
- Q: How to replace the lower intake manifold on Chevrolet Silverado 1500 Classic?A: Draining the cooling system should be the first step before replacing the lower Intake Manifold. Start by disconnecting the fuel pipes/hoses and Distributor and evap canister harness from the purge solenoid valve. Start by opening the heater outlet hose's clamp then remove both the heater outlet hose from the Intake Manifold and the heater inlet hose from the Water Pump. Start by repositioning the hoses then remove the cruise control cable from the Throttle Body lever and disconnect the accelerator control cable from both the Throttle Body lever and the accelerator control cable bracket. Disconnect the electrical connectors for the sequence of components that includes air conditioning (A/C) compressor clutch followed by pressure switch and throttle position (TP) sensor, idle air control (IAC) motor and control port injector module, evap canister purge solenoid valve and manifold absolute pressure (MAP) sensor. Disconnect the engine wiring harness clip bolt, engine wiring harness bracket and ground wire at the rear of the right cylinder head. Separate the positive crankcase ventilation (PCV) valve hose and disconnect the power Brake Booster Vacuum Hose then remove the radiator inlet hose from the Thermostat Housing. Access the front Intake Manifold bolt by removing the Drive Belt and loosening the power steering (P/S) pump rear bracket nut then moving the p/s pump bracket nuts and bolts forward while sliding the bracket ahead. Discard the gaskets while removing the Intake Manifold itself along with the lower bolts. Thoroughly inspect and clean the Intake Manifold-lower before continuing. When installing the gasket place 4.0 mm (0.157 inch) adhesive directly on the cylinder head side of each gasket ending while keeping them in place until the adhesive sets. After setting the locating pins install the Intake Manifold Gasket and use a 5 mm (0.197 inch) bead of adhesive starting from the front and rear engine block tops, which should extend 13 mm (0.50 inch) onto each intake gasket. Install the Intake Manifold while applying thread lock adhesive to the lower Intake Manifold-bolt connections if using existing fasteners. Tighten the bolts in the specified sequence using a three-step method: first pass to 3 nm (27 inch lbs.), second pass to 12 nm (106 inch lbs.)use a three-step torque method to tighten each bolt starting at 3 nm (27 inch lbs.) then 12 nm (106 inch lbs.) before finishing at 15 nm (11 ft. Lbs.). Reinstall the p/s pump bracket, tighten the nuts to 41 nm (30 ft. Lbs.)first install the Drive Belt before reinstalling the p/s pump bracket and connecting the Water Pump inlet hose and radiator inlet hose together with the power Brake Booster Vacuum Hose. Finally connect the PCV Valve Hose. Reinstall the Water Pump inlet hose along with the radiator inlet hose before you attach the power Brake Booster Vacuum Hose followed by the PCV Valve Hose. Position the engine wiring harness and bracket, installing the bracket stud and tightening it to 25 nm (18 ft. Lbs.), followed by the rear bracket nut at the evap canister purge solenoid valve to 9 nm (80 inch lbs.) apply torque of 16 nm (12 ft. Lbs.) when securing the ground nut. Start by reinstalling the engine wiring harness bracket. Secure the nuts to 12 nm (106 inch lbs.) of torque. Install the engine wiring harness clip bolt by torqueing it to 9 nm (80 inch lbs.). After that, connect the evap canister harness, MAP Sensor, tp sensor, iac motor, and control port injector module. Reattach the accelerator control cable bracket with cables to the Throttle Body, tightening the nuts to 9 nm (80 inch lbs.)connect the a/c compressor clutch and a/c pressure switch before reinstalling the engine wiring harness bracket. After fitting the Throttle Body lever to the bracket you should install the accelerator cable while reattaching the cruise control cable if your vehicle has it and placing the heater hoses before refitting the fuel pipes/hoses and Distributor for filling the cooling system.

Related Chevrolet Silverado 1500 Classic Parts
 Chevrolet Silverado 1500 Classic Air Hose
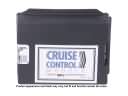 Chevrolet Silverado 1500 Classic Cruise Control Module
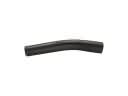 Chevrolet Silverado 1500 Classic Fuel Filler Hose
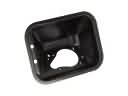 Chevrolet Silverado 1500 Classic Fuel Filler Housing
 Chevrolet Silverado 1500 Classic Fuel Injection Pump
 Chevrolet Silverado 1500 Classic Fuel Injector
 Chevrolet Silverado 1500 Classic Fuel Pump Gasket
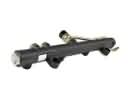 Chevrolet Silverado 1500 Classic Fuel Rail
 Chevrolet Silverado 1500 Classic Fuel Tank Sending Unit
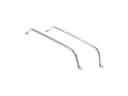 Chevrolet Silverado 1500 Classic Fuel Tank Strap
 Chevrolet Silverado 1500 Classic Intake Manifold Gasket
 Chevrolet Silverado 1500 Classic Throttle Body