ChevyParts
My Garage
My Account
Cart
OEM Chevrolet Suburban 1500 Engine Mount
Engine Motor Mount- Select Vehicle by Model
- Select Vehicle by VIN
Select Vehicle by Model
orMake
Model
Year
Select Vehicle by VIN
For the most accurate results, select vehicle by your VIN (Vehicle Identification Number).
5 Engine Mounts found


Chevrolet Suburban 1500 Motor Mount Part Number: 15226255
$125.59 MSRP: $215.69You Save: $90.10 (42%)


Chevrolet Suburban 1500 Motor Mount, Green Part Number: 25828247
$132.41 MSRP: $227.41You Save: $95.00 (42%)


Chevrolet Suburban 1500 Motor Mount Part Number: 15854941
$170.53 MSRP: $292.89You Save: $122.36 (42%)

Chevrolet Suburban 1500 Mount Bracket, Passenger Side Part Number: 15113847
$47.39 MSRP: $80.69You Save: $33.30 (42%)Ships in 1-2 Business DaysChevrolet Suburban 1500 Mount Bracket, Driver Side Part Number: 15113849
$59.70 MSRP: $93.50You Save: $33.80 (37%)
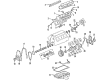
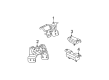
Chevrolet Suburban 1500 Engine Mount
Want to cut long-term maintenance and repair costs? Choose OEM Engine Mount. Those parts deliver top durability you can trust. On our site, you'll find a huge catalog of genuine Chevrolet Suburban 1500 parts. Prices are unbeatable, so you can keep more in your pocket. Every OEM Chevrolet Suburban 1500 Engine Mount includes a manufacturer's warranty. You can also get an easy return policy that keeps buying risk free. Fast delivery, get your car on the road quickly. It's simple to search, compare, and order. Stop guessing about quality or fit. Order today and save with parts that last.
Chevrolet Suburban 1500 Engine Mount Parts Questions & Experts Answers
- Q: How to replace the engine mount on Chevrolet Suburban 1500?A:First inspect your mount for damage along with looseness because broken and deteriorated mounts will lead to misaligned drive train components that stress remaining mounts beyond normal limits when a mount fails. Start the procedure by lifting the vehicle and unbolting the upper mount from the lower Engine Mount using its three retaining bolts while simultaneously taking out the underbody shield. Engine support must be achieved through a screw jack that holds the engine rather than by using the Oil Pan or crankshaft balancer. Remove the bolts from the upper mount to the engine before taking out the upper mount and then remove the lower Engine Mount Bracket through bolts together with the bracket from the frame structure. Begin by attaching the lower Engine Mount to the frame before inserting through bolts then tighten them initially by fingers only. Plant the upper Engine Mount on the engine block followed by securing its bolts until they reach 50 nm torque (37 ft. Lbs.). Follow by vehicle lowering and proceed with connecting the upper and lower Engine Mount using their three bolts until you achieve 50 nm (37 ft. Lbs.) torque. The through bolts require installation when the vehicle reaches its maximum height and the torque should be set to 92 nm (68 ft. Lbs.). Following this step finish by replacing the underbody shield before lowering the vehicle.

Related Chevrolet Suburban 1500 Parts
 Chevrolet Suburban 1500 Coolant Filter
 Chevrolet Suburban 1500 Crankshaft
 Chevrolet Suburban 1500 Harmonic Balancer
 Chevrolet Suburban 1500 Head Gasket
 Chevrolet Suburban 1500 Lash Adjuster
 Chevrolet Suburban 1500 Oil Pan
 Chevrolet Suburban 1500 Oil Pan Gasket
 Chevrolet Suburban 1500 Piston
 Chevrolet Suburban 1500 Rod Bearing
 Chevrolet Suburban 1500 Timing Chain
 Chevrolet Suburban 1500 Timing Cover
 Chevrolet Suburban 1500 Valve Cover Grommet