ChevyParts
My Garage
My Account
Cart
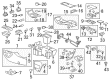
OEM Chevrolet Tahoe HVAC Control Module
Heater Control Assembly- Select Vehicle by Model
- Select Vehicle by VIN
Select Vehicle by Model
orMake
Model
Year
Select Vehicle by VIN
For the most accurate results, select vehicle by your VIN (Vehicle Identification Number).
10 HVAC Control Modules found


Chevrolet Tahoe Blower Motor Resistor Part Number: 84178783
$89.14 MSRP: $183.19You Save: $94.05 (52%)Ships in 1-2 Business Days
Chevrolet Tahoe Blower Motor Resistor Part Number: 84488485
$39.23 MSRP: $70.05You Save: $30.82 (44%)Ships in 1-3 Business Days
Chevrolet Tahoe Control Module Part Number: 13506230
$98.81 MSRP: $203.07You Save: $104.26 (52%)Ships in 1-2 Business Days


Chevrolet Tahoe Heater Control Part Number: 19244874


Chevrolet Tahoe Heater Control Part Number: 15763059

Chevrolet Tahoe Dash Control Unit, Rear Part Number: 16233144
Chevrolet Tahoe Dash Control Unit Part Number: 19417446
$165.06 MSRP: $259.72You Save: $94.66 (37%)Chevrolet Tahoe Heater Control Part Number: 19370216
$174.14 MSRP: $274.00You Save: $99.86 (37%)
Chevrolet Tahoe Heater Control Part Number: 19370209
$169.27 MSRP: $266.33You Save: $97.06 (37%)
Chevrolet Tahoe Control Module Part Number: 88892738
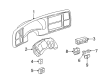
Chevrolet Tahoe HVAC Control Module
Want to cut long-term maintenance and repair costs? Choose OEM HVAC Control Module. Those parts deliver top durability you can trust. On our site, you'll find a huge catalog of genuine Chevrolet Tahoe parts. Prices are unbeatable, so you can keep more in your pocket. Every OEM Chevrolet Tahoe HVAC Control Module includes a manufacturer's warranty. You can also get an easy return policy that keeps buying risk free. Fast delivery, get your car on the road quickly. It's simple to search, compare, and order. Stop guessing about quality or fit. Order today and save with parts that last.
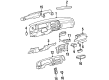
Chevrolet Tahoe HVAC Control Module is one of the significant parts of climate control systems that are designed and manufactured to display the main features of reliability and performance. Thus, this module is the command centre that constantly manages heating and cooling of the Chevrolet Tahoe's interior environment irrespective of the weather outside. It has buttons, dials and knobs through which the driver can conveniently adjust, thus improving the general driving experience. The HVAC Control Module to be currently fixed in many generations of Chevrolet Tahoe starting from the first generation up to the fifth one; however, its primary function is to manage the climate control system in a live mode and therefore contribute to enhancing the car efficiency and safety rates correspondingly. Newer features, like ATC and blower motor control presuming temperature sensors, are added in this module positioning it as a superior quality automotive part that is much more comfortable to use than previous models for climate control. Chevrolet Tahoe with its powerful engine and large dimensions also positively solves this problem with the help of this module, which eliminates typical problems such as the low contrast of labels and the failure of displays. Not only as a device to provide a comfortable environment in a car, the Chevrolet Tahoe HVAC Control Module has proved itself also as a useful addition to a car and thus the Chevrolet Tahoe is surely an optimal choice for many drivers as a reliable and powerful SUV.
Chevrolet Tahoe HVAC Control Module Parts Questions & Experts Answers
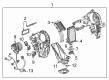
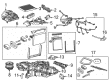
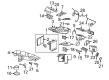
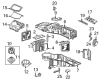
- Q: How to replace the auxiliary HVAC Control Module on an extended wheelbase on Chevrolet Tahoe?A:Vehicle maintenance begins with proper refrigerant recovery from the A/C system and complete engine coolant drain before handling the auxiliary HVAC module replacement process on extended wheelbase vehicles. Locate the auxiliary HVAC module underneath and remove all lines connecting heater lines (2, 3) and air conditioning lines (4, 5). Lower the vehicle after removing the module retaining nuts so you can remove the right rear quarter trim panel. First remove the fasteners securing the module and the forward auxiliary air duct before extracting the auxiliary HVAC module after cable disconnection from its electrical connectors and outlet of the forward auxiliary air duct. Place the installed auxiliary HVAC module assembly back into the vehicle and fasten it with 2 bolts followed by reattaching the forward auxiliary air duct. The vehicle's right rear quarter trim panel should be reinstalled before you reconnect all electrical connectors. Then raise the vehicle. Secure the auxiliary HVAC module in place with nuts tightened to 9 Nm (80 lb in) before installing air conditioning lines (4, 5) then tightening the nut to 16 Nm (12 lb ft) and finally connecting heater lines (2, 3). Finish the repairs by lowering the vehicle and filling engine coolant followed by refrigerant recharge before conducting a leak test using the J 39400-A Halogen Leak Detector.

Related Chevrolet Tahoe Parts
 Chevrolet Tahoe Blend Door Actuator
 Chevrolet Tahoe Blower Motor
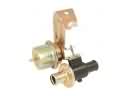 Chevrolet Tahoe Heater Control Valve
 Chevrolet Tahoe A/C Clutch
 Chevrolet Tahoe A/C Compressor
 Chevrolet Tahoe A/C Compressor Cut-Out Switches
 Chevrolet Tahoe A/C Expansion Valve
 Chevrolet Tahoe A/C Hose
 Chevrolet Tahoe A/C Service Cap
 Chevrolet Tahoe Air Temperature Sensor
 Chevrolet Tahoe Evaporator
 Chevrolet Tahoe HVAC Pressure Switch