ChevyParts
My Garage
My Account
Cart
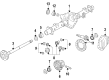
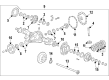
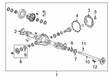
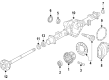
OEM GMC Axle Shaft
Car Axle Shaft- Select Vehicle by Model
- Select Vehicle by VIN
Select Vehicle by Model
orMake
Model
Year
Select Vehicle by VIN
For the most accurate results, select vehicle by your VIN (Vehicle Identification Number).
590 Axle Shafts found


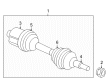
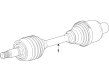
GMC Axle Assembly, Front Driver Side Part Number: 84212542
$222.70 MSRP: $353.59You Save: $130.89 (38%)Ships in 1-2 Business DaysProduct Specifications- Other Name: Shaft Assembly-Front Wheel Drive Half; CV Axle Assembly; Axle Shaft; CV Axle; Axle; Shaft, Front Wheel Drive Axle
- Position: Front Driver Side
- Replaces: 23291775

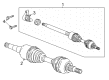
GMC Axle Shafts, Rear Driver Side Part Number: 85150637
$145.38 MSRP: $228.75You Save: $83.37 (37%)Ships in 1-3 Business DaysProduct Specifications- Other Name: Shaft Assembly-Rear Wheel Drive; Axle Shaft; Axle Assembly; Shaft, Rear Axle Drive
- Position: Rear Driver Side
- Replaced by: 86508786

GMC Axle Assembly, Front Passenger Side Part Number: 84814086
$464.02 MSRP: $790.00You Save: $325.98 (42%)Product Specifications- Other Name: Shaft Assembly-Front Wheel Drive; Axle Shaft; Shaft, Front Wheel Drive Axle
- Position: Front Passenger Side
- Replaced by: 85535776


GMC Axle Shaft, Rear Passenger Side Part Number: 84937152
$135.25 MSRP: $212.82You Save: $77.57 (37%)Ships in 1-2 Business DaysProduct Specifications- Other Name: Shaft Assembly-Rear Axle; Axle Shafts; Shaft, Rear Axle Drive
- Position: Rear Passenger Side

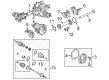
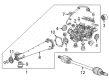
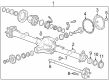
GMC Differential Assembly, Front Center Part Number: 25792317
$1411.89 MSRP: $2231.53You Save: $819.64 (37%)Ships in 1-3 Business DaysProduct Specifications- Other Name: Axle, Front Axle And Axle Center; Differential
- Position: Front Center

GMC Intermediate Shaft, Front Part Number: 84937888
$46.23 MSRP: $72.42You Save: $26.19 (37%)Ships in 1-2 Business DaysProduct Specifications- Other Name: Shaft, Front Axle; Shaft, Front Wheel Drive Axle
- Position: Front

GMC Axle Assembly, Front Part Number: 84521702
$162.57 MSRP: $255.80You Save: $93.23 (37%)Ships in 1-2 Business DaysProduct Specifications- Other Name: Shaft Assembly-Front Wheel Drive Half; Shaft, Front Wheel Drive Axle
- Position: Front

GMC Axle Assembly, Front Passenger Side Part Number: 85103941
$130.67 MSRP: $222.45You Save: $91.78 (42%)Ships in 1-3 Business DaysProduct Specifications- Other Name: Shaft Assembly-Front Wheel Drive Half; Axle Shaft; Axle; Shaft, Front Wheel Drive Axle
- Position: Front Passenger Side
- Replaces: 84112017, 84645996, 84796309, 85103944, 84170692, 84645994, 84796310, 84615518
GMC Axle Shaft, Rear Driver Side Part Number: 84937151
$133.63 MSRP: $210.27You Save: $76.64 (37%)Ships in 1-2 Business DaysProduct Specifications- Other Name: Shaft Assembly-Rear Axle; Shaft, Rear Axle Drive
- Position: Rear Driver Side
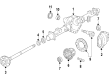
GMC Axle Assembly, Rear Part Number: 23492802
$2704.23 MSRP: $3480.34You Save: $776.11 (23%)Ships in 1-3 Business DaysProduct Specifications- Other Name: Axle Assembly-Rear; Axle Shaft; Axle, Rear Axle
- Position: Rear
- Replaces: 23206159
GMC Axle Assembly, Rear Part Number: 22958792
$3555.36 MSRP: $4575.76You Save: $1020.40 (23%)Ships in 1-3 Business DaysProduct Specifications- Other Name: Axle Assembly-Rear; Axle Shaft; Axle, Rear Axle
- Position: Rear


GMC Axle Assembly, Rear Part Number: 87821646
$3284.05 MSRP: $4227.83You Save: $943.78 (23%)Ships in 1-2 Business DaysProduct Specifications- Other Name: Axle Assembly-Rear; Axle, Rear Axle
- Position: Rear
GMC Axle Assembly, Rear Part Number: 23492798
$2704.23 MSRP: $3480.34You Save: $776.11 (23%)Ships in 1-3 Business DaysProduct Specifications- Other Name: Axle Assembly-Rear; Axle Shaft; Axle, Rear Axle
- Position: Rear
- Replaces: 23162383, 23206155

GMC Axle Assembly, Rear Part Number: 22810683
$2983.15 MSRP: $3839.32You Save: $856.17 (23%)Ships in 1-3 Business DaysProduct Specifications- Other Name: Axle Assembly-Rear; Axle Shaft; Axle, Rear Axle
- Position: Rear
- Replaces: 22752001, 20977789

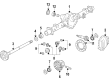
GMC Axle Assembly, Rear Part Number: 84692717
$5455.88 MSRP: $7023.84You Save: $1567.96 (23%)Ships in 1-3 Business DaysProduct Specifications- Other Name: Axle Assembly-Rear; Differential; Axle Shaft; Axle; Axle, Rear Axle
- Position: Rear

GMC Axle Assembly, Rear Part Number: 87821649
$2446.68 MSRP: $3148.89You Save: $702.21 (23%)Ships in 1-2 Business DaysProduct Specifications- Other Name: Axle Assembly-Rear
- Position: Rear
- Replaces: 85555145
GMC Axle Assembly, Rear Part Number: 84258421
$3787.66 MSRP: $4874.73You Save: $1087.07 (23%)Ships in 1-3 Business DaysProduct Specifications- Other Name: Axle Assembly-Rear; Axle Shaft; Axle, Rear Axle
- Position: Rear
- Replaces: 84083620, 23337023, 23405767, 22958774, 84051232
GMC Axle Assembly, Rear Part Number: 84447462
$3284.05 MSRP: $4227.83You Save: $943.78 (23%)Ships in 1-3 Business DaysProduct Specifications- Other Name: Axle Assembly-Rear; Axle Shaft; Axle; Axle, Rear Axle
- Position: Rear
GMC Axle Assembly, Rear Part Number: 22958777
$3555.36 MSRP: $4575.76You Save: $1020.40 (23%)Ships in 1-3 Business DaysProduct Specifications- Other Name: Axle Assembly-Rear; Axle Shaft; Axle, Rear Axle
- Position: Rear
- Replaces: 22871884

GMC Axle Assembly, Rear Part Number: 22874942
$2269.00 MSRP: $2920.20You Save: $651.20 (23%)Ships in 1-3 Business DaysProduct Specifications- Other Name: Axle Assembly-Rear; Axle Shaft; Axle, Rear Axle
- Position: Rear
- Replaces: 20937831
| Page 1 of 30 |Next >
1-20 of 590 Results
GMC Axle Shaft
Want to cut long-term maintenance and repair costs? Choose OEM Axle Shaft. Those parts deliver top durability you can trust. On our site, you'll find a huge catalog of genuine GMC parts. Prices are unbeatable, so you can keep more in your pocket. Every OEM GMC Axle Shaft includes a manufacturer's warranty. You can also get an easy return policy that keeps buying risk free. Fast delivery, get your car on the road quickly. It's simple to search, compare, and order. Stop guessing about quality or fit. Order today and save with parts that last.
GMC Axle Shaft Parts Questions & Experts Answers
- Q: How to replace the rear axle shaft on GMC Canyon?A:Start the rear Axle Shaft replacement process by taking off tires and wheels first. First remove any necessary clip on the rear Brake Drum before taking out the rear brake drums from the vehicle. First remove the rear axle housing cover before removing the lock pin bolt then taking out the pinion shaft. The next step involves taking off the rear axle c-lock before extracting the rear Axle Shaft. The first step for installation consists of putting on the new rear Axle Shaft followed by attaching the c-lock to the rear axle. Install the pinion shaft after which install the lock bolt and secure it at 25 nm (18 lb ft). Reattach the rear brake drums as you install the rear axle housing cover along with its necessary gasket. Proper fluid needs to be placed into the rear axle before reinstalling the tire combined with wheel.
- Q: How to replace the front axle shaft on GMC Yukon?A:Then, to change the front wheel drive shaft, one must lift the car, remove the wheel and tire assembly. If available, remove the drive axle center cap. Attach a drift or a large screwdriver to ensure the drive axle wheel drive shaft cannot rotate by driving it down through the brake caliper into one of the brake rotor vanes. Leave the nut and washer from the hub and do not reuse them because a new one needs to be fitted for its use. Cut the drive shaft with your battery-powered sawzall (J 97817), and then use the axle remover (J 45859) to push the wheel drive shaft away from the hub, and take out the six bolts that hold the wheel drive shaft inboard flange to the output shaft flange in place. You should remove the drift from the rotor, and then detach the stabilizer shaft link from the lower Control Arm. Wrap shop towels around the wheel drive shaft boots (both inner & outer) to prevent damage during removal & installation, and pull the wheel drive shaft through the opening of the lower Control Arm. For installation, repeat wrapping shop towels around the boots and make sure the Steering Knuckle and wheel drive shaft splines & threads are clean and dry. Push the wheel drive shaft splined shank into the knuckle hub, and screw the washer(screw302) on, followed by the new hub nut(screw310) without actually tightening it. Mount the wheel drive shaft inboard flange on the output shaft flange by using the inboard flange bolts and packing a drift o-large screwdriver into one of the vanes of the brake rotor to prevent turning the wheel drive shaft. Tighten the inboard flange to 79 nm (58 ft. Lbs.) and the hub nut to 240 nm (177 ft. Lbs.). Take the drift out of the rotor, install the drive axle center cap, if any, reattach the stabilizer shaft link, install the wheel with a tire, and lastly, drop the car.
- Q: How to replace the rear axle shaft on an 8.6 Inch Axle with Drum Brake and VSES on GMC Sierra 1500?A:A technician must elevate and stabilize the vehicle before removing the tire alongside its wheel assembly to change the rear Axle Shaft on an 8.6 inch axle with drum brake and vses. Remove the rear Wheel Speed Sensor and the rear cover together with their attached gasket. Begin by removing the pinion shaft locking bolt on both non-locking differential axles before extracting the shaft or partially extracting it if the differential has a locking mechanism and rotating the case to let the shaft touch the differential housing. Position the screwdriver tool or equivalent tool to rotate the c-lock until proper alignment with the thrust block occurs. First remove the Brake Drum and afterward push inside the Axle Shaft while removing the c-lock from the Axle Shaft to extract it from the differential housing. The j 45859 and j 2619-01 tools will help you remove an axle that resists your efforts. When installing the differential Axle Shaft place it carefully into the differential housing while the splines meet up with the differential side gears. The proper installation of the c-lock requires placement on the button end of the Axle Shaft for non-locking differentials but placement on the Axle Shaft with the pinion shaft partially withdrawn for locking differentials with the ends aligned to the thrust block. Service personnel should extend the Axle Shaft outward to allow the lock into the differential gear before aligning the pinion shaft with the differential case. Tighten the new pinion shaft locking bolt to 34 n.m (25 lb ft). Reinstall all components in this sequence: the rear axle cover with a gasket and the rear Wheel Speed Sensor along with the tire and wheel assembly. Soak up fluid into the rear axle and after that take away the support to decrease the vehicle.


Related GMC Parts
 GMC Differential
 GMC Differential Cover
 GMC Drive Shaft
 GMC Differential Bearing
 GMC Differential Seal
 GMC Driveshaft Yokes
 GMC Pinion Bearing
 GMC Pinion Washer
 GMC Slip Yoke
 GMC Universal Joint
 GMC Wheel Seal
Browse GMC Axle Shaft by Models
Acadia Sierra 1500 Yukon Canyon Sierra 2500 HD Terrain Envoy Sonoma Typhoon Syclone Caballero C1500 Envoy XL Envoy XUV Jimmy K1500 S15 S15 Jimmy Safari Savana 2500 Savana 3500 Sierra 2500 Sierra 3500 Yukon XL Acadia Limited C2500 C3500 G2500 K2500 K3500 P3500 Savana 1500 Yukon XL 1500 C1500 Suburban C2500 Suburban G1500 G3500 K1500 Suburban K2500 Suburban P2500 R1500 R1500 Suburban R2500 R2500 Suburban R3500 Sierra 1500 Classic Sierra 1500 HD Sierra 1500 HD Classic Sierra 1500 Limited Sierra 2500 HD Classic Sierra 3500 Classic Sierra 3500 HD V1500 V1500 Suburban V2500 V2500 Suburban V3500 Yukon XL 2500