ChevyParts
My Garage
My Account
Cart
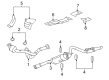
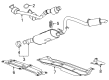
OEM GMC Muffler
Exhaust Muffler- Select Vehicle by Model
- Select Vehicle by VIN
Select Vehicle by Model
orMake
Model
Year
Select Vehicle by VIN
For the most accurate results, select vehicle by your VIN (Vehicle Identification Number).
456 Mufflers found

GMC Muffler & Pipe Part Number: 19257843
$579.65 MSRP: $870.52You Save: $290.87 (34%)Ships in 1-3 Business DaysProduct Specifications- Other Name: Muffler Assembly, Exhaust (W/Exhaust Pipe & Tail Pipe); Direct-Fit Exhaust; Exhaust System Kit; Muffler; Muffler, Exhaust; Exhaust Pipe
- Replaces: 15092770

GMC Muffler & Pipe Part Number: 23241281
$441.09 MSRP: $659.47You Save: $218.38 (34%)Ships in 1-3 Business DaysProduct Specifications- Other Name: Muffler, Exhaust; Exhaust Pipe; Muffler

GMC Muffler & Pipe Part Number: 20882403
$1361.40 MSRP: $2044.56You Save: $683.16 (34%)Product Specifications- Other Name: Muffler Assembly-Exhaust (W/Resonator, Exhaust & Tail Pipe; Direct-Fit Exhaust; Exhaust System Kit; Exhaust Pipe; Muffler; Muffler, Exhaust Tail Pipe; Muffler, Exhaust
- Replaces: 20779911, 25940546

GMC Muffler & Pipe Part Number: 84665237
$903.54 MSRP: $1356.94You Save: $453.40 (34%)Ships in 1-3 Business DaysProduct Specifications- Other Name: Muffler, Exhaust; Exhaust Pipe; Muffler
- Replaced by: 85052292
GMC Muffler & Pipe Part Number: 85555978
$667.41 MSRP: $1002.32You Save: $334.91 (34%)Ships in 1-3 Business DaysProduct Specifications- Other Name: Muffler, Exhaust; Muffler
- Replaced by: 86533474

GMC Muffler & Pipe Part Number: 84496909
$828.98 MSRP: $1244.97You Save: $415.99 (34%)Ships in 1-3 Business DaysProduct Specifications- Other Name: Muffler, Exhaust; Exhaust Pipe; Muffler
- Replaces: 23219847, 84012769, 23226904, 23440151, 23289701, 84125232, 84327969, 23367635

GMC Diesel Particulate Filter Part Number: 86786607
$1775.54 MSRP: $2653.90You Save: $878.36 (34%)Ships in 1-3 Business DaysProduct Specifications- Other Name: Filter Assembly-Exhaust Particulate (W/ Exhaust Pipe); Muffler & Pipe
- Replaced by: 86534437
- Replaces: 86777036
GMC Diesel Particulate Filter Part Number: 84612881
$1597.71 MSRP: $2387.61You Save: $789.90 (34%)Ships in 1-3 Business DaysProduct Specifications- Other Name: Filter Assembly-Exhaust Particulate (W/ Exhaust Pipe); Exhaust Pipe; Muffler; Muffler & Pipe
- Replaced by: 86534426
GMC Muffler & Pipe Part Number: 20920636
$351.19 MSRP: $525.05You Save: $173.86 (34%)Product Specifications- Other Name: Muffler, Exhaust; Exhaust Pipe; Muffler
- Replaces: 20779898, 25940531


GMC Muffler Part Number: 12546145
Product Specifications- Other Name: Muffler A; Muffler, Exhaust

GMC Muffler Part Number: 15026244
Product Specifications- Other Name: Muffler, Exhaust

GMC Muffler & Pipe Part Number: 15156873
Product Specifications- Other Name: Muffler; Exhaust Pipe; Muffler, Exhaust

GMC Muffler Part Number: 15727713
Product Specifications- Other Name: Direct-Fit Exhaust; Exhaust System Kit; Muffler, Exhaust
GMC Muffler Part Number: 15727715
Product Specifications- Other Name: Direct-Fit Exhaust; Exhaust System Kit; Muffler, Exhaust
GMC Muffler Part Number: 15727716
Product Specifications- Other Name: Direct-Fit Exhaust; Exhaust System Kit; Muffler, Exhaust
GMC Muffler Part Number: 15994362
Product Specifications- Other Name: Muffler A; Muffler, Exhaust

GMC Muffler Part Number: 15994353
Product Specifications- Other Name: Muffler Assembly, Exhaust; Muffler, Exhaust

GMC Muffler Part Number: 12540368
Product Specifications- Other Name: Muffler, Exhaust
GMC Muffler Part Number: 12546139
Product Specifications- Other Name: Muffler Assembly, Exhaust; Muffler, Exhaust
GMC Muffler Part Number: 12546140
Product Specifications- Other Name: Muffler Assembly, Exhaust; Muffler, Exhaust
| Page 1 of 23 |Next >
1-20 of 456 Results
GMC Muffler
Want to cut long-term maintenance and repair costs? Choose OEM Muffler. Those parts deliver top durability you can trust. On our site, you'll find a huge catalog of genuine GMC parts. Prices are unbeatable, so you can keep more in your pocket. Every OEM GMC Muffler includes a manufacturer's warranty. You can also get an easy return policy that keeps buying risk free. Fast delivery, get your car on the road quickly. It's simple to search, compare, and order. Stop guessing about quality or fit. Order today and save with parts that last.
GMC Muffler Parts Questions & Experts Answers
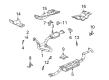
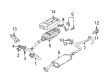
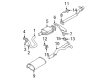
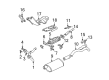
- Q: How to replace the muffler (NB5) on GMC Acadia?A:In order to change the Muffler (NB5) first, lift up the vehicle and support it. Take out exhaust flexible pipe to Muffler nuts , and with the aid of an assistant, remove the rubber insulators from the exhaust underbody hangers. Help and take off the Muffler assembly from exhaust flexible pipe and the vehicle. For installation, with an assistant's help, mount the Muffler assembly onto the vehicle and attach it to the exhaust flexible pipe. Following this, fit the rubber insulators to the exhaust underbody hangers. Make sure to loosen the exhaust flexible pipe to Muffler nuts a 50 n.m (37 lb ft). Finally, lower the vehicle.
- Q: How to replace the muffler on a 1500 Series equipped with a 4.3L, 4.8L, 5.3L, or 6.0L engine on GMC Sierra 1500?A:Installation of the new Muffler on 1500 series vehicles starts by supporting the vehicle and lowering the spare tire when replacing engines using 4.3l, 4.8l, 5.3l, and 6.0l as power units. Start by removing the exhaust Muffler nuts which secure the Catalytic Converter. A 4.8l engine requires lubrication on the 3 insulator points entering the Muffler assembly hangers before their removal. With help, personnel can detach the insulators (1, 2) from the front and rear hanger points. Take out the intermediate Muffler assembly by first removing its insulator followed by pulling the assembly backward until the front frame crossmember flange clears. The procedure for insulators (1, 2) lubrication and removal must be repeated exactly as described for vehicles using 5.3l or 6.0l engines. Both flex couple installation and removal require careful handling to avoid damage to internal structures. To install the Muffler assembly with a 4.8l engine system you must perform a new lubrication of the 3 insulators before properly positioning the assembly then assisted installation of the insulators (1, 2) on the front and rear Muffler hangers followed by the insulator installation to the intermediate hanger. The installation procedure should be redone for vehicles equipped with 5.3l or 6.0l engines. Next proceed with installing the Catalytic Converter by attaching exhaust Muffler nuts while torquing to 45 n.m (33 lb ft). Once complete replace the spare tire and lift the vehicle down.
- Q: How to replace the exhaust muffler on those equipped with L92 on GMC Yukon?A:You should gather hose clamp pliers (J 38185) as your first step to replace the exhaust Muffler on l92 vehicles. Hose clamp pliers (J 38185). First detach the right rear wheel together with its tire followed by disconnecting the wiring harness electrical connector from the right rear wheel speed sensor wiring harness electrical connector. The right rear Shock Absorber and Shock Absorber air line need separation when rpo z55 exists during this process. Carefully detach the right rear wheel speed sensor wiring harness electrical connector clip from the frame yet avoid displacing the rear suspension sensor link rod from the position sensor ball stud. Use a nut spinner to separate the right rear automatic level control sensor link rod ball from its ball stud after supporting the sensor lever. Apply an adjustable jack to support the rear axle before you disassemble the right axle tie rod bolt and nut , the rear axle vent hose, and the vent hose swivel clip from the rear brake crossover pipe (if required). First, detach the right rear stabilizer shaft link to frame bolt along with the corresponding nut followed by removing the right rear stabilizer shaft link from the frame and finally the right rear Shock Absorber lower bolt together with its nut. Lower the right side of the rear axle while removing the Muffler carefully by taking out its nuts that connect it to the catalytic converter and separating the hanger. To remove the Muffler assembly both yukon denali and escalade owners should first apply lubrication to the exhaust system hangers and the resonator insulator. Following this, mutual help allows removing the exhaust system hangers (4, and 5) and the resonator insulator before Muffler assembly removal. Perform the same procedure on all insulators of the exhaust system hangers (3, 4, and 5) and for the insulator near the resonator for yukon xl vehicles with yukon denali xl and escalade esv and escalade ext variants. You should avoid stretching the flex coupler beyond its limits to avoid damage inside the system. After lubricating the insulators once more than add the Muffler assembly together with insulators to the exhaust system hangers (3, 4, and 5) and the insulator near the resonator. Install the insulators to exhaust system hangers (2, 3) and the insulator near the resonator after reapplying lubrication for vehicles classed as yukon denali or escalade. Secure the Muffler to catalytic converter nuts with 45 nm (33 lb ft) torque and secure the insulator to its designated hanger. Raise the rear axle using the adjustable jack to position it correctly and fasten the right rear Shock Absorber lower bolt and nut with a torque of 95 nm (70 lb ft). Begin by attaching the right rear stabilizer shaft link to the frame structure then bolt and start tightening the right rear stabilizer shaft link to frame assembly to 65 nm (48 lb ft). Put the right rear axle tie rod bolt and nut into place then tighten them to 105 nm (77 lb ft) and replace the rear axle vent hose and vent hose swivel clip when needed. Attach the right rear link rod to ball studs through hose clamp pliers (J 38185) while making sure the harness clip of the rear axle maintains proper orientation. The installation process requires you to attach the right rear wheel speed sensor wiring harness clips to the frame and Control Arm Bracket followed by connecting the right rear wheel speed sensor wiring harness electrical connector clip to the frame. For vehicles with rpo z55 you must also connect the right rear air line and chassis wiring harness electrical connector to the right rear Shock Absorber before you connect the chassis wiring harness electrical connector to the right rear wheel speed sensor wiring harness electrical connector . Replace the right rear wheel with its tire after completing the procedure.


Related GMC Parts
 GMC Catalytic Converter
 GMC Exhaust Manifold
 GMC Air Inject Check Valve
 GMC Catalytic Converter Gasket
 GMC EGR Vacuum Solenoid
 GMC EGR Valve Gasket
 GMC Exhaust Hanger
 GMC Exhaust Heat Shield
 GMC Exhaust Manifold Gasket
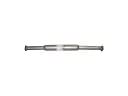 GMC Exhaust Resonator
 GMC PCV Valve Elbow
 GMC Tail Pipe
Browse GMC Muffler by Models
Acadia Sierra 1500 Yukon Canyon Sierra 2500 HD Terrain Envoy Sonoma Typhoon Syclone Caballero C1500 Envoy XL Envoy XUV Jimmy K1500 S15 S15 Jimmy Safari Savana 2500 Savana 3500 Sierra 2500 Sierra 3500 Yukon XL Acadia Limited C2500 C3500 G2500 K2500 K3500 P3500 Savana 1500 Yukon XL 1500 C1500 Suburban C2500 Suburban G1500 G3500 K1500 Suburban K2500 Suburban P2500 R1500 R1500 Suburban R2500 R2500 Suburban R3500 Sierra 1500 Classic Sierra 1500 HD Sierra 1500 HD Classic Sierra 2500 HD Classic Sierra 3500 Classic Sierra 3500 HD V1500 V1500 Suburban V2500 V2500 Suburban V3500 Yukon XL 2500