ChevyParts
My Garage
My Account
Cart
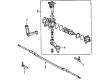
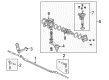
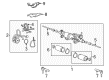
OEM GMC Rack And Pinion
Steering Rack And Pinion- Select Vehicle by Model
- Select Vehicle by VIN
Select Vehicle by Model
orMake
Model
Year
Select Vehicle by VIN
For the most accurate results, select vehicle by your VIN (Vehicle Identification Number).
151 Rack And Pinions found


GMC Steering Gear Part Number: 84157552
$387.78 MSRP: $759.23You Save: $371.45 (49%)Ships in 1-2 Business DaysProduct Specifications- Other Name: Gear Assembly-Hydraulic Rack & Pinion Steering; Gear Assembly; Gear, Steering
- Replaces: 20845543


GMC Steering Gear Part Number: 15951338
$455.60 MSRP: $782.48You Save: $326.88 (42%)Ships in 1-2 Business DaysProduct Specifications- Other Name: Gear, Steering; Gear Assembly
- Replaces: 25817575, 15864178, 15921544

GMC Steering Gear Part Number: 84944190
$1094.75 MSRP: $1404.89You Save: $310.14 (23%)Ships in 1-3 Business DaysProduct Specifications- Other Name: Gear Assembly-Electrical Belt Drive Rack & Pinion Steering; Gear Assembly
- Replaced by: 85038109

GMC Steering Gear Part Number: 84854535
$1020.43 MSRP: $1309.24You Save: $288.81 (23%)Ships in 1-3 Business DaysProduct Specifications- Other Name: Gear Assembly-Electrical Belt Drive Rack & Pinion Steering; Gear, Steering
- Replaced by: 85038091
GMC Steering Gear Part Number: 84944189
$1016.17 MSRP: $1303.75You Save: $287.58 (23%)Ships in 1-2 Business DaysProduct Specifications- Other Name: Gear Assembly-Electrical Belt Drive Rack & Pinion Steering; Gear Assembly
- Replaced by: 85038103

GMC Steering Gear Part Number: 85607373
$1092.68 MSRP: $1402.23You Save: $309.55 (23%)Product Specifications- Other Name: Gear Assembly-Electrical Belt Drive Rack & Pinion Steering; Gear Assembly; Gear, Steering
- Replaced by: 86276163

GMC Steering Gear Part Number: 84774225
$1911.12 MSRP: $2455.56You Save: $544.44 (23%)Product Specifications- Other Name: Gear Assembly-Electrical Belt Drive Rack & Pinion Steering; Gear Assembly; Gear, Steering
- Replaced by: 86553003
GMC Steering Gear Part Number: 25817574
$528.63 MSRP: $956.80You Save: $428.17 (45%)Ships in 1-2 Business DaysProduct Specifications- Other Name: Gear, Steering; Gear Assembly
- Replaces: 15921545

GMC Steering Gear Part Number: 84924576
$816.28 MSRP: $1578.12You Save: $761.84 (49%)Ships in 1-2 Business DaysProduct Specifications- Other Name: Gear Assembly-Hydraulic Recirculating Ball Steering; Gear Assembly
- Replaced by: 86825252

GMC Gear Assembly Part Number: 84168690
$994.33 MSRP: $1940.65You Save: $946.32 (49%)Ships in 1-2 Business DaysProduct Specifications- Other Name: Gear Assembly-Electrical Belt Drive Rack & Pinion Steering
- Replaced by: 84670807
GMC Steering Gear Part Number: 19417977
$555.28 MSRP: $1083.07You Save: $527.79 (49%)Ships in 1-2 Business DaysProduct Specifications- Other Name: Gear Assembly, Hydraulic Recirculating Ball Steering; Gear Assembly
- Replaced by: 85603319


GMC Steering Gear Part Number: 86802094
$527.45 MSRP: $828.68You Save: $301.23 (37%)Ships in 1-2 Business DaysProduct Specifications- Other Name: Gear Assembly-Hydraulic Recirculating Ball Steering; Gear Assembly; Gear, Steering
- Replaced by: 85821190
- Replaces: 85523466

GMC Steering Gear Part Number: 15067316
$401.24 MSRP: $631.34You Save: $230.10 (37%)Ships in 1-3 Business DaysProduct Specifications- Other Name: Gear, Steering

GMC Steering Gear Part Number: 26082140
$390.93 MSRP: $615.11You Save: $224.18 (37%)Ships in 1-3 Business DaysProduct Specifications- Other Name: Gear Assembly-Steering; Gear Assembly
GMC Steering Gear Part Number: 86802093
$527.45 MSRP: $828.68You Save: $301.23 (37%)Ships in 1-2 Business DaysProduct Specifications- Other Name: Gear Assembly-Hydraulic Recirculating Ball Steering; Gear Assembly; Gear, Steering
- Replaced by: 85821189
- Replaces: 85523465

GMC Gear Assembly Part Number: 19330487
$520.05 MSRP: $853.23You Save: $333.18 (40%)Ships in 1-2 Business DaysProduct Specifications- Other Name: Gear, Steering
- Replaces: 26104949
GMC Steering Gear Part Number: 84774229
$1504.10 MSRP: $2372.31You Save: $868.21 (37%)Product Specifications- Other Name: Gear Assembly-Electrical Belt Drive Rack & Pinion Steering; Gear Assembly; Gear, Steering
- Replaced by: 86553008


GMC Steering Gear Part Number: 20870557
Product Specifications- Other Name: Gear Assembly-Steering; Gear Assembly; Gear, Steering
- Replaces: 25841213
GMC Steering Gear Part Number: 84722750
$1471.48 MSRP: $2320.73You Save: $849.25 (37%)Product Specifications- Other Name: Gear Assembly-Electrical Belt Drive Rack & Pinion Steering; Gear Assembly; Gear, Steering
- Replaced by: 86553010

GMC Steering Gear Part Number: 19330566
$579.54 MSRP: $1038.53You Save: $458.99 (45%)Product Specifications- Other Name: Gear Kit, Steering (Remanufacture); Gear Assembly; Gear Kit, Steering
- Replaces: 19179739, 19207490, 19153073
| Page 1 of 8 |Next >
1-20 of 151 Results
GMC Rack And Pinion
Want to cut long-term maintenance and repair costs? Choose OEM Rack And Pinion. Those parts deliver top durability you can trust. On our site, you'll find a huge catalog of genuine GMC parts. Prices are unbeatable, so you can keep more in your pocket. Every OEM GMC Rack And Pinion includes a manufacturer's warranty. You can also get an easy return policy that keeps buying risk free. Fast delivery, get your car on the road quickly. It's simple to search, compare, and order. Stop guessing about quality or fit. Order today and save with parts that last.
GMC Rack And Pinion Parts Questions & Experts Answers
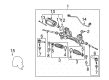
- Q: How to replace the rack and pinion on GMC Canyon?A:Vehicle maintenance starts by supporting the lifted vehicle then removing both front tires and wheels. The first step requires engine protection shield removal if your vehicle has it installed. Place a drain pan to contain the fluid as you disconnect the outer Tie Rod End from the Steering Knuckle. Disengage the Rack And Pinion Power Steering Hose automobile assembly while separating the intermediate shaft from the Rack And Pinion through removal of its coupler clamp bolt. Rack And Pinion installation requires technicians to remove vertical and horizontal mounting nuts, washers, and bolts before extracting the crossmember when necessary. Position the Rack And Pinion into the vehicle before starting by loosely attaching the horizontal mounting nuts, washers, and bolts then completing the installation with crossmember installation if required. Install the vertical mounting nuts, washers and bolts at first but then apply torque to the long bolts to 130 nm (96 lb ft) and the isolator clamp bolts to 100 nm (74 lb ft). Attach the Rack And Pinion's intermediate shaft and follow by fastening the coupler clamp bolt. First connect the Power Steering Hose assembly to the Rack And Pinion and reinstall the engine protection shield (if present). Lastly attach the outer Tie Rod End to the Steering Knuckle. After lowering the vehicle down reattach both front tire and wheel assemblies and proceed with draining the power steering system.
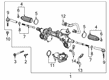
- Q: How to Remove and Install the Rack and Pinion Pitman Arm from the Steering Gear on GMC C2500?A:Unplug the Pitman Arm from the Rack And Pinion and then remove the pitman and side covers. Lightly scrub the end of the pitman shaft and use a wire brush to clean both the splines on the shaft and the Rack And Pinion housing too. Take the pitman shaft boot (3) off the Rack And Pinion housing (1) carefully so as not to damage the housing bore and then take out the pitman shaft dust seal (3) and the pitman shaft retaining ring (2) using j 4245. Detach the back up washer (3) and pry the pitman shaft seal (2) from the Rack And Pinion housing (1) using a screwdriver, be sure to check and remove any burrs inside the housing as required. Push the bone j 6278 into the top hole of the Rack And Pinion housing (1) and drive out the needle bearing inside the housing (2). First, put j 6278 through the needle bearing (2) into the Rack And Pinion housing (1) until the shoulder fits against the housing. Put grease on the pitman shaft seal (2) and back up washer (3) and then use j 6219 to secure the pitman shaft seal onto the Rack And Pinion housing (1), ending with the back up washer. Put on the pitman shaft retainer ring (2) to the Rack And Pinion housing (1) with j 4245, grease the dust seal after putting it on and then attach it (2) to the gear housing (1). In the end, add the pitman shaft boot (3) to the Rack And Pinion housing (1), connect the pitman shaft and side cover and finish by attaching the Pitman Arm to the Rack And Pinion.
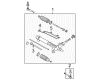
- Q: How to Replace the Front Rack and Pinion Steering Gear on GMC Envoy?A:First raise the vehicle for support while placing a drain pan under the Rack And Pinion to begin Rack And Pinion replacement. First remove the tires and wheels and after that remove the retaining nuts from the outer tie rods. Drive a wedge between the joint and attached part to protect the seals when not disconnecting steering linkage joints. The j24319-b steering linkage and tie rod puller enables users to detach outer tie rods from steering knuckles. To proceed with the repair remove the lower intermediate shaft retaining bolt from the Rack And Pinion then disconnect the lower intermediate shaft. First disassemble the Power Steering Hose assembly by removing its retaining bolt while taking out the crossmember as well as the hose assembly itself. The Rack And Pinion requires support while you remove its mount screws to extract it from the vehicle. Separate the outer tie rods from inner tie rods by both loosening and removing the jam nuts during the process. Examine and dispose of the jam nuts. Inner tie rod threads should receive chassis lubricant before installing new outer tie rods with fresh jam nuts. After mounting the Rack And Pinion into the vehicle reinstall both outer tie rods to the inner tie rods. For Rack And Pinion mounting bolts installation tighten them to a torque value of 110 nm (81 ft. Lbs.). Thread the Power Steering Hose assembly to the Rack And Pinion and tighten the retaining bolt until it reaches 12 nm torque (9 ft. Lbs.). Reinstall the steering gear crossmember then connect the lower intermediate shaft with the Rack And Pinion using a retaining bolt torqued to 40 nm (30 ft. Lbs.). Connect outer tie rods to steering knuckles then secure with retaining nuts while tightening to 45 nm (33 ft. Lbs.). After wheel installation and drain pan removal wait for the vehicle to descend before performing power steering system bleeding then finalize front toe adjustments. The j44586 Rack And Pinion oil seal remover/installer should be used during the operation if required.


Related GMC Parts
 GMC Power Steering Cooler
 GMC Steering Column
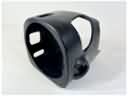 GMC Steering Column Cover
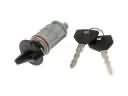 GMC Ignition Lock Cylinder
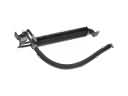
 GMC Center Link
 GMC Drag Link
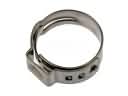 GMC Fuel Line Clamps
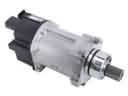 GMC Power Steering Assist Motor
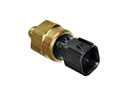 GMC Power Steering Pressure Switch
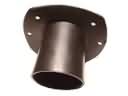 GMC Steering Column Seal
 GMC Tie Rod
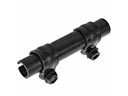 GMC Tie Rod Adjusting Sleeve
Browse GMC Rack And Pinion by Models
Acadia Sierra 1500 Yukon Canyon Sierra 2500 HD Terrain Envoy Sonoma Typhoon Syclone Caballero C1500 Envoy XL Envoy XUV Jimmy K1500 S15 S15 Jimmy Safari Savana 2500 Savana 3500 Sierra 2500 Sierra 3500 Yukon XL Acadia Limited C2500 C3500 G2500 K2500 K3500 P3500 Savana 1500 Yukon XL 1500 C1500 Suburban C2500 Suburban G1500 G3500 Hummer EV Pickup K1500 Suburban K2500 Suburban P2500 R1500 R1500 Suburban R2500 R2500 Suburban R3500 Sierra 1500 Classic Sierra 1500 HD Sierra 1500 HD Classic Sierra 2500 HD Classic Sierra 3500 Classic Sierra 3500 HD V1500 V1500 Suburban V2500 V2500 Suburban V3500 Yukon XL 2500