ChevyParts
My Garage
My Account
Cart
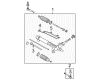
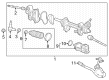
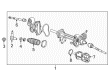
OEM GMC Canyon Rack And Pinion
Steering Rack And Pinion- Select Vehicle by Model
- Select Vehicle by VIN
Select Vehicle by Model
orMake
Model
Year
Select Vehicle by VIN
For the most accurate results, select vehicle by your VIN (Vehicle Identification Number).
18 Rack And Pinions found


GMC Canyon Steering Gear Part Number: 15951338
$455.60 MSRP: $782.48You Save: $326.88 (42%)Ships in 1-2 Business Days

GMC Canyon Steering Gear Part Number: 25912269
$515.01 MSRP: $999.54You Save: $484.53 (49%)
GMC Canyon Gear Assembly Part Number: 86544643
$1010.73 MSRP: $1296.75You Save: $286.02 (23%)Ships in 1-2 Business Days
GMC Canyon Steering Gear Part Number: 84670798
$1249.45 MSRP: $1732.12You Save: $482.67 (28%)Ships in 1-3 Business DaysGMC Canyon Gear Assembly Part Number: 84168690
$994.33 MSRP: $1940.65You Save: $946.32 (49%)Ships in 1-2 Business Days
GMC Canyon Rack Part Number: 86544642
$1010.73 MSRP: $1296.75You Save: $286.02 (23%)Ships in 1-2 Business DaysGMC Canyon Steering Gear Part Number: 84670808
$1089.97 MSRP: $1519.91You Save: $429.94 (29%)GMC Canyon Steering Gear Part Number: 84670804
$1022.75 MSRP: $1417.82You Save: $395.07 (28%)Ships in 1-3 Business DaysGMC Canyon Gear Assembly Part Number: 84670803
$1189.26 MSRP: $1658.80You Save: $469.54 (29%)Ships in 1-3 Business DaysGMC Canyon Steering Gear Part Number: 84670794
$969.82 MSRP: $1351.89You Save: $382.07 (29%)Ships in 1-3 Business DaysGMC Canyon Steering Gear Part Number: 25817574
$528.63 MSRP: $956.80You Save: $428.17 (45%)Ships in 1-2 Business DaysGMC Canyon Steering Gear Part Number: 26095462
GMC Canyon Steering Gear Part Number: 84670810
$1085.44 MSRP: $1950.09You Save: $864.65 (45%)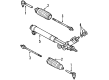
GMC Canyon Steering Gear Part Number: 19330468
GMC Canyon Steering Gear Part Number: 19330466
GMC Canyon Steering Gear Part Number: 15951337
GMC Canyon Steering Gear Part Number: 15864177
GMC Canyon Steering Gear Part Number: 84670795
$1051.72 MSRP: $1349.49You Save: $297.77 (23%)
GMC Canyon Rack And Pinion
Want to cut long-term maintenance and repair costs? Choose OEM Rack And Pinion. Those parts deliver top durability you can trust. On our site, you'll find a huge catalog of genuine GMC Canyon parts. Prices are unbeatable, so you can keep more in your pocket. Every OEM GMC Canyon Rack And Pinion includes a manufacturer's warranty. You can also get an easy return policy that keeps buying risk free. Fast delivery, get your car on the road quickly. It's simple to search, compare, and order. Stop guessing about quality or fit. Order today and save with parts that last.
The Steering Rack in GMC Canyon automobiles play a major role in converting the rotational movement of the steering wheel into lateral movement of the front wheels. This mechanism uses rack and pinion system in which the pinion gear interconnect with a rack gear located in a metal tube thus enabling precise control of the steering. Majority of the GMC Canyon's steering utilize power assisted rack and pinion for the easier operation but through hydraulic or electrical means. In earlier models of GMC Canyon vehicles, it had been common to have the steering racks either manual or power assisted however, the current models comprises of power assisted steering racks most of the time. The most obvious difference is that the hydraulic assistance is used in power racks where they employ the use of pressurized fluid in the steering process while using pure muscle strength in the manual system. Any sort of fluid leakage and or some worn-out part of the power steering system can cause the vehicle to develop some sort of difficult power steering, making it famous as the Steering Rack given its significance in the maintenance of the overall performance and safety of the automobile.
GMC Canyon Rack And Pinion Parts Questions & Experts Answers
- Q: How to Service the Rack and Pinion on GMC Canyon?A:If one needs to change the Rack And Pinion on 2004 to 2006 chevrolet colorado, 2004 to 2006 gmc canyon, and 2006 hummer h3, then he or she has to first lift the vehicle and consider enough help from transportation device, next remove both the front tire and wheel assembly. If they are available, remove the engine protection shield and remove the outer Tie Rod End from the Steering Knuckle. Loose drain pan in order to catch fluid and remove your steering Rack And Pinion hose assembly from the Rack And Pinion. Take off the coupler clamp bolt from the intermediate shaft and divide the intermediate shaft from the Rack And Pinion. Next, take out the Rack And Pinion vertical mounting nuts, washers, and bolts. For 4 x 4 trucks, support the front carrier and disconnect the driver's side mounting bracket-to-frame bolts and position the left side of front carriers rearward to remove the Rack And Pinion. After the Rack And Pinion was removed from the engine, removal of the Rack And Pinion horizontal mounting nuts, washers, and bolts was done, followed by the Rack And Pinion right-hand isolator bracket. For 2wd, remove the crossmember before removing the Rack And Pinion from the vehicle. To install it, put the Rack And Pinion back into the car and install the right-hand isolator bracket. Loosely install the Rack And Pinion horizontal mounting nuts, washers, and bolts, making sure it is tightened and the driver's side carrier mounting bracket-to-frame bolts to 152 n.m (112 lb-ft) for 4wd vehicles. Take away the front carrier support first and install the crossmember for the 2wd models. Loosely install the Rack And Pinion vertical mount nuts, washers and bolts, tighten the long bolts to 130 n. M (96 lb f), and the isolator clamp bolts to 100 n.m (74 lb ft). Return the intermediate shaft to its attachment on the Rack And Pinion and bolt on the coupler clamp bolt. Reconnect the Rack And Pinion hose assembly to the Rack And Pinion, and reinstall the engine protection shield if one is installed. Mount the outer Tie Rod End replacing the Steering Knuckle, thereafter re-mount the two front tire and wheel assemblies. Compress the vehicle, bleed the Rack And Pinion system, and check the wheel adjustment.

Related GMC Canyon Parts
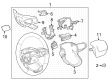
 GMC Canyon Steering Wheel
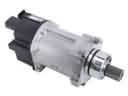 GMC Canyon Power Steering Assist Motor
 GMC Canyon Power Steering Hose
 GMC Canyon Power Steering Pump
 GMC Canyon Power Steering Reservoir
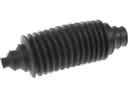 GMC Canyon Rack and Pinion Boot
 GMC Canyon Steering Column
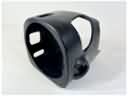 GMC Canyon Steering Column Cover
 GMC Canyon Steering Gearbox
 GMC Canyon Steering Shaft
 GMC Canyon Tie Rod
 GMC Canyon Tie Rod End