ChevyParts
My Garage
My Account
Cart
OEM GMC Safari Steering Knuckle
Front Steering Knuckle- Select Vehicle by Model
- Select Vehicle by VIN
Select Vehicle by Model
orMake
Model
Year
Select Vehicle by VIN
For the most accurate results, select vehicle by your VIN (Vehicle Identification Number).
10 Steering Knuckles found

GMC Safari Knuckle, Driver Side Part Number: 15124101
$243.71 MSRP: $383.45You Save: $139.74 (37%)Ships in 1-3 Business Days


GMC Safari Knuckle, Passenger Side Part Number: 18060572


GMC Safari Knuckle, Driver Side Part Number: 18060561
GMC Safari Knuckle, Passenger Side Part Number: 18060694
GMC Safari Knuckle, Driver Side Part Number: 18060693
GMC Safari Knuckle, Driver Side Part Number: 18060688
GMC Safari Knuckle, Passenger Side Part Number: 18060687
GMC Safari Knuckle, Driver Side Part Number: 18060571
GMC Safari Knuckle, Passenger Side Part Number: 18060562
GMC Safari Knuckle, Passenger Side Part Number: 15124102
GMC Safari Steering Knuckle
Want to cut long-term maintenance and repair costs? Choose OEM Steering Knuckle. Those parts deliver top durability you can trust. On our site, you'll find a huge catalog of genuine GMC Safari parts. Prices are unbeatable, so you can keep more in your pocket. Every OEM GMC Safari Steering Knuckle includes a manufacturer's warranty. You can also get an easy return policy that keeps buying risk free. Fast delivery, get your car on the road quickly. It's simple to search, compare, and order. Stop guessing about quality or fit. Order today and save with parts that last.
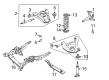
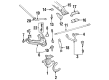
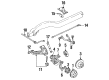
The GMC Safari Steering Knuckle is one of the essential parts of the car and the symbol of stability and high-quality performance in the series of GMC Safari automobiles that were manufactured between 1985 and 2005. This important component links the suspension and the steering systems with the front wheels so that they can move in conformity with the road and the driver's instructions. Which means that the GMC Safari Steering Knuckle is created with the rear-wheel drive and all-wheel drive configurations in mind in order to optimize the efficiency coupled with safety. As such, it can last longer serving its purpose and sometimes may only need replacement as a result of the wear of parts with which it is connected, such as bushings and bearings. The GMC Safari which has been identified as a passenger and cargo van enjoys the performance of the Steering Knuckle in as much as it has to do with towing capacities and other handling attributes of the vehicle. Also, the installation of the new 3.0 L throttle body fuel injection system in 1986 enhanced the fuel economy on the Safari thus emphasizing the role of the Steering Knuckle in enhancing the car's performance. The GMC Safari has been made for about 3.2 million units, and isn't it the Steering Knuckle is constantly helping to uphold this car's reputation Due to its suitability to all models of Safari and its capacity to optimise the driving style, the GMC Safari Steering Knuckle is one of the highly recommended features that is available in the market that will guarantee safety and efficiency of all users.
GMC Safari Steering Knuckle Parts and Q&A
- Q: How to replace the steering knuckle on GMC Safari?A:In order to change the Steering Knuckle, start first with an elevating and holding the vehicle, keeping the floor jack under the lower Control Arm to secure its position and avoid personal danger. Take away the tire and wheel, take out the Torsion Bar, as well as the Wheel Hub and bearing. After that, take off the outer tie rod cotter pin and the retaining nut, remove the outer tie rod from the Steering Knuckle, using the steering linkage and tie rod puller (J 24319-B). Have a go to remove upper Ball Joint cotter pin and retaining nut, as well as attach the Ball Joint separator (J 36607) to separate the upper Ball Joint from the Steering Knuckle. Do so again for the lower Ball Joint by first taking off its cotter pin and retaining nut, and using a pry bar to help release the lower Ball Joint stud from the Steering Knuckle. Once having removed the Steering Knuckle from the support and slipped out its seal, install the new seal with the help of the Steering Knuckle seal installer (J 36605). Reinstall the Steering Knuckle to the upper and lower Ball Joint, securing the lower Ball Joint and its retaining nut to 128 nm (95 ft. Lbs.) and the upper Ball Joint to 98 nm (72 ft. Lbs.). Appropriate cotter pins should be installed, nuts should be well tightened to allow for the insertion of the pins, and the ends beaten flat against the nuts. Install the outer tie rod ball stud to the Steering Knuckle and use the retaining nut by tightening up with 49 nm (36 ft. Lbs.), followed by fitting a new cotter pin. Lastly, reinstall the hub and the bearing assembly, load the Torsion Bar, put the tire and wheel in place, lower the vehicle, and inspect the front wheel alignment.
- Q: What tools are required to service and repair the steering knuckle on GMC Safari?A:The necessary tools for Steering Knuckle maintenance and repair include steering linkage and tie rod puller (J 24319-B) together with Ball Joint separator (J 36607) and Steering Knuckle seal installer (J 36605). Service and repair of the Steering Knuckle requires three key tools: steering linkage and tie rod puller (J 24319-B), ball joint separator (J 36607), and Steering Knuckle seal installer (J 36605). Start the process by lifting the vehicle then positioning it on stands while keeping the floor jack under the lower control arm fixed in position. The service begins by removing the tire and wheel before extracting the Torsion Bar then separating Wheel Hub and bearing. Using the steering linkage and tie rod puller (J 24319-B) remove the outer tie rod from the Steering Knuckle after removing both the retaining nut and the outer tie rod cotter pin. Start by removing the upper Ball Joint retaining nut and cotter pin before attaching a Ball Joint separator tool (J 36607) for upper Ball Joint separation from the knuckle. You should use a pry bar to help release the Steering Knuckle studs before repeating the process for the lower Ball Joint. Insert the seal into the Steering Knuckle through the use of the Steering Knuckle seal installer tool (J 36605). Secure the Steering Knuckle to its ball joints at the connecting points through the upper and lower retaining nuts while torquing the lower Ball Joint retaining nut to 128 nm (95 ft. Lbs.) and the upper Ball Joint retaining nut to 98 nm (72 ft. Lbs.). Use new cotter pins after you tighten the nuts sufficiently to let the pins slip inside. Secure the outer tie rod ball stud with its retaining nut by tightening it to 49 nm (36 ft. Lbs.). Then install a new cotter pin. Reinstall the hub and bearing assembly before loading the Torsion Bar and putting the tire and wheel on followed by lowering the vehicle and checking front wheel alignment.


