ChevyParts
My Garage
My Account
Cart
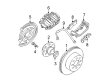
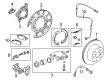
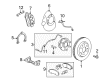
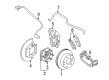
OEM GMC Yukon XL 1500 Brake Caliper Bracket
Caliper Bracket- Select Vehicle by Model
- Select Vehicle by VIN
Select Vehicle by Model
orMake
Model
Year
Select Vehicle by VIN
For the most accurate results, select vehicle by your VIN (Vehicle Identification Number).
5 Brake Caliper Brackets found


GMC Yukon XL 1500 Mount Bracket, Rear Part Number: 18043519
$94.27 MSRP: $129.06You Save: $34.79 (27%)

GMC Yukon XL 1500 Caliper Support Part Number: 15265833
$68.69 MSRP: $134.48You Save: $65.79 (49%)
GMC Yukon XL 1500 Caliper Bracket, Silver Part Number: 23498371
$62.47 MSRP: $125.42You Save: $62.95 (51%)


GMC Yukon XL 1500 Caliper Bracket, Rear Part Number: 25997047
GMC Yukon XL 1500 Caliper Bracket, Rear Part Number: 25997048
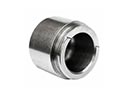
GMC Yukon XL 1500 Brake Caliper Bracket
Want to cut long-term maintenance and repair costs? Choose OEM Brake Caliper Bracket. Those parts deliver top durability you can trust. On our site, you'll find a huge catalog of genuine GMC Yukon XL 1500 parts. Prices are unbeatable, so you can keep more in your pocket. Every OEM GMC Yukon XL 1500 Brake Caliper Bracket includes a manufacturer's warranty. You can also get an easy return policy that keeps buying risk free. Fast delivery, get your car on the road quickly. It's simple to search, compare, and order. Stop guessing about quality or fit. Order today and save with parts that last.
GMC Yukon XL 1500 Brake Caliper Bracket Parts Questions & Experts Answers
- Q: How to replace the rear brake caliper bracket (except 35 Series) on GMC Yukon XL 1500?A:The replacement of the rear Brake Caliper Bracket (except 35 Series) begins with checking the brake master cylinder reservoir fluid levels. Fluid removal from the reservoir is necessary when fluid levels reach beyond the midpoint separating maximum-full and minimum allowable limits. Place the vehicle on supports then take off the tire and wheel assembly. The check for caliper function should begin with using a c-clamp to keeping both brake caliper pistons in equal compression. Use heavy gauge wire to suspend the caliper from the vehicle frame after you disconnect the caliper from its bracket using caliper mounting bolts. The evaluation of the caliper and bracket begins after removing Brake Pads and anti-rattle clips from the mounting bracket followed by Brake Caliper Bracket mounting bolt extraction. During installation position the brake pads together with anti-rattle clips onto the mounting bracket. Before installing the caliper bracket mounting bolts, remove any original adhesive, clean the bolt threads with brake parts cleaner, and apply threadlocker gm p/n 12345493 or red loctite tm #272. Mount the caliper bracket first before tightening its mounting bolts to 200 nm for jc5/jh5 systems or 165 nm for jh6 systems. For jc5/jh5 systems tighten the brake caliper mounting bolts to 42 nm (31 ft. Lbs.) while jh6 systems require 108 nm (80 ft. Lbs.). To release trapped air from the rubber boot you should gently move its edges against the caliper housing. Reinstall the tire-wheel assembly while you remove safety stands before lowering the vehicle down. When the engine is off apply the brake pedal gradually to reach two-thirds of its total length before letting it go. Perform this procedure two more times followed by a firm pedal check to allow correct pad and piston position within the caliper. End the procedure by adding the right amount of clean brake fluid into the master cylinder reservoir.

Related GMC Yukon XL 1500 Parts
 GMC Yukon XL 1500 Brake Caliper Piston
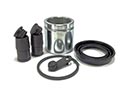 GMC Yukon XL 1500 Brake Caliper Repair Kit
 GMC Yukon XL 1500 Brake Calipers
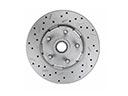 GMC Yukon XL 1500 Brake Disc
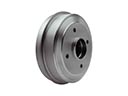 GMC Yukon XL 1500 Brake Drum
 GMC Yukon XL 1500 Brake Dust Shields
 GMC Yukon XL 1500 Brake Line
 GMC Yukon XL 1500 Brake Proportioning Valve
 GMC Yukon XL 1500 Wheel Bearing
 GMC Yukon XL 1500 Wheel Bearing Dust Cap
 GMC Yukon XL 1500 Wheel Hub
 GMC Yukon XL 1500 Wheel Speed Sensor