ChevyParts
My Garage
My Account
Cart
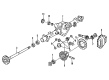
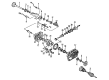
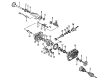
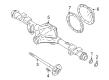
OEM GMC Yukon XL 1500 Drive Shaft
Axle Shaft- Select Vehicle by Model
- Select Vehicle by VIN
Select Vehicle by Model
orMake
Model
Year
Select Vehicle by VIN
For the most accurate results, select vehicle by your VIN (Vehicle Identification Number).
14 Drive Shafts found


GMC Yukon XL 1500 Slip Yoke Part Number: 10390404
$1526.36 MSRP: $1964.46You Save: $438.10 (23%)Ships in 1-3 Business Days
GMC Yukon XL 1500 Drive Shaft Part Number: 84675732
$454.37 MSRP: $780.39You Save: $326.02 (42%)Ships in 1-2 Business Days
GMC Yukon XL 1500 Drive Shaft, Front Part Number: 84669663
$313.29 MSRP: $624.71You Save: $311.42 (50%)Ships in 1-2 Business Days


GMC Yukon XL 1500 Drive Shaft, Front Part Number: 22845694


GMC Yukon XL 1500 Drive Shaft Part Number: 20912713


GMC Yukon XL 1500 Drive Shaft Part Number: 15814474


GMC Yukon XL 1500 Drive Shaft Assembly Part Number: 15109397

GMC Yukon XL 1500 Drive Shaft Part Number: 25804152
GMC Yukon XL 1500 Drive Shaft Part Number: 22922244
GMC Yukon XL 1500 Drive Shaft Part Number: 22845688
GMC Yukon XL 1500 Drive Shaft Part Number: 15791197

GMC Yukon XL 1500 Drive Shaft Part Number: 15791184
GMC Yukon XL 1500 Drive Shaft Part Number: 15093867
GMC Yukon XL 1500 Drive Shaft, Front Part Number: 22845693
$277.89 MSRP: $437.25You Save: $159.36 (37%)
GMC Yukon XL 1500 Drive Shaft
Want to cut long-term maintenance and repair costs? Choose OEM Drive Shaft. Those parts deliver top durability you can trust. On our site, you'll find a huge catalog of genuine GMC Yukon XL 1500 parts. Prices are unbeatable, so you can keep more in your pocket. Every OEM GMC Yukon XL 1500 Drive Shaft includes a manufacturer's warranty. You can also get an easy return policy that keeps buying risk free. Fast delivery, get your car on the road quickly. It's simple to search, compare, and order. Stop guessing about quality or fit. Order today and save with parts that last.
GMC Yukon XL 1500 Drive Shaft Parts and Q&A
- Q: How to replace the front drive shaft on GMC Yukon XL 1500?A:The necessary tool for front propeller shaft replacement is Clamp Plier (J 43218). Begin by lifting the vehicle while also removing the transfer case shield when present. Test the position of the propeller shaft in relation to the front pinion yoke before you break open the transfer case clamp using a flat-bladed tool on the exposed end. Following steps start with removing bolts as well as yoke retainers from the front axle pinion yoke. Prevent damage to the injection joints by not applying strong force when removing the propeller shaft from the front axle pinion yoke. Use tape to cover the bearing caps so roller bearing loss is avoided during the removal operation of the propeller shaft from the transfer case output shaft by pushing it forwards. Before installation inspectors should check if the transfer case output shaft splines have enough grease. They should use GM P/N 12345879 or equivalent grease for necessary lubrication. First install the new clamp into the propeller shaft boot's groove before inserting the propeller shaft splines into the transfer case output shaft to connect them with the front axle pinion yoke by lining up reference mark indications from removal. Seal the yoke retainers into place with bolts before tightening them to 25 Nm (19 ft. lbs.). Insert the boot onto the transfer case output shaft until it snaps into position before crimping the clamp with the Clamp Plier (J 43218) and reinstalling the transfer case shield when present and lowering the vehicle.

Related GMC Yukon XL 1500 Parts
 GMC Yukon XL 1500 Axle Shaft
 GMC Yukon XL 1500 Differential
 GMC Yukon XL 1500 Differential Bearing
 GMC Yukon XL 1500 Differential Cover
 GMC Yukon XL 1500 Differential Seal
 GMC Yukon XL 1500 Driveshaft Yokes
 GMC Yukon XL 1500 Pinion Bearing
 GMC Yukon XL 1500 Pinion Washer
 GMC Yukon XL 1500 Slip Yoke
 GMC Yukon XL 1500 Universal Joint
 GMC Yukon XL 1500 Wheel Seal