ChevyParts
My Garage
My Account
Cart
OEM GMC Yukon XL 1500 Fan Blade
Fan Propeller Blade- Select Vehicle by Model
- Select Vehicle by VIN
Select Vehicle by Model
orMake
Model
Year
Select Vehicle by VIN
For the most accurate results, select vehicle by your VIN (Vehicle Identification Number).
9 Fan Blades found


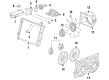
GMC Yukon XL 1500 Fan Blade Part Number: 15017911
$66.27 MSRP: $136.20You Save: $69.93 (52%)

GMC Yukon XL 1500 Fan Blade Part Number: 89024933
$96.78 MSRP: $198.88You Save: $102.10 (52%)Ships in 1-2 Business Days


GMC Yukon XL 1500 Fan Blade Part Number: 89023366
$90.19 MSRP: $185.34You Save: $95.15 (52%)Ships in 1-2 Business Days

GMC Yukon XL 1500 Fan Blade, Driver Side Part Number: 20903472
$36.35 MSRP: $107.60You Save: $71.25 (67%)Ships in 1-2 Business Days

GMC Yukon XL 1500 Fan Blade Part Number: 15780794
$100.67 MSRP: $206.86You Save: $106.19 (52%)Ships in 1-2 Business Days

GMC Yukon XL 1500 Fan Blade Part Number: 15780793
$103.31 MSRP: $192.77You Save: $89.46 (47%)GMC Yukon XL 1500 Fan Blade, Passenger Side Part Number: 20903473
$38.88 MSRP: $79.90You Save: $41.02 (52%)Ships in 1-2 Business DaysGMC Yukon XL 1500 Fan Blade, Driver Side Part Number: 20897351
$90.92 MSRP: $170.74You Save: $79.82 (47%)Ships in 1-2 Business DaysGMC Yukon XL 1500 Fan Blade, Passenger Side Part Number: 20897350
$82.29 MSRP: $169.10You Save: $86.81 (52%)Ships in 1-2 Business Days
GMC Yukon XL 1500 Fan Blade
Want to cut long-term maintenance and repair costs? Choose OEM Fan Blade. Those parts deliver top durability you can trust. On our site, you'll find a huge catalog of genuine GMC Yukon XL 1500 parts. Prices are unbeatable, so you can keep more in your pocket. Every OEM GMC Yukon XL 1500 Fan Blade includes a manufacturer's warranty. You can also get an easy return policy that keeps buying risk free. Fast delivery, get your car on the road quickly. It's simple to search, compare, and order. Stop guessing about quality or fit. Order today and save with parts that last.
GMC Yukon XL 1500 Fan Blade Parts Questions & Experts Answers
- Q: How to replace the fan blade on GMC Yukon XL 1500?A:The first step to replace the Fan Blade includes removal of the upper Fan Shroud. Inspection procedures for engine types 4.3l, 4.8l, 5.3l, 6.0l, 8.1l require using the j41240 (J 41240) with the Fan Clutch and the j41240-5a (J 41240-5A) for 6.6l models. After removing the upper Fan Shroud start by laying the Fan Blade down on a workbench with its face visible. You should take out the Fan Clutch bolts from the rear of the Fan Blade for 4.3l, 4.8l, 5.3l or 6.0l engine models and the 6.6l or 8.1l engines when needed. Make a separation between the Fan Blade and Fan Clutch. The cooling fan assembly needs immediate replacement with a new one to prevent personal injury and property damage and avoid any installation attempt on damaged components. The installation of the Fan Clutch onto the Fan Blade should proceed for both 6.6l and 8.1l engines followed by securing the Fan Clutch bolts. Installation of the Fan Clutch onto the Fan Blade becomes necessary for the 4.3l, 4.8l, 5.3l, or 6.0l engine models before tightening the Fan Clutch bolts to 23 nm (17 ft. Lbs.). Fan Blade installation precedes attachment of the j 41240-5a (J 41240-5A) Fan Clutch while the j 41240 (J 41240) needs installation for 4.3l, 4.8l, 5.3l, and 6.0l or 8.1l engines by tightening the Fan Clutch nut to 56 nm (41 ft. Lbs.). Put back the upper Fan Shroud as the last step.

Related GMC Yukon XL 1500 Parts
 GMC Yukon XL 1500 Coolant Pipe
 GMC Yukon XL 1500 Coolant Reservoir Cap
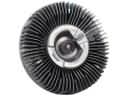 GMC Yukon XL 1500 Cooling Fan Clutch
 GMC Yukon XL 1500 Cooling Hose
 GMC Yukon XL 1500 Fan Motor
 GMC Yukon XL 1500 Radiator
 GMC Yukon XL 1500 Radiator Cap
 GMC Yukon XL 1500 Radiator Hose
 GMC Yukon XL 1500 Radiator fan
 GMC Yukon XL 1500 Thermostat Gasket
 GMC Yukon XL 1500 Water Pump
 GMC Yukon XL 1500 Water Pump Gasket