ChevyParts
My Garage
My Account
Cart
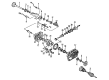
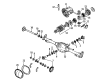
OEM GMC Yukon XL 2500 Universal Joint
U-Joint- Select Vehicle by Model
- Select Vehicle by VIN
Select Vehicle by Model
orMake
Model
Year
Select Vehicle by VIN
For the most accurate results, select vehicle by your VIN (Vehicle Identification Number).
4 Universal Joints found


GMC Yukon XL 2500 Universal Joints Part Number: 23104840
$36.45 MSRP: $88.98You Save: $52.53 (60%)


GMC Yukon XL 2500 Universal Joints Part Number: 89059111
$163.83 MSRP: $273.43You Save: $109.60 (41%)Ships in 1-2 Business Days


GMC Yukon XL 2500 Universal Joints Part Number: 89040245
$107.41 MSRP: $180.82You Save: $73.41 (41%)Ships in 1-2 Business Days


GMC Yukon XL 2500 Universal Joints Part Number: 88964413
$196.62 MSRP: $328.19You Save: $131.57 (41%)Ships in 1-2 Business Days
GMC Yukon XL 2500 Universal Joint
Want to cut long-term maintenance and repair costs? Choose OEM Universal Joint. Those parts deliver top durability you can trust. On our site, you'll find a huge catalog of genuine GMC Yukon XL 2500 parts. Prices are unbeatable, so you can keep more in your pocket. Every OEM GMC Yukon XL 2500 Universal Joint includes a manufacturer's warranty. You can also get an easy return policy that keeps buying risk free. Fast delivery, get your car on the road quickly. It's simple to search, compare, and order. Stop guessing about quality or fit. Order today and save with parts that last.
GMC Yukon XL 2500 Universal Joint Parts Questions & Experts Answers
- Q: What tools are required to service and repair the universal joint with an external snap ring on GMC Yukon XL 2500?A:You need U-Joint Bearing Separator J. 9522-3 and U-Joint Bearing Spacer Remover J 9522-5 to work with external snap ring universal joints. Set the propeller shaft on a press table horizontally before starting any work to shield its tubing from harm. Use a marker to show where the transmission and rear axle connect to the propeller shaft. Using pliers squeeze the snap ring ends to open it then tap gently on the cup end if needed to reduce internal stress. Put the lower yoke ear on a 30mm hex head socket or 27mm socket and place U-joint Separator J 9522-3 on open horizontal bearing cups to extract the lower bearing cup from the yoke ear. Insert the U-Joint Bearing Spacer Remover (J 9522-5) between the seal and the bearing cup after lifting the cross to remove the spacer. Continue to push while passing the bearing cup. Use the propeller shaft rotation to remove the second bearing cup while marking the slip yoke setup position. Examine all grooves and bores in the bearing cups and retaining rings to check for cleanliness and damage near the parts' removal. Place half a bearing cup in one yoke ear first and join the trunnion smoothly into the assembled cross section. Use consistent force to press the bearing cups into their matching yoke ears and check for correct trunnion matching. Push downward until the bearing retainer grooves show and add the retainer parts before completing the press action when both parts click into position. A light strike from the dead blow hammer and chassis grease added to the snap ring make it easier to install the retainer properly.

Related GMC Yukon XL 2500 Parts
 GMC Yukon XL 2500 Differential
 GMC Yukon XL 2500 Differential Bearing
 GMC Yukon XL 2500 Differential Cover
 GMC Yukon XL 2500 Differential Seal
 GMC Yukon XL 2500 Drive Shaft
 GMC Yukon XL 2500 Driveshaft Yokes
 GMC Yukon XL 2500 Pinion Bearing
 GMC Yukon XL 2500 Pinion Washer
 GMC Yukon XL 2500 Slip Yoke
 GMC Yukon XL 2500 Wheel Seal