ChevyParts
My Garage
My Account
Cart
OEM 2001 Cadillac Seville Water Pump
H2O Pump- Select Vehicle by Model
- Select Vehicle by VIN
Select Vehicle by Model
orMake
Model
Year
Select Vehicle by VIN
For the most accurate results, select vehicle by your VIN (Vehicle Identification Number).
1 Water Pump found


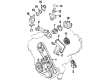
2001 Cadillac Seville Water Pump Part Number: 19210509
$85.62 MSRP: $166.18You Save: $80.56 (49%)Ships in 1-2 Business DaysProduct Specifications- Other Name: Pump Kit, Water; Water Pump Assembly; Pump Kit, Engine Coolant
- Replaces: 12487361, 88894344, 07490007, 12529993, 12365639, 7490007, 89017900, 89017467
- Item Weight: 2.20 Pounds
- Item Dimensions: 7.0 x 4.5 x 4.3 inches
- Condition: New
- Fitment Type: Direct Replacement
- SKU: 19210509
- Warranty: This genuine part is guaranteed by GM's factory warranty.
2001 Cadillac Seville Water Pump
With a comprehensive array of OEM 2001 Cadillac Seville Water Pump, from fuel pumps to door handles, our website is a one-stop-shop for your needs. All our genuine 2001 Cadillac Seville Water Pump are backed by the manufacturer's warranty and are offered at competitive prices in the market. Rest assured, you can shop with complete confidence.
2001 Cadillac Seville Water Pump Parts Questions & Experts Answers
- Q: How to replace the water pump on 2001 Cadillac Seville?A: You must first drain the cooling system before removing the upper filler panel, air cleaner assembly, secondary air valve, oil level indicator tube nut and Water Pump Drive Belt shield. Unfasten the Water Pump belt shield fasteners from the shield itself and then remove the Water Pump Drive Belt . The hose clamp pliers (J 38185) helps disconnect the radiator outlet hose from the Thermostat Housing. After that remove the Water Pump cover bolts and take out the cover. Install the Water Pump remover & installer (J 38816-A) on the Water Pump locking ears while making sure the support plate touches the water housing crossover for correct seating. Rephrase the sentence clockwise to pull the pump out from the housing. Afterward remove the support plate and Water Pump. Clear the surface area of the water crossover seal before examining both parts and the Water Pump. To install the seal position it within the water crossover recess and verify the notched locking ear faces 7 o'clock direction. Correspond the Water Pump locking ears to the water crossover tangs. Secure the Water Pump remover & installer (J 38816-A) onto the water housing crossover and press the support plate before tightening the Water Pump to 100 nm using the tool counterclockwise. Position the Water Pump cover on the heater return hose, install it into the water cross-over housing, and tighten its bolts to 10 nm (89 inch lbs.). Place the Water Pump Drive Belt into its slot and secure the hose clamp pliers (J 38185) on the radiator outlet hose. Afterwards install the Water Pump belt shield and fasten its fasteners with a torque of 10 nm (89 inch lbs.). As the last steps connect the oil level indicator tube nut to 10 nm (89 inch lbs.), install the secondary air injection control valve, mount the air cleaner assembly, and upper filler panel before filling the cooling system.
Related 2001 Cadillac Seville Parts
 2001 Cadillac Seville Radiator
 2001 Cadillac Seville A/C Condenser Fan
 2001 Cadillac Seville Coolant Reservoir Cap
 2001 Cadillac Seville Cooling Hose
 2001 Cadillac Seville Fan Blade
 2001 Cadillac Seville Radiator Hose
 2001 Cadillac Seville Radiator fan
 2001 Cadillac Seville Thermostat
 2001 Cadillac Seville Thermostat Gasket
 2001 Cadillac Seville Thermostat Housing
 2001 Cadillac Seville Water Pump Gasket
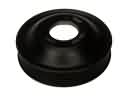 2001 Cadillac Seville Water Pump Pulley