ChevyParts
My Garage
My Account
Cart
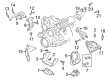
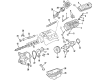
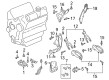
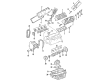
OEM 2004 Chevrolet Impala Engine Mount
Engine Motor Mount- Select Vehicle by Model
- Select Vehicle by VIN
Select Vehicle by Model
orMake
Model
Year
Select Vehicle by VIN
For the most accurate results, select vehicle by your VIN (Vehicle Identification Number).
12 Engine Mounts found


2004 Chevrolet Impala Strut Mount Part Number: 10271462
$207.03 MSRP: $325.75You Save: $118.72 (37%)Ships in 1-2 Business DaysProduct Specifications- Other Name: Bracket, Engine Mounting; Engine Mount Torque Strut; Engine Torque Strut Mount; Engine Mount Bracket; Motor Mount; Strut Bracket; Lower Bracket; Strut Front Bracket
- Item Weight: 2.40 Pounds
- Item Dimensions: 7.6 x 6.9 x 3.1 inches
- Condition: New
- Fitment Type: Direct Replacement
- SKU: 10271462
- Warranty: This genuine part is guaranteed by GM's factory warranty.


2004 Chevrolet Impala Strut Mount Part Number: 10420009
$45.32 MSRP: $77.17You Save: $31.85 (42%)Ships in 1-2 Business DaysProduct Specifications- Other Name: Strut, Engine Mount Dampening; Engine Mount Torque Strut; Engine Mount Bracket; Engine Torque Strut; Motor Mount; Strut; Strut, Engine Mounting
- Item Weight: 1.30 Pounds
- Item Dimensions: 7.6 x 3.2 x 1.6 inches
- Condition: New
- Fitment Type: Direct Replacement
- SKU: 10420009
- Warranty: This genuine part is guaranteed by GM's factory warranty.


2004 Chevrolet Impala Motor Mount Part Number: 10448575
$69.62 MSRP: $118.53You Save: $48.91 (42%)Ships in 1-3 Business DaysProduct Specifications- Other Name: Mount, Engine Mount Dampening; Engine Mount Torque Strut; Engine Mount Bracket; Spring Insulator; Lower Mount; Mount Insulator; Mount; Mount, Engine Mounting; Engine Mount
- Replaces: 17998813, 22113282, 22178657, 22146018, 22175206, 10340740, 10448574, 10448576, 22146466
- Item Weight: 4.20 Pounds
- Item Dimensions: 11.6 x 5.1 x 5.2 inches
- Condition: New
- Fitment Type: Direct Replacement
- SKU: 10448575
- Warranty: This genuine part is guaranteed by GM's factory warranty.


2004 Chevrolet Impala Mount Bracket Part Number: 12594433
$30.60 MSRP: $61.44You Save: $30.84 (51%)Product Specifications- Other Name: Bracket-Engine Mount Strut & Engine Lift; Engine Mount Bracket; Transmission Mount; Motor Mount; Strut Bracket; Lift Bracket; Rear Brace; Engine Mounting Bracket; Engine Lift Bracket
- Replaces: 10154776, 12570320
- Item Weight: 4.80 Pounds
- Item Dimensions: 4.3 x 4.4 x 15.6 inches
- Condition: New
- Fitment Type: Direct Replacement
- SKU: 12594433
- Warranty: This genuine part is guaranteed by GM's factory warranty.

2004 Chevrolet Impala Strut Mount Part Number: 10232891
$137.10 MSRP: $195.31You Save: $58.21 (30%)Ships in 1-2 Business DaysProduct Specifications- Other Name: Bracket, Engine Lift; Torque Strut Mount; Motor Mount; Mount Bracket; Strut Bracket; Strut Mount Bracket; Strut Lower Bracket; Bracket, Engine Mounting
- Item Weight: 2.20 Pounds
- Item Dimensions: 8.4 x 4.7 x 3.0 inches
- Condition: New
- Fitment Type: Direct Replacement
- Require Quantity: 2
- SKU: 10232891
- Warranty: This genuine part is guaranteed by GM's factory warranty.


2004 Chevrolet Impala Strut Bracket, Driver Side Part Number: 24503458
Product Specifications- Other Name: Bracket, Engine Lift; Engine Mount Bracket; Transmission Mount; Motor Mount; Engine Bracket; Lift Bracket; Upper Bracket; Strut Front Bracket; Bracket; Bracket, Engine Mounting
- Position: Driver Side
- Item Weight: 2.30 Pounds
- Item Dimensions: 9.0 x 6.2 x 3.2 inches
- Condition: New
- Fitment Type: Direct Replacement
- SKU: 24503458
- Warranty: This genuine part is guaranteed by GM's factory warranty.


2004 Chevrolet Impala Mount Bracket Part Number: 10321856
Product Specifications- Other Name: Bracket, Engine Mounting; Engine Mount Bracket; Transmission Mount; Motor Mount; Engine Bracket; Bracket
- Replaces: 10243884
- Item Weight: 2.30 Pounds
- Item Dimensions: 12.1 x 12.6 x 6.2 inches
- Condition: New
- Fitment Type: Direct Replacement
- SKU: 10321856
- Warranty: This genuine part is guaranteed by GM's factory warranty.


2004 Chevrolet Impala Mount Bracket Part Number: 10216970
Product Specifications- Other Name: Bracket, Engine Mounting; Engine Mount Bracket; Transmission Mount; Motor Mount; Engine Bracket; Lower Bracket; Bracket
- Item Weight: 1.20 Pounds
- Item Dimensions: 9.2 x 3.5 x 1.8 inches
- Condition: New
- Fitment Type: Direct Replacement
- SKU: 10216970
- Warranty: This genuine part is guaranteed by GM's factory warranty.

2004 Chevrolet Impala Mount Bracket Part Number: 24504390
Product Specifications- Other Name: Bracket, Engine Mounting; Engine Mount Torque Strut; Engine Mount Bracket; Transmission Mount; Motor Mount; Strut Bracket; Engine Bracket; Compressor Mount Bracket; Torque Strut Bracket; A/C Compressor Mounting.
- Item Weight: 5.70 Pounds
- Item Dimensions: 4.4 x 4.3 x 12.6 inches
- Condition: New
- Fitment Type: Direct Replacement
- SKU: 24504390
- Warranty: This genuine part is guaranteed by GM's factory warranty.
 Product Specifications
- Other Name: Bracket, Engine Mounting; Engine Mount Bracket; Motor Mount; Engine Bracket; Upper Bracket; Strut Front Bracket
- Position: Passenger Side
- Item Weight: 10.80 Pounds
- Item Dimensions: 12.1 x 8.2 x 6.8 inches
- Condition: New
- Fitment Type: Direct Replacement
- SKU: 24507211
- Warranty: This genuine part is guaranteed by GM's factory warranty.
 Product Specifications
- Other Name: Bracket, Engine Mounting; Engine Mount Bracket; Motor Mount; Engine Bracket; Upper Bracket
- Position: Passenger Side
- Item Weight: 2.10 Pounds
- Item Dimensions: 6.2 x 5.7 x 3.1 inches
- Condition: New
- Fitment Type: Direct Replacement
- SKU: 24506488
- Warranty: This genuine part is guaranteed by GM's factory warranty.
- Product Specifications
- Other Name: Bracket, Engine Mounting; Engine Mount Bracket; Motor Mount; Engine Bracket; Lower Brace
- Position: Passenger Side
- Item Weight: 1.50 Pounds
- Item Dimensions: 5.9 x 4.2 x 2.0 inches
- Condition: New
- Fitment Type: Direct Replacement
- SKU: 24506489
- Warranty: This genuine part is guaranteed by GM's factory warranty.
2004 Chevrolet Impala Engine Mount
With a comprehensive array of OEM 2004 Chevrolet Impala Engine Mount, from fuel pumps to door handles, our website is a one-stop-shop for your needs. All our genuine 2004 Chevrolet Impala Engine Mount are backed by the manufacturer's warranty and are offered at competitive prices in the market. Rest assured, you can shop with complete confidence.
2004 Chevrolet Impala Engine Mount Parts and Q&A
- Q: How to replace the engine mount on 2004 Chevrolet Impala?A: The first step in Engine Mount replacement requires users to disconnect Battery Cable negativity and lift off both fuel injector sight shields. The iat sensor electrical connector must be unplugged followed by removing the air inlet duct that connects to the Throttle Body. The first step involves removing right and left Engine Mount struts together with the Drive Belt and then supporting the vehicle at a height. Start the Engine Mount replacement by taking away the right front tire with wheel along with the right engine splash shield and power steering oil cooler pipe brackets from the frame. Secure the A/C Compressor along with its bracket in place before discharging the a/c system. Lower the vehicle first by taking out both right hand exhaust manifold pipe stud nuts from the Catalytic Converter and the Engine Mount lower nuts from the frame. First install the engine support fixture after which you should use it to elevate the engine before elevating the vehicle. Lower the frame to remove Engine Mount brackets when you first remove the bolts on both the left and right engine mounts then set the frame with jackstands and next loosen the left frame bolts before removing the right bolts. Starting with the Engine Mount and its bracket removal from the motor unit then proceed to remove the Engine Mount upper nut fixtures followed by extracting the Engine Mount from the mount bracket. Secure the Engine Mount onto the Engine Mount bracket after which install the Engine Mount upper nuts and torque them to 43 nm (32 ft. Lbs.). First install the Engine Mount bracket combined with the mount to the engine. Then apply loosely tightened right and left Engine Mount bracket bolts before securing them firmly at 102 nm (75 ft. Lbs.). Position the vehicle frame to its original height using the jackstands while you fasten the right-side frame bolts and eventually tighten both right and left frame bolts to 180 nm (133 ft. Lbs.). Position the vehicle at ground level before lowering the engine with the help of the support fixture. After raising the vehicle once more you should bolt the Engine Mount lower nuts to the frame before tightening them to 43 nm (32 ft. Lbs.). Refasten the Catalytic Converter to the right exhaust manifold before torquing the right exhaust manifold pipe stud nuts to 30 nm (22 ft. Lbs.). Reattach the A/C Compressor bracket with bolts which need to be tightened to 50 nm (37 ft. Lbs.) and apply 30 nm (22 ft. Lbs.) force to the A/C Compressor nuts. Place the power steering oil cooler pipe brackets and right engine splash shield and right front tire with wheel before letting the vehicle descend to the ground. Set the engine support fixture aside before you add the right and left Engine Mount struts with the Throttle Body air inlet duct and reestablish the electrical connection to the intake air temperature (IAT) sensor. Installation of the Drive Belt and the fuel injector sight shield must be completed before reconnecting the negative Battery Cable.
Related 2004 Chevrolet Impala Parts
 2004 Chevrolet Impala Head Gasket
 2004 Chevrolet Impala Oil Pan Gasket
 2004 Chevrolet Impala Balance Shaft Gear
 2004 Chevrolet Impala Crankshaft
 2004 Chevrolet Impala Cylinder Head
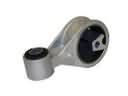 2004 Chevrolet Impala Engine Torque Strut Mount
 2004 Chevrolet Impala Intake Valve
 2004 Chevrolet Impala Oil Pan Baffle
 2004 Chevrolet Impala Piston
 2004 Chevrolet Impala Piston Ring
 2004 Chevrolet Impala Valve Cover Gasket
 2004 Chevrolet Impala Valve Stem Oil Seal