ChevyParts
My Garage
My Account
Cart
OEM 2004 Chevrolet Trailblazer Shock Absorber
Suspension Shock Absorber- Select Vehicle by Model
- Select Vehicle by VIN
Select Vehicle by Model
orMake
Model
Year
Select Vehicle by VIN
For the most accurate results, select vehicle by your VIN (Vehicle Identification Number).
6 Shock Absorbers found


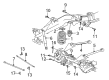
2004 Chevrolet Trailblazer Shock Absorber, Rear Part Number: 15881662
$80.32 MSRP: $157.27You Save: $76.95 (49%)Ships in 1-2 Business DaysProduct Specifications- Other Name: Absorber, Rear Shock; Suspension Shock Absorber; Shock; Absorber, Front And Rear Suspension
- Position: Rear
- Replaces: 15159641, 15058616, 15198311, 15172341, 15193273
- Item Weight: 3.20 Pounds
- Item Dimensions: 4.1 x 4.1 x 29.7 inches
- Condition: New
- Fitment Type: Direct Replacement
- Require Quantity: 2
- SKU: 15881662
- Warranty: This genuine part is guaranteed by GM's factory warranty.


2004 Chevrolet Trailblazer Shock Absorber, Front Driver Side Part Number: 15098726
$79.86 MSRP: $236.33You Save: $156.47 (67%)Product Specifications- Other Name: Front Shock Absorber Kit; Suspension Assembly; Air Spring to Coil Conversion; Complete Strut Set; Strut; Absorber, Front And Rear Suspension; Shock
- Position: Front Driver Side
- Item Weight: 4.30 Pounds
- Item Dimensions: 6.2 x 6.4 x 22.9 inches
- Condition: New
- Fitment Type: Direct Replacement
- SKU: 15098726
- Warranty: This genuine part is guaranteed by GM's factory warranty.


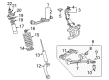
2004 Chevrolet Trailblazer Shock Absorber Part Number: 25820699
Product Specifications- Other Name: Shock; Absorber, Front And Rear Suspension
- Position: Rear
- Replaces: 15159645, 15172343, 15206892, 15894447, 15172340, 25865982, 25820694, 15159648, 15172342, 15894449, 15894448, 25820695
- Item Weight: 3.20 Pounds
- Item Dimensions: 28.0 x 4.3 x 3.8 inches
- Condition: New
- Fitment Type: Direct Replacement
- Require Quantity: 2
- SKU: 25820699
- Warranty: This genuine part is guaranteed by GM's factory warranty.

2004 Chevrolet Trailblazer Shock Absorber, Front Part Number: 15098725
Product Specifications- Other Name: Front Shock Absorber Kit; Suspension Assembly; Air Spring to Coil Conversion; Complete Strut Set; Strut; Absorber, Front And Rear Suspension; Shock
- Position: Front
- Replaces: 15063734
- Item Weight: 4.10 Pounds
- Item Dimensions: 22.6 x 6.1 x 5.9 inches
- Condition: New
- Fitment Type: Direct Replacement
- SKU: 15098725
- Warranty: This genuine part is guaranteed by GM's factory warranty.

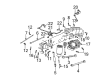
2004 Chevrolet Trailblazer Shock Absorber Part Number: 88965472
Product Specifications- Other Name: Absorber Kit, Front Shock; Suspension Shock Absorber; Link; Absorber Kit, Front And Rear Suspension; Shock
- Position: Front
- Item Weight: 3.80 Pounds
- Item Dimensions: 26.3 x 4.5 x 3.5 inches
- Condition: New
- Fitment Type: Direct Replacement
- Require Quantity: 2
- SKU: 88965472
- Warranty: This genuine part is guaranteed by GM's factory warranty.

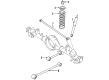
2004 Chevrolet Trailblazer Shock Absorber Part Number: 15058617
Product Specifications- Other Name: Suspension Strut and Shock Absorber Assembly Kit; Air to Coil Spring Conversion; Complete Strut Kit.; Absorber, Front And Rear Suspension
- Position: Rear
- Item Weight: 3.20 Pounds
- Item Dimensions: 28.3 x 4.0 x 4.0 inches
- Condition: New
- Fitment Type: Direct Replacement
- Require Quantity: 2
- SKU: 15058617
- Warranty: This genuine part is guaranteed by GM's factory warranty.
2004 Chevrolet Trailblazer Shock Absorber
With a comprehensive array of OEM 2004 Chevrolet Trailblazer Shock Absorber, from fuel pumps to door handles, our website is a one-stop-shop for your needs. All our genuine 2004 Chevrolet Trailblazer Shock Absorber are backed by the manufacturer's warranty and are offered at competitive prices in the market. Rest assured, you can shop with complete confidence.
2004 Chevrolet Trailblazer Shock Absorber Parts Questions & Experts Answers
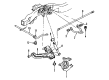
- Q: How to Replace a Shock Absorber Module on 2004 Chevrolet Trailblazer?A: A first step to change the shock module involves the removal of its upper retaining nuts. Support the vehicle under safe conditions as you handle the Coil Springs because premature failure occurs when the coating gets damaged. First remove the tire and wheel before loosening the shock module yoke to lower Control Arm retaining nut and using the ball joint separator (J 36607) to extract the shock module yoke from the lower Control Arm by prying action. Begin by removing both items - the ball joint separator j 36607 and retaining nut first. After that successively extract the shock module from shock tower and lower Control Arm assembly. You should maintain a proper fit by placing the shock module inside the shock tower and lower Control Arm before connecting the shock module yoke to the lower Control Arm. Lower the vehicle while installing the shock module upper retaining nuts to a torque of 45 nm (33 ft. Lbs.). After raising the vehicle you should install the shock module yoke to lower Control Arm retaining nut then secure it with 110 nm (81 ft. Lbs.). Users must reposition the tire and wheel onto the vehicle after completely lowering it.