ChevyParts
My Garage
My Account
Cart
OEM 2007 Buick LaCrosse CV Joint
CV Joint Axle- Select Vehicle by Model
- Select Vehicle by VIN
Select Vehicle by Model
orMake
Model
Year
Select Vehicle by VIN
For the most accurate results, select vehicle by your VIN (Vehicle Identification Number).
6 CV Joints found

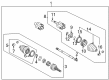
2007 Buick LaCrosse CV Joints, Front Part Number: 26073381
Product Specifications- Other Name: Joint Kit, Front Wheel Drive Axle; CV Joint; Inner CV Joint; Inner Joint; Inner Joint Assembly; Tripod
- Position: Front
- Item Weight: 7.70 Pounds
- Item Dimensions: 7.5 x 7.1 x 6.5 inches
- Condition: New
- SKU: 26073381
- Warranty: This genuine part is guaranteed by GM's factory warranty.

2007 Buick LaCrosse CV Joints, Front Driver Side Part Number: 26073376
Product Specifications- Other Name: Joint Kit, Front Wheel Drive Axle; CV Joint; Inner CV Joint; Inner Joint; Inner Joint Assembly; Tripod
- Position: Front Driver Side
- Replaces: 26073378
- Item Weight: 7.70 Pounds
- Item Dimensions: 8.6 x 6.9 x 7.1 inches
- Condition: New
- SKU: 26073376
- Warranty: This genuine part is guaranteed by GM's factory warranty.
2007 Buick LaCrosse CV Joints, Front Part Number: 26073382
Product Specifications- Other Name: Joint Kit, Front Wheel Drive Axle; CV Joint; Inner CV Joint; Inner Joint; Inner Joint Assembly; Tripod
- Position: Front
- Item Weight: 7.80 Pounds
- Item Dimensions: 7.7 x 7.0 x 6.6 inches
- Condition: New
- SKU: 26073382
- Warranty: This genuine part is guaranteed by GM's factory warranty.
- Product Specifications
- Other Name: Joint Kit, Front Wheel Drive Axle; CV Joint; Inner CV Joint; Inner Joint; Inner Joint Assembly; Tripod
- Position: Front Passenger Side
- Item Weight: 6.70 Pounds
- Item Dimensions: 8.5 x 6.7 x 7.1 inches
- Condition: New
- SKU: 26073375
- Warranty: This genuine part is guaranteed by GM's factory warranty.

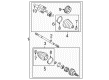
2007 Buick LaCrosse C.V. Joint, Outer Part Number: 19122437
Product Specifications- Other Name: Outer CV Joint; CV Joint; CV Joints; Outer Joint; Outer Joint Assembly
- Position: Outer
- Replaces: 26044410, 26045070
- Item Weight: 6.50 Pounds
- Item Dimensions: 7.6 x 7.2 x 6.5 inches
- Condition: New
- SKU: 19122437
- Warranty: This genuine part is guaranteed by GM's factory warranty.


2007 Buick LaCrosse C.V. Joint, Outer Part Number: 19148843
Product Specifications- Other Name: Outer CV Joint; CV Joint; CV Joints; Outer Joint; Outer Joint Assembly
- Position: Outer
- Replaces: 26044408, 26075595
- Item Weight: 6.60 Pounds
- Item Dimensions: 8.7 x 6.7 x 7.4 inches
- Condition: New
- SKU: 19148843
- Warranty: This genuine part is guaranteed by GM's factory warranty.
2007 Buick LaCrosse CV Joint
With a comprehensive array of OEM 2007 Buick LaCrosse CV Joint, from fuel pumps to door handles, our website is a one-stop-shop for your needs. All our genuine 2007 Buick LaCrosse CV Joint are backed by the manufacturer's warranty and are offered at competitive prices in the market. Rest assured, you can shop with complete confidence.
2007 Buick LaCrosse CV Joint Parts Questions & Experts Answers
- Q: What Tools Are Required to Service and Repair the CV Joint Boot for the Wheel Drive Shaft Inner Joint and Seal Replacement on 2007 Buick LaCrosse?A: To repair and service constant velocity joint boot, for the wheel drive shaft inner joint and seal replacement, the following tools are available; snap ring pliers (J 8059), drive axle seal clamp pliers (J 35910) and drive axle swage ring clamp (j 41048). To begin, disconnect the swage ring from the halfshaft bar by using a hand grinder to avoid damaging the halfshaft bar. Using side cutters cut off the large seal retaining clamp from the tripot joint and throw it away. Split the inboard seal from the trilobal tripot bushing at large diameter and move the seal along halfshaft bar away from and around the joint. Disassemble the housing from tripot joint spider and halfshaft bar. Place the snap ring pliers (J 8059) at the open end of the spacer ring and use it to spread the spacer ring and remove from the spider assembly plane455 (J 1505) removing the spacer ring, spider assembly, which will be disposed of and the rings. Use a wire brush to clean the halfshaft bar, removing any rust in the boot mounting area and checking the needle rollers, needle bearings, and trunnion for any damage, with the replacement of damaged parts with suitable kits. For an installation, install the halfshaft into a vise for an eared clamp installation: set the new small swage ring or the "eared clamp" on the small terminal of the joint seal and slide down onto the halfshaft bar. Put the small end of the joint seal in the joint seal groove of the halfshaft bar. For swage ring installation, install drive axle swage ring clamp (J 41048) into a vise, line up the inboard end of the halfshaft assembly in the tool, align the top of the seal neck on the bottom die on the tool, and on bottom half of tool on the die. Make certain that the position of the halfshaft did not possess any pinch points on its inboard seal, insert bolts, and manually fasten them until they were taut. If the halfshaft inboard seal, halfshaft bar or swage ring is installed, then there will be tightening of each bolt at intervals by drive axle swage ring clamp (J 41048) 180 degrees to the ratchet wrench, at a time in an alternate direction until both sides bottom. So, crimp the eared clamp by using drive axle seal clamp pliers (J 35910), such as torque wrench and a breaker bar. Fit the spacer ring into the groove of the halfshaft bar with snap ring pliers (J 8059), slide the tripot joint spider assembly onto the halfshaft bar and fit the spacer ring into the groove of the halfshaft bar again using snap ring pliers (J 8059). Put about half of the grease from the service kit into the halfshaft inboard seal, and leave the rest to repack into the housing while making sure the trilobal tripot bushing butts out at the face of the housing. Mount the trilobal tripot bushing to the housing and mount the larger new seal retaining clamp to the halfshaft inboard seal, while sliding the housing over tripot joint spider assembly on the halfshaft bar. Push the large diameter of the halfshaft inboard seal up the trilobal tripot bushing and position the lip of the seal in the groove. Place the joint assembly at the correct vehicle dimension of 106 mm (4.00 in), insert a thin flat blunt tool between the large seal opening and the trilobal tripot bushing to balance off the pressure by means thereof and withdraw the tool. Bend the halfshaft inboard seal, tripot housing, and large seal retaining clamp as it snaps and then pinch seal retaining clamp using drive axle seal clamp pliers (J 35910) to 176 n.m (130 lb ft) - attach breaker bar and torque wrench to the tool if necessary. If they are greater, check the gap dimension on the clamp ear and iterate tightening until the gap dimension of 2.6mm (0.102in) is attained. Finally, stroke the joint completely some times in order to spread the grease.
Related 2007 Buick LaCrosse Parts
 2007 Buick LaCrosse Axle Shaft
 2007 Buick LaCrosse CV Boot
 2007 Buick LaCrosse Coil Spring Insulator
 2007 Buick LaCrosse Coil Springs
 2007 Buick LaCrosse Control Arm Bracket
 2007 Buick LaCrosse Shock Absorber
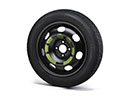 2007 Buick LaCrosse Spare Wheel
 2007 Buick LaCrosse Spindle Nut
 2007 Buick LaCrosse Steering Knuckle
 2007 Buick LaCrosse Suspension Strut Rod
 2007 Buick LaCrosse Sway Bar Bushing
 2007 Buick LaCrosse Trailing Arm