ChevyParts
My Garage
My Account
Cart
OEM 2007 Chevrolet Impala Oil Pan
Oil Drain Pan- Select Vehicle by Model
- Select Vehicle by VIN
Select Vehicle by Model
orMake
Model
Year
Select Vehicle by VIN
For the most accurate results, select vehicle by your VIN (Vehicle Identification Number).
3 Oil Pans found

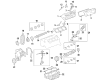
2007 Chevrolet Impala Oil Pan Part Number: 12603201
$190.70 MSRP: $299.93You Save: $109.23 (37%)Ships in 1-3 Business DaysProduct Specifications- Other Name: Pan, Engine Oil; Engine Oil Pan
- Item Weight: 14.10 Pounds
- Item Dimensions: 19.0 x 12.5 x 11.2 inches
- Condition: New
- Fitment Type: Direct Replacement
- SKU: 12603201
- Warranty: This genuine part is guaranteed by GM's factory warranty.


2007 Chevrolet Impala Oil Pan Part Number: 12599654
Product Specifications- Other Name: Pan, Engine Oil
- Item Weight: 13.10 Pounds
- Item Dimensions: 22.2 x 12.8 x 6.5 inches
- Condition: New
- Fitment Type: Direct Replacement
- SKU: 12599654
- Warranty: This genuine part is guaranteed by GM's factory warranty.

2007 Chevrolet Impala Oil Pan Part Number: 12598156
Product Specifications- Other Name: Pan, Engine Oil
- Replaces: 12569040
- Condition: New
- Fitment Type: Direct Replacement
- SKU: 12598156
- Warranty: This genuine part is guaranteed by GM's factory warranty.
2007 Chevrolet Impala Oil Pan
With a comprehensive array of OEM 2007 Chevrolet Impala Oil Pan, from fuel pumps to door handles, our website is a one-stop-shop for your needs. All our genuine 2007 Chevrolet Impala Oil Pan are backed by the manufacturer's warranty and are offered at competitive prices in the market. Rest assured, you can shop with complete confidence.
2007 Chevrolet Impala Oil Pan Parts and Q&A
- Q: How to replace the oil pan on 2007 Chevrolet Impala?A: To replace Oil Pan using a new one you have to disconnect the negative Battery Cable, remove the Engine Mount struts, and install the engine support fixture (J43514-B). Next, take off the Catalytic Converter, Oil Pan Drain Plug, and drain the crankcase before putting the plug back. The Oil Filter, starter, and the nut and bolt of the a/c compressor along with the rear bolt of the a/c compressor should have to be removed followed by the positioning of the a/c compressor to the side of the car. Unplug the oil level sensor electric connector, remove the engine harness clips from Oil Pan and the trunk of transaxle brace and remove the bolts securing the front transaxle brace to the engine and remove the brace. Unfasten the Engine Mount lower nuts, remove the transaxle mount lower nuts, and the rear transaxle brace to engine/Oil Pan bolts. Adjust the vehicle lowering and raise the engine with the engine support fixture (J43514-B). Remove the steering shaft intermediate pinch bolt, the Engine Mount bracket bolts as well as the Engine Mount and bracket. Loosen the left side lower Ball Joint, outer tie rod, and stabilizer link and mount jackstands to the frame. Take off the right side frame bolts and loosen further the left side frame bolts and bring the right side of the frame down with the jackstands. Finally, before removing the Oil Pan and gasket, pull out the right side Oil Pan side bolts with the help of the torque wrench adapter (J 39505), then the left side Oil Pan side bolts and the Oil Pan bolts respectively. Clean the flanges of the Oil Pan, oil fan rail, front cover, rear main bearing cap and threaded holes. For installation, make sure you apply sealer at both faces of the crankshaft rear main bearing cap and press the cap into the hole using a putty knife. Place a new Oil Pan Gasket, align Oil Pan to the engine, and install the Oil Pan bolts, tighten them to 25 n.m (18 lb ft). Install left side Oil Pan side bolts and using the torque wrench adapter (J 39505), install the right side Oil Pan side bolts and tighten them to 50 n.m (37 lbft). Lift the right side of the frame back to its original position using the jackstands, install and tighten the right frame side bolts, then it's possible to remove the jackstands. Mount the right side stabilizer link, outer tie rod, and lower Ball Joint on the steering knuckle. Position the Engine Mount and bracket to the Oil Pan and install the Engine Mount bracket bolts, tightening them to 50 n.m (37 lb ft). Put in the steering shaft intermediate pinch bolt and drop the vehicle after which lower the engine with the engine support fixture (J43514-B). Lift the vehicle once more and then bolt the rear transaxle brace to engine/Oil Pan bolts, then tighten to 63 n.m (46 lb ft). Mount the Engine Mount lower nuts and tighten to 50 n.m (37 lb ft); thereafter, tighten the transaxle mount lower nuts. Install the front transaxle brace and the brace to the engine bolts. Ensure that they are torqued to 63 n.m (46 lb ft). Connect oil level sensor electrical connector, run engine harness clips to Oil Pan and transaxle brace, locate a/ c compressor, and tighten a/c compressor nut and bolt, to 50 n.m (37 lb ft). Mount the a/c compressor rear bolt, which should be tightened to 50 n.m (37 lb ft), then mount the Starter, oil filter, and the Catalytic Converter. Lower the vehicle, remove the engine support fixture, installation of the Engine Mount struts, filling of the crankcase with new engine oil, and then connecting of the negative Battery Cable.
Related 2007 Chevrolet Impala Parts
 2007 Chevrolet Impala Harmonic Balancer
 2007 Chevrolet Impala Head Gasket
 2007 Chevrolet Impala Timing Chain
 2007 Chevrolet Impala Cam Gear
 2007 Chevrolet Impala Dipstick
 2007 Chevrolet Impala Exhaust Valve
 2007 Chevrolet Impala Lash Adjuster
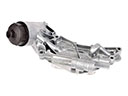 2007 Chevrolet Impala Oil Cooler
 2007 Chevrolet Impala Oil Filler Cap
 2007 Chevrolet Impala Pushrod
 2007 Chevrolet Impala Rod Bearing
 2007 Chevrolet Impala Timing Cover