ChevyParts
My Garage
My Account
Cart
OEM 2009 Cadillac XLR Battery Cable
Car Battery Cable- Select Vehicle by Model
- Select Vehicle by VIN
Select Vehicle by Model
orMake
Model
Year
Select Vehicle by VIN
For the most accurate results, select vehicle by your VIN (Vehicle Identification Number).
2 Battery Cables found

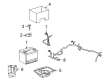
2009 Cadillac XLR Positive Cable Part Number: 88987107
Product Specifications- Other Name: Cable Assembly, Battery Positive; Battery Cables; Cable, Battery(Positive)
- Item Weight: 1.60 Pounds
- Item Dimensions: 11.4 x 10.0 x 4.6 inches
- Condition: New
- Fitment Type: Direct Replacement
- SKU: 88987107
- Warranty: This genuine part is guaranteed by GM's factory warranty.

2009 Cadillac XLR Negative Cable Part Number: 19116218
Product Specifications- Other Name: Cable; Battery Cables; Ground Strap; Cable, Battery Ground(Negative)
- Replaces: 88987106
- Item Weight: 0.90 Pounds
- Item Dimensions: 12.6 x 6.3 x 2.3 inches
- Condition: New
- Fitment Type: Direct Replacement
- SKU: 19116218
- Warranty: This genuine part is guaranteed by GM's factory warranty.
2009 Cadillac XLR Battery Cable
With a comprehensive array of OEM 2009 Cadillac XLR Battery Cable, from fuel pumps to door handles, our website is a one-stop-shop for your needs. All our genuine 2009 Cadillac XLR Battery Cable are backed by the manufacturer's warranty and are offered at competitive prices in the market. Rest assured, you can shop with complete confidence.
2009 Cadillac XLR Battery Cable Parts and Q&A
- Q: How to Replace the Battery Cable (LH2) on 2009 Cadillac XLR?A: Start the replacement of battery positive and negative cables by disconnecting the battery negative cable first. First loose the battery positive cable nut while disconnecting the battery positive cable from the battery. Remove the battery positive cable nut after opening the stud cover of the fuse/relay center. Then disconnect the battery positive cable lead from the center stud. The next step requires you to take off the Battery Cable clips followed by disconnection of the battery negative terminal from its frame rail stud using a nut remover tool. Following the removal of the bolt securing the battery negative cable with its ground pack to the right rear cylinder head you must also remove the Intake Manifold. First disconnect the starter jumper wiring harness from the engine harness connector before taking out the terminal nut that disconnects the terminals from the Starter Solenoid. The performing repairer disconnects the generator Battery Cable through terminal adapter manipulation then battery positive/starter cable nut removal before cable-terminal disconnection at the generator stud. Remove first the bushing bolt for positive cable routing together with the battery connection assembly and terminal cable. Install the starter cable assembly first by indicating the battery terminals in their required sequence. The generator stud receives the battery positive/starter/generator cable through its terminal placement at 2 to 4 o'clock with proper wire orientation before terminal nut installation and torque to 20 nm (15 lb ft). Place the boot over the stud and its attached nut. Install the positive Battery Cable routing clip bolt inside the cable retaining clip before fastening it to the engine front region with a torque of 35 nm (26 lb ft). Connect the engine harness leads to the solenoid first before placing your positive cable terminal. Then install the Starter Solenoid leverages and large nut and apply torque to 12 nm (106 lb in) while small nut torque reaches 4 nm (35 lb in). The starter jumper wiring harness must be attached to the engine harness connector before reinstallation of the Intake Manifold. The battery negative cable together with the engine harness ground pack should be placed at the right rear cylinder head position then install the Battery Cable bolt tight the battery positive cable routing clip bolt to 35 nm (26 lb ft). Place the battery negative cable by the frame rail stud then mount the negative frame rail nut before tightening it to 11 nm (97 lb in). First install battery clips onto the assembly while positioning the positive Battery Cable lead towards the fuse/relay center stud before fastening the positive Battery Cable nut to 12 nm (106 lb in). Put the fuse/relay center stud cover aside before connecting the battery link of positive Battery Cable and tightening its nut to 8 nm (71 lb in). After that, proceed to attach the negative Battery Cable.
Related 2009 Cadillac XLR Parts
 2009 Cadillac XLR Air Bag Clockspring
 2009 Cadillac XLR Air Bag Sensor
 2009 Cadillac XLR Alternator
 2009 Cadillac XLR Camshaft Position Sensor
 2009 Cadillac XLR Crankshaft Position Sensor
 2009 Cadillac XLR Ignition Coil
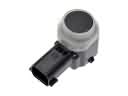 2009 Cadillac XLR Parking Assist Distance Sensor
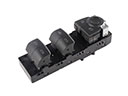 2009 Cadillac XLR Power Window Switch
 2009 Cadillac XLR Seat Switch
 2009 Cadillac XLR Spark Plug Wires
 2009 Cadillac XLR Starter
 2009 Cadillac XLR Wiper Switch