ChevyParts
My Garage
My Account
Cart
OEM 2010 Cadillac CTS Engine Mount
Engine Motor Mount- Select Vehicle by Model
- Select Vehicle by VIN
Select Vehicle by Model
orMake
Model
Year
Select Vehicle by VIN
For the most accurate results, select vehicle by your VIN (Vehicle Identification Number).
10 Engine Mounts found


2010 Cadillac CTS Motor Mount Part Number: 15234751
$211.85 MSRP: $360.67You Save: $148.82 (42%)Ships in 1-2 Business DaysProduct Specifications- Other Name: Mount Assembly-Engine; Engine Mount Bracket; Front Mount; Mount, Engine Mount Dampening
- Item Weight: 4.10 Pounds
- Item Dimensions: 6.7 x 6.4 x 6.6 inches
- Condition: New
- Fitment Type: Direct Replacement
- SKU: 15234751
- Warranty: This genuine part is guaranteed by GM's factory warranty.


2010 Cadillac CTS Motor Mount, Driver Side Part Number: 22887776
$122.89 MSRP: $209.23You Save: $86.34 (42%)Ships in 1-3 Business DaysProduct Specifications- Other Name: Mount Assembly-Engine; Engine Mount Bracket; Front Mount; Mount; Mount, Engine Mount Dampening; Mount, Engine Mounting
- Position: Driver Side
- Replaces: 10360737, 25971088, 25792213
- Item Weight: 4.50 Pounds
- Item Dimensions: 8.1 x 5.5 x 5.6 inches
- Condition: New
- Fitment Type: Direct Replacement
- SKU: 22887776
- Warranty: This genuine part is guaranteed by GM's factory warranty.


2010 Cadillac CTS Motor Mount Part Number: 22887775
$122.06 MSRP: $207.81You Save: $85.75 (42%)Ships in 1-3 Business DaysProduct Specifications- Other Name: Mount Assembly-Engine; Engine Mount Bracket; Engine Mount; Front Mount; Mount; Mount, Engine Mount Dampening; Mount, Engine Mounting
- Replaces: 10360736, 25764959, 25764956, 19210426, 25741434, 25971085, 25737318, 25744159
- Item Weight: 4.50 Pounds
- Item Dimensions: 8.0 x 5.5 x 5.5 inches
- Condition: New
- Fitment Type: Direct Replacement
- SKU: 22887775
- Warranty: This genuine part is guaranteed by GM's factory warranty.


2010 Cadillac CTS Motor Mount Part Number: 22783392
$187.59 MSRP: $322.19You Save: $134.60 (42%)Product Specifications- Other Name: Mount Assembly-Engine; Engine Mount Bracket; Transfer Case Mount; Transmission Mount; Front Mount; Mount; Mount, Engine Mount Dampening; Mount, Engine Mounting
- Replaces: 25973848, 25864909, 25958431, 15234750
- Item Weight: 4.20 Pounds
- Item Dimensions: 10.0 x 5.4 x 5.4 inches
- Condition: New
- Fitment Type: Direct Replacement
- SKU: 22783392
- Warranty: This genuine part is guaranteed by GM's factory warranty.

2010 Cadillac CTS Mount Bracket, Passenger Side Part Number: 15854018
$84.63 MSRP: $169.90You Save: $85.27 (51%)Ships in 1-2 Business DaysProduct Specifications- Other Name: Bracket, Engine Mounting; Engine Mount Bracket; Motor Mount
- Position: Passenger Side
- Item Weight: 1.90 Pounds
- Item Dimensions: 9.2 x 8.2 x 5.6 inches
- Condition: New
- Fitment Type: Direct Replacement
- SKU: 15854018
- Warranty: This genuine part is guaranteed by GM's factory warranty.

2010 Cadillac CTS Mount Bracket, Driver Side Part Number: 15234761
$27.47 MSRP: $43.02You Save: $15.55 (37%)Ships in 1-3 Business DaysProduct Specifications- Other Name: Bracket, Engine Mounting; Engine Mount Bracket; Motor Mount
- Position: Driver Side
- Item Weight: 1.90 Pounds
- Item Dimensions: 8.6 x 5.9 x 3.9 inches
- Condition: New
- Fitment Type: Direct Replacement
- SKU: 15234761
- Warranty: This genuine part is guaranteed by GM's factory warranty.


2010 Cadillac CTS Mount Bracket, Passenger Side Part Number: 15234762
$27.47 MSRP: $43.03You Save: $15.56 (37%)Product Specifications- Other Name: Bracket, Engine Mounting; Engine Mount Bracket; Motor Mount
- Position: Passenger Side
- Item Weight: 1.90 Pounds
- Item Dimensions: 8.7 x 5.8 x 4.0 inches
- Condition: New
- Fitment Type: Direct Replacement
- SKU: 15234762
- Warranty: This genuine part is guaranteed by GM's factory warranty.

2010 Cadillac CTS Mount Bracket, Driver Side Part Number: 15854019
$90.01 MSRP: $141.00You Save: $50.99 (37%)Product Specifications- Other Name: Bracket, Engine Mounting; Engine Mount Bracket; Motor Mount
- Position: Driver Side
- Item Weight: 1.90 Pounds
- Item Dimensions: 6.2 x 5.1 x 5.0 inches
- Condition: New
- Fitment Type: Direct Replacement
- SKU: 15854019
- Warranty: This genuine part is guaranteed by GM's factory warranty.

2010 Cadillac CTS Mount Bracket, Driver Side Part Number: 25905220
$119.75 MSRP: $188.42You Save: $68.67 (37%)Product Specifications- Other Name: Bracket, Engine Mounting; Engine Mount Bracket; Motor Mount
- Position: Driver Side
- Replaces: 15234759
- Item Weight: 1.90 Pounds
- Item Dimensions: 9.5 x 9.2 x 5.6 inches
- Condition: New
- Fitment Type: Direct Replacement
- SKU: 25905220
- Warranty: This genuine part is guaranteed by GM's factory warranty.

2010 Cadillac CTS Mount Bracket, Passenger Side Part Number: 25905221
$96.84 MSRP: $151.69You Save: $54.85 (37%)Product Specifications- Other Name: Bracket, Engine Mounting; Engine Mount Bracket; Motor Mount; Mount
- Position: Passenger Side
- Replaces: 15234760
- Item Weight: 1.90 Pounds
- Item Dimensions: 9.3 x 5.1 x 4.8 inches
- Condition: New
- Fitment Type: Direct Replacement
- SKU: 25905221
- Warranty: This genuine part is guaranteed by GM's factory warranty.
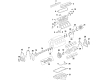
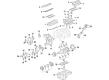
2010 Cadillac CTS Engine Mount
With a comprehensive array of OEM 2010 Cadillac CTS Engine Mount, from fuel pumps to door handles, our website is a one-stop-shop for your needs. All our genuine 2010 Cadillac CTS Engine Mount are backed by the manufacturer's warranty and are offered at competitive prices in the market. Rest assured, you can shop with complete confidence.
2010 Cadillac CTS Engine Mount Parts and Q&A
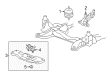
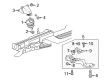
- Q: How to replace the right side engine mount on an AWD on 2010 Cadillac CTS?A: The first step to replace the right side Engine Mount of an awd vehicle is disconnecting the battery ground cable. The cross vehicle brace together with the exhaust system must be removed first. The repairing sequence begins with taking out the upper Engine Mount retaining nut followed by the lower Engine Mount retaining nuts. Place a screw jack alongside a wood block below the Oil Pan to support the engine while you note down the initial mount position for removal. The engine should rise to a level sufficient for taking out the Engine Mount from the vehicle. The installation process begins with correct positioning of the Engine Mount. After that, install it and lower the engine through the screw jack procedure. Unfasten the screw jack and block of wood while installing and tightening the upper Engine Mount retaining nut to 80 nm (59 lb ft). Seal the right and left lower Engine Mount retaining nuts with an 80 nm torque (59 lb ft). Reinstall the exhaust system followed by the cross vehicle brace and then connect the battery ground cable.
Related 2010 Cadillac CTS Parts
 2010 Cadillac CTS Cam Gear
 2010 Cadillac CTS Camshaft Bearing
 2010 Cadillac CTS Crankshaft
 2010 Cadillac CTS Crankshaft Gear
 2010 Cadillac CTS Crankshaft Thrust Washer Set
 2010 Cadillac CTS Cylinder Head
 2010 Cadillac CTS Dipstick Tube
 2010 Cadillac CTS Exhaust Valve
 2010 Cadillac CTS Oil Pan Baffle
 2010 Cadillac CTS Oil Pan Gasket
 2010 Cadillac CTS Piston
 2010 Cadillac CTS Valve Cover Grommet