ChevyParts
My Garage
My Account
Cart
OEM Buick Heater Control Valve
HVAC Heater Control Valve- Select Vehicle by Model
- Select Vehicle by VIN
Select Vehicle by Model
orMake
Model
Year
Select Vehicle by VIN
For the most accurate results, select vehicle by your VIN (Vehicle Identification Number).
15 Heater Control Valves found


Buick Control Valve Part Number: 22532158
$13.50 MSRP: $25.36You Save: $11.86 (47%)Ships in 1-3 Business DaysProduct Specifications- Other Name: Valve, Heater Water Temperature Control; Heater Control Valve; Control, Throttle Body Coolant Supply; Nipple, Heater Flow; Valve, Temperature Control; Fitting, Heater.


Buick Bleeder Valve Part Number: 10070107
$10.00 MSRP: $18.78You Save: $8.78 (47%)Ships in 1-2 Business DaysProduct Specifications- Other Name: Valve, Engine Air Cooling Control; Coolant Bleeder Screw; By-Pass Valve; Water Manifold Valve; Valve; Valve, Turbocharger/Supercharger; Valve, Heater
- Replaces: 25535220


Buick Control Valve Part Number: 10258504
$98.01 MSRP: $201.40You Save: $103.39 (52%)Ships in 1-2 Business DaysProduct Specifications- Other Name: Valve Assembly-Heater Water Flow Control; Heater Control Valve; Valve, Heater Coolant Flow

Buick Control Valve Part Number: 25527164
$13.11 MSRP: $18.75You Save: $5.64 (31%)Product Specifications- Other Name: Valve; Heater Control Valve; Valve, Heater Water Temperature Control

Buick Control Valve Part Number: 10165021
$70.28 MSRP: $131.16You Save: $60.88 (47%)Product Specifications- Other Name: Valve Assembly-Heater Water Flow Control; Heater Control Valve; Valve, Heater Coolant Flow


Buick Control Valve Part Number: 22502236
Product Specifications- Other Name: Valve Assembly-Heater Water Shutoff; Heater Control Valve; Valve Assembly, Heater Water Temperature Control; Valve, Heater Water Temperature Control; Valve, Heater Coolant Flow
Buick Control Valve Part Number: 411823
Product Specifications- Other Name: Valve Assembly-Heater Water Shut Off; Heater Control Valve; Valve, Heater Water Temperature Control; Valve, Heater Coolant Flow

Buick Control Valve Part Number: 25526626
Product Specifications- Other Name: Valve Assembly-Heater Water Flow Control; Heater Control Valve; Valve, Heater Water Temperature Control; Valve, Heater Coolant Flow
Buick Control Valve Part Number: 25523118
Product Specifications- Other Name: Valve; Heater Control Valve; Valve, Heater Water Temperature Control

Buick Control Valve Part Number: 25506256
Product Specifications- Other Name: Valve; Heater Control Valve; Valve, Heater Water Temperature Control
Buick Control Valve Part Number: 14032034
Product Specifications- Other Name: Valve Assembly-Heater Water Flow Control; Heater Control Valve
Buick Control Valve Part Number: 10258505
Product Specifications- Other Name: Valve Assembly-Heater Water Flow Control; Heater Control Valve; Valve, Heater Coolant Flow
Buick Control Valve Part Number: 25528308
Product Specifications- Other Name: Valve Assembly; Heater Control Valve; Valve, Heater Coolant Flow
Buick Control Valve Part Number: 25506254
Product Specifications- Other Name: Valve; Heater Control Valve; Valve, Heater Water Temperature Control

Buick Control Valve Part Number: 10124601
Product Specifications- Other Name: Valve Assembly-Heater Water Flow Control; Heater Control Valve; Valve, Heater Water Temperature Control; Valve, Heater Coolant Flow
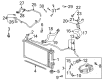
Buick Heater Control Valve
Choose OEM Heater Control Valve, you're making the optimal decision for superior quality and perfect performance. You can feel confident because each component goes through stringent quality checks. Every part is carefully built to comply with Buick's factory specifications. You'll enjoy a smooth, worry-free installation that fits just right. At ChevyPartsGiant.com, you'll find it easy to get top-quality OEM Buick Heater Control Valve. You can shop at highly competitive prices and protect your budget. All our genuine Buick parts include a dependable manufacturer's warranty. You'll also appreciate our straightforward return policy and swift delivery services for extra convenience.
The Buick Heater Control Valve will take the engine coolant into the heater core where passengers can use the system to dial in warm air fast so that their ride is comfortable even in winter. Being one of the old automakers, Buick was established in 1903, and it is characterized by the combination of traditions and innovative approaches that make every day driving enjoyable. Rough pavement is absorbed by smooth suspensions and the road noise does not infiltrate conversation due to QuietTuning. The interior is adorned with soft seats and driver-friendly dashboards that combine vintage chrome elements and current touch screens to make the room cozy to both teenagers and grandparents. The brand changes its appearance on a regular basis but maintains elegant lines that are easy to recognize. In 2022 the impressive Wildcat EV concept heralded an all electric future that continued to promise the smooth ride that people have their trust in. Buick has gained a reputation of reliability, style and relaxing comfort over decades making the long travel to become a comfortable journey. It is easy to replace the Heater Control Valve at home provided you remain well organised and patient. Park on flat ground, turn off the engine and allow everything to cool down until the radiator cap can be opened with no steam. Follow the two heater hoses, to the little valve, tape them in place, clamp and disconnect them, taking care to have all the draining coolant in a clean pan. Put mounting screws or clips in place, assemble the new valve with its flow direction the same as the coolant flow, reconnect hoses, tighten clamps, refill the radiator, bleed trapped air, charge start engine, check for leaks, ensure constant cabin temperature, and recheck clamps after a brief test drive.
Related Buick Parts
 Buick Blend Door Actuator
 Buick Blower Motor
 Buick Heater Core
 Buick A/C Accumulator
 Buick A/C Compressor
 Buick A/C Condenser
 Buick A/C Hose
 Buick A/C Switch
 Buick Ambient Temperature Sensor
 Buick Blower Control Switches
 Buick Evaporator
 Buick HVAC Control Module