ChevyParts
My Garage
My Account
Cart
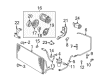
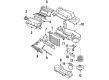
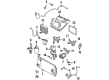
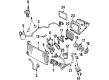
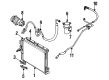
OEM Buick A/C Hose
Air Conditioning Hose- Select Vehicle by Model
- Select Vehicle by VIN
Select Vehicle by Model
orMake
Model
Year
Select Vehicle by VIN
For the most accurate results, select vehicle by your VIN (Vehicle Identification Number).
247 A/C Hoses found


Buick A/C Hose Part Number: 10308247
$55.99 MSRP: $105.14You Save: $49.15 (47%)Product Specifications- Other Name: Evaporator Outlet Hose; A/C Refrigerant Liquid Hose; A/C Line; Accumulator Tube; Hose; Hose, A/C Refrigerant (Metal And Rubber Sections)


Buick A/C Hose Part Number: 10170102
$15.96 MSRP: $105.92You Save: $89.96 (85%)Ships in 1-2 Business DaysProduct Specifications- Other Name: Hose, Air Conditioner Compressor; A/C Refrigerant Liquid Hose; A/C Hoses; Hose; Fitting, A/C Compressor
- Replaces: 10146962

Buick A/C Hoses Part Number: 10226168
$62.42 MSRP: $116.46You Save: $54.04 (47%)Ships in 1-2 Business DaysProduct Specifications- Other Name: Hose, Air Conditioner Compressor; A/C Refrigerant Liquid Hose; A/C Hose; Hose & Tube Assembly; Hose, A/C Compressor

Buick A/C Hose Part Number: 10259130
$24.37 MSRP: $122.48You Save: $98.11 (81%)Ships in 1-2 Business DaysProduct Specifications- Other Name: Hose, Air Conditioner Compressor; A/C Refrigerant Liquid Hose; A/C Hoses; Hose & Tube Assembly; Hose, A/C Compressor

Buick Discharge Hose Part Number: 22587823
$22.71 MSRP: $123.34You Save: $100.63 (82%)Ships in 1-2 Business DaysProduct Specifications- Other Name: Hose, Air Conditioner Compressor; A/C Refrigerant Liquid Hose; A/C Hose; Pressure Hose; Hose & Tube Assembly; Hose, A/C Compressor
Buick A/C Hose Part Number: 19213213
$29.67 MSRP: $144.76You Save: $115.09 (80%)Ships in 1-2 Business DaysProduct Specifications- Other Name: Hose, Air Conditioner Compressor; A/C Refrigerant Liquid Hose; Compressor Hose; Discharge Hose; A/C Hoses; Pressure Hose; Hose & Tube Assembly; Hose, A/C Compressor
- Replaces: 22604170, 22594631, 22651088, 22645977


Buick A/C Hose Part Number: 10190636
$52.47 MSRP: $93.70You Save: $41.23 (44%)Product Specifications- Other Name: Tube Assembly-A/C Evaporator; A/C Refrigerant Liquid Hose; A/C Line; A/C Tube; Evaporator Tube; Tube, A/C Refrigerant (All Metal)

Buick Pressure Hose Part Number: 84074315
$112.64 MSRP: $202.05You Save: $89.41 (45%)Product Specifications- Other Name: Hose, Air Conditioner Refrigerant (Metal And Rubber Sections); A/C Refrigerant Liquid Hose; A/C Hose; Liquid Line; Liquid Hose; Hose, A/C Refrigerant (Metal And Rubber Sections)
- Replaces: 23264954, 13315760

Buick Blower Motor Tube Part Number: 52487082
Product Specifications- Other Name: Tube, Air Conditioner Blower Motor Cooling; A/C Refrigerant Liquid Hose; A/C Hose; Tube; Hose; Tube, A/C Blower Motor Cooling; Tube, Heater Motor Cooling

Buick A/C Hoses Part Number: 10031048
Product Specifications- Other Name: Tube Assembly-A/C Evaporator; A/C Accumulator Tube Outlet; A/C Refrigerant Liquid Hose; A/C Hose; A/C Tube; Tube; Tube, A/C Refrigerant (All Metal)
Buick A/C Tube Part Number: 10053984
Product Specifications- Other Name: Tube Assembly-A/C Evaporator; A/C Accumulator Tube Outlet; A/C Refrigerant Liquid Hose; A/C Hose; Tube; Tube, A/C Refrigerant (All Metal)
Buick A/C Tube Part Number: 10243268
Product Specifications- Other Name: Tube Assembly-A/C Evaporator; A/C Accumulator Tube Outlet; A/C Refrigerant Liquid Hose; A/C Hose; Tube; Tube, A/C Refrigerant (All Metal)

Buick A/C Tube Part Number: 10146915
Product Specifications- Other Name: Tube Assembly-A/C Evaporator; A/C Accumulator Tube Outlet; A/C Refrigerant Liquid Hose; A/C Hose; Tube; Tube, A/C Refrigerant (All Metal)
Buick A/C Hoses Part Number: 10188052
Product Specifications- Other Name: Tube, Air Conditioner Refrigerant (All Metal); A/C Accumulator Tube Outlet; A/C Refrigerant Liquid Hose; A/C Hose; A/C Tube; Tube; Tube, A/C Refrigerant (All Metal)

Buick A/C Hose Part Number: 10406565
Product Specifications- Other Name: Evaporator Outlet Hose; A/C Refrigerant Liquid Hose; Accumulator Tube; Hose; Hose, A/C Refrigerant (Metal And Rubber Sections)
- Replaces: 10292334

Buick A/C Hose Part Number: 10223050
Product Specifications- Other Name: Tube Assembly-A/C Accumulator; A/C Refrigerant Liquid Hose; A/C Tube; Evaporator Tube; Line; Tube, A/C Refrigerant (All Metal)
Buick A/C Hose Part Number: 25614064
Product Specifications- Other Name: Hose, Air Conditioner Compressor; A/C Refrigerant Liquid Hose; A/C Hoses; Hose, A/C Compressor

Buick Pressure Hose Part Number: 22587824
Product Specifications- Other Name: Hose, Air Conditioner Compressor; A/C Refrigerant Liquid Hose; A/C Hose; Hose & Tube Assembly; Hose, A/C Compressor

Buick A/C Hose Part Number: 22640033
Product Specifications- Other Name: Hose, Air Conditioner Compressor; A/C Refrigerant Liquid Hose; Compressor Hose; Discharge Hose; A/C Hoses; Pressure Hose; Hose & Tube Assembly; Hose, A/C Compressor
- Replaces: 22645976

Buick Compressor Hose Part Number: 10443399
$82.41 MSRP: $147.16You Save: $64.75 (44%)Product Specifications- Other Name: Hose, Air Conditioner Compressor; A/C Refrigerant Liquid Hose; A/C Hose; Hose & Tube Assembly; Hose, A/C Compressor
- Replaces: 10291583, 10403405
| Page 1 of 13 |Next >
1-20 of 247 Results
Buick A/C Hose
Want to cut long-term maintenance and repair costs? Choose OEM A/C Hose. Those parts deliver top durability you can trust. On our site, you'll find a huge catalog of genuine Buick parts. Prices are unbeatable, so you can keep more in your pocket. Every OEM Buick A/C Hose includes a manufacturer's warranty. You can also get an easy return policy that keeps buying risk free. Fast delivery, get your car on the road quickly. It's simple to search, compare, and order. Stop guessing about quality or fit. Order today and save with parts that last.
Buick A/C Hose Parts Questions & Experts Answers
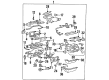
- Q: How to Replace an A/C Hose for Suction Hose on Buick Enclave?A:Start by recovering all refrigerant before you raise and support the vehicle for replacement of the suction hose. The first step for suction hose replacement involves removing both the right front wheel house liner and the right front engine splash shield. The first step involves removing the suction hose bracket nut followed by the bracket while the suction hose/pipe bolt leads to disconnecting the suction hose/pipe from the A/C Compressor. Unfasten the txv tube nut from the suction hose/pipe and cut the hose/pipe loose from the txv tube before totally disconnecting the suction hose/pipe components. Replace all extracted o-rings from the suction hose/pipe with fresh components before attaching them to the suction hose/pipe. After installing the suction hose/pipe onto the txv tube you should fasten the txv nut with a bolt at 9 n.m (80 lb in). The suction hose/pipe should be attached to the A/C Compressor before applying the suction hose/pipe bolt which must be tightened to 9 n.m (80 lb in). Reattach the suction hose/pipe bracket with its nut before replacing both the right front engine splash shield and right front wheel house liner. After lowering the vehicle use proper equipment to evacuate and recharge the refrigerant system. The halogen leak detector (J 39400-A) should perform a leak test to inspect the fittings of this component.
- Q: How to replace the A/C Hose Assembly on Buick LaCrosse?A:The first step when replacing the compressor hose assembly requires recovering all refrigerant. The first step should be removal of the air cleaner assembly followed by disconnection of the A/C Compressor hose from the condenser after unscrewing the hose nut from the condenser. The installation begins by taking the A/C Compressor hose block between the evaporator tube and removing its hose nut and continuing to detach the hose from the tube. Start the hose assembly installation by taking off the A/C Compressor hose nut from the compressor before removing the hose from the compressor body. Discard all sealing washers. New sealing washers should be installed on the A/C Compressor hose assembly before attaching the hose to the A/C Compressor using the A/C Compressor hose nut and tightening it to 27 n.m (20 lb ft). The A/C Compressor hose assembly requires new sealing washers before connecting the A/C Compressor hose to the evaporator tube while tightening the evaporator tube nut to 16 n.m (12 lb ft). Join the condenser by attaching the A/C Compressor hose through its nut before tightening it to 16 n.m (12 lb ft). After completing the task install the air cleaner assembly and carry out an a/c system evacuation followed by recharging. Finally test for leaks using the halogen leak detector (J 39400-A).
- Q: How to replace the A/C Hose Assembly on Buick Regal?A:Staring the replacement of the A/C Compressor hose assembly requires the initial step to recover refrigerant. You must begin by taking off the right front fender upper diagonal brace next to removing the air cleaner assembly. Begin by disconnecting the A/C Compressor hose from the condenser after you have taken off the A/C Compressor hose nut . The A/C Compressor hose requires two nut removals to disconnect the hose from both its condenser and accumulator endpoints. Raise the vehicle until stable and support it while you eliminate the lower air deflector. Then discard used o-rings and sealing washers when you remove the nut from the A/C Compressor hose assembly at the A/C Compressor and separate the hose assembly. Mineral base 525 viscosity refrigerant oil serves to lubricate new o-ring seals before installation of the seal and sealing washers onto the A/C Compressor hose assembly. The hose assembly attachment must secure to the A/C Compressor rear end using the hose assembly nut until it reaches 33 n.m (24 lb ft). Accomplish the lower air deflector reinstallation before you lower the vehicle. Then attach the A/C Compressor hose nut at the accumulator and tighten it to 16 n.m (12 lb ft). Connect the A/C Compressor hose and nut to the condenser using a torque of 16 n.m (12 lb ft) and follow the same procedure for attaching the hose and nut to the condenser tube leading from the condenser to the accumulator. To complete the repair install the right front fender upper diagonal brace followed by the air cleaner assembly while the a/c system requires evacuation and recharging before testing for fittings leaks through the halogen leak detector (J 39400-A).


Related Buick Parts
 Buick Blend Door Actuator
 Buick Blower Motor
 Buick Blower Motor Resistor
 Buick A/C Clutch
 Buick A/C Expansion Valve
 Buick A/C Idler Pulley
 Buick A/C Orifice Tube
 Buick A/C Service Cap
 Buick A/C Switch
 Buick Blower Control Switches
 Buick Evaporator
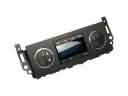 Buick HVAC Control Module