ChevyParts
My Garage
My Account
Cart
OEM Buick Heater Core
HVAC Heater Core- Select Vehicle by Model
- Select Vehicle by VIN
Select Vehicle by Model
orMake
Model
Year
Select Vehicle by VIN
For the most accurate results, select vehicle by your VIN (Vehicle Identification Number).
41 Heater Cores found


Buick Heater Core Part Number: 3042073
$48.39 MSRP: $90.88You Save: $42.49 (47%)Ships in 1-2 Business DaysProduct Specifications- Other Name: Core-Heater
- Replaced by: 52479875

Buick Heater Core Part Number: 84206592
$89.49 MSRP: $183.91You Save: $94.42 (52%)Ships in 1-2 Business DaysProduct Specifications- Other Name: Core Kit-Heater; Evaporator Core
- Replaced by: 84760093


Buick Heater Core Part Number: 52498633
Product Specifications- Other Name: Core, Heater; HVAC Heater Core; Core, Heater Core


Buick Heater Core Part Number: 88956887
Product Specifications- Other Name: Core, Heater Core; HVAC Heater Core
- Replaces: 52465600, 52481498


Buick Heater Core Part Number: 52482185
Product Specifications- Other Name: Core, Heater; HVAC Heater Core; Core, Heater Core

Buick Heater Core Part Number: 19131980
Product Specifications- Other Name: Core, Heater Core; Core
- Replaces: 03037689, 52479872, 3037689

Buick Heater Core Part Number: 15925712
Product Specifications- Other Name: Heater, Heater; HVAC Heater Core; Heater, Auxiliary Heater; Heater, Heater Core
- Replaces: 10364909

Buick Heater Core Part Number: 19131982
Product Specifications- Other Name: Core, Heater Core; HVAC Heater Core; Core; Case
- Replaces: 03040837, 52479874, 3040837

Buick Heater Core Part Number: 19131979
Product Specifications- Other Name: Core, Heater Core; HVAC Heater Core; Core
- Replaces: 03035420, 3035420, 52479871

Buick Heater Core Part Number: 3035420
Product Specifications- Other Name: Core & Fitting; HVAC Heater Core
- Replaced by: 19131979

Buick Heater Core Part Number: 52479869
Product Specifications- Other Name: Core, Heater; Core; Core, Heater Core
- Replaces: 3036422, 03036422

Buick Heater Core Part Number: 52467073
Product Specifications- Other Name: Core, Heater; Core; Core, Heater Core

Buick Heater Core Part Number: 19131975
Product Specifications- Other Name: Core, Heater Core; Core
- Replaces: 03037852, 3037852, 52479867
Buick Heater Core Part Number: 19132003
Product Specifications- Other Name: Core, Heater Core; Core
- Replaces: 03040690, 52484067, 3040690

Buick Heater Core Part Number: 19131991
Product Specifications- Other Name: Core, Heater Core; Core
- Replaces: 03092683, 52479884, 3092683
Buick Core Part Number: 3047169
Product Specifications- Other Name: Core, Heater; Heater Core; Core, Heater Core


Buick Heater Core Part Number: 19131984
Product Specifications- Other Name: Core, Heater Core; Core
- Replaces: 52479876

Buick Heater Core Part Number: 19132004
Product Specifications- Other Name: Core, Heater Core; Core
- Replaces: 03053452, 52484069, 3053452

Buick Heater Core Part Number: 52471442
Product Specifications- Other Name: Core, Heater; Core, Heater Core


Buick Heater Core Part Number: 52487191
Product Specifications- Other Name: Core, Heater Core; Core
- Replaces: 03091147, 3091147
| Page 1 of 3 |Next >
1-20 of 41 Results
Buick Heater Core
Choose OEM Heater Core, you're making the optimal decision for superior quality and perfect performance. You can feel confident because each component goes through stringent quality checks. Every part is carefully built to comply with Buick's factory specifications. You'll enjoy a smooth, worry-free installation that fits just right. At ChevyPartsGiant.com, you'll find it easy to get top-quality OEM Buick Heater Core. You can shop at highly competitive prices and protect your budget. All our genuine Buick parts include a dependable manufacturer's warranty. You'll also appreciate our straightforward return policy and swift delivery services for extra convenience.
Buick Heater Core Parts and Q&A
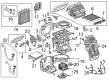
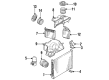
- Q: How to Service and Repair the Heater Core on Buick LaCrosse?A:One must drain the coolant as the first step of heater core replacement. The Hose Clamp Pliers (J 38185) should be used to set aside clamps of the heater hose inlet and outlet before disconnecting the hookup between the heater core and hoses. The first step involves removing RH and LH instrument panel closeout/insulator panels together with floor carpet and communication interface module. Use Hose Clamp Pliers (J 38185) to transition the floor air outlet duct away from the floor reinforcement holes before cutting it free from the heater core outlet cover. To proceed you should remove the heater core outlet cover screws with heat stakes using a small chisel before taking off the outlet cover from the HVAC module assembly. First prepare the heater core cover by removing screws and heat stakes with a small chisel then take off the cover from the HVAC module assembly. Move the heater core as well as its foam seal outside the HVAC module assembly. The installation process requires addition of a new heater core foam seal to the HVAC module assembly before heater core installation. Install the heater core cover by drilling the dimples around its heat stakes using a 5.5 mm (7/32 in) drill bit and then tighten its screws to 1.5 N.m (13 lb in). Reuse the procedure to install the heater core outlet cover screws by tightening them to 1.5 N.m torque (13 lb in.). The rear air duct should be reattached from the heater core outlet to the floor reinforcement holes where it will be installed. The technician reattaches the communication interface module followed by the floor carpet and insulator panels for both sides of the instrument panel. You should link heater core inlet and outlet hoses and tighten their clamps with Hose Clamp Pliers (J 38185) before performing coolant refill.
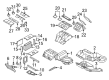
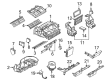
- Q: How to Address Issues with the Heater Core on Buick Regal?A:The first step to replace a Heater Core involves taking off the fuel injector sight shield along with draining coolant from the system. You need to detach both heater hoses from the Heater Core while also removing the lower floor console when present and then walking down the lh and rh instrument panel insulators. The outlet cover must be moved downward and to the rear from the duct assembly before you can remove its screws and the outlet assembly. You will now detach the Heater Core cover by unfastening its screws while removing the cover along with seats (1, 2, 3) and Heater Core outer seal. First remove the Heater Core line clamp screw followed by its retaining clamp before moving on to the Heater Core pipe retainer clamp screw . Remove the Heater Core from its position inside the hvac lower case after discarding all seals consisting of the lower seal and center seal and upper seal and side seals. Insert the new side seals and upper seal along with the center seal and lower seal onto the hvac case before inserting the Heater Core. The installation requires a screw to fasten the Heater Core line clamp at 1.5 n.m (13 lb in) while the Heater Core mounting clip requires another screw with a proper 1.5 n.m (13 lb in) torque setting. Position the Heater Core outer seal to the Heater Core and afterward install new seals (1, 2, 3) onto the Heater Core cover. Secure the cover with its screws to 1.5 n.m (13 lb in) torque specification. Place both Heater Core outlet cover screws and tighten them to 1.5 n.m (13 lb in). Completing the service requires lower floor console installation if present together with lh and rh instrument panel insulators reinstallation followed by connecting the heater hoses to the Heater Core before refilling the coolant system and installing the fuel injector sight shield.


Related Buick Parts
 Buick Blower Motor Resistor
 Buick Cabin Air Filter
 Buick A/C Clutch
 Buick A/C Compressor
 Buick A/C Compressor Cut-Out Switches
 Buick A/C Expansion Valve
 Buick A/C Hose
 Buick A/C Service Cap
 Buick A/C Switch
 Buick Ambient Temperature Sensor
 Buick Evaporator
 Buick Heater Control Valve