ChevyParts
My Garage
My Account
Cart
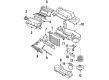
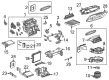
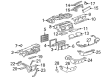
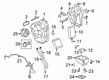
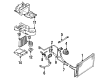
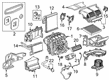
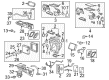
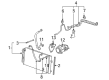
OEM Buick A/C Accumulator
Accumulator- Select Vehicle by Model
- Select Vehicle by VIN
Select Vehicle by Model
orMake
Model
Year
Select Vehicle by VIN
For the most accurate results, select vehicle by your VIN (Vehicle Identification Number).
47 A/C Accumulators found


Buick Dehydrator Part Number: 13277638
$34.95 MSRP: $65.65You Save: $30.70 (47%)Ships in 1-2 Business DaysProduct Specifications- Other Name: Receiver & Dehydrato, Air Conditioner Refrigerant; Drier Desiccant Element; A/C Receiver Drier; A/C Accumulator; Drier; Receiver & Dehydrato, A/C Refrigerant


Buick Dehydrator Part Number: 95374678
$34.52 MSRP: $61.64You Save: $27.12 (44%)Ships in 1-3 Business DaysProduct Specifications- Other Name: Receiver & Dehydrato, Air Conditioner Refrigerant; Drier Desiccant Element; A/C Receiver Drier; A/C Accumulator; Drier; Receiver & Dehydrato, A/C Refrigerant
- Replaces: 95018147


Buick Dehydrator Part Number: 2724802
$24.37 MSRP: $45.48You Save: $21.11 (47%)Product Specifications- Other Name: Accumulator Dehydrator; Drier Desiccant Element; A/C Receiver Drier; A/C Accumulator; Drier; Accumulator; Accumulator, A/C Refrigerant


Buick Dehydrator Part Number: 88959210
$8.55 MSRP: $45.96You Save: $37.41 (82%)Ships in 1-2 Business DaysProduct Specifications- Other Name: Receiver & Dehydrator Assembly, A/C; Drier Desiccant Element; A/C Receiver Drier; A/C Accumulator; Drier; Receiver & Dehydrato, A/C Refrigerant
- Replaces: 02724879, 2724879


Buick Dehydrator Part Number: 2724828
$4.73 MSRP: $71.34You Save: $66.61 (94%)Ships in 1-2 Business DaysProduct Specifications- Other Name: Accumulator Assembly, A/C; Drier Desiccant Element; A/C Receiver Drier; A/C Accumulator; Drier; Accumulator, A/C Refrigerant

Buick Drier Dessicant Bag Part Number: 42589939
$32.38 MSRP: $57.82You Save: $25.44 (44%)Ships in 1-3 Business DaysProduct Specifications- Other Name: Receiver & Dehydrato, Air Conditioner Refrigerant; Drier Desiccant Element; A/C Receiver Drier; A/C Accumulator; Dehydrator; Receiver & Dehydrato, A/C Refrigerant

Buick Dehydrator Part Number: 88968512
$28.60 MSRP: $51.08You Save: $22.48 (45%)Ships in 1-2 Business DaysProduct Specifications- Other Name: Accumulator, Air Conditioner Refrigerant; Drier; Accumulator
- Replaced by: 02724900

Buick Dehydrator Part Number: 84473270
$77.97 MSRP: $160.24You Save: $82.27 (52%)Product Specifications- Other Name: Receiver & Dehydrato, Air Conditioner Refrigerant; Drier Desiccant Element; A/C Receiver Drier; A/C Accumulator; Drier; Receiver & Dehydrato, A/C Refrigerant
- Replaced by: 86515463

Buick Dehydrator Part Number: 10327446
$21.67 MSRP: $40.70You Save: $19.03 (47%)Ships in 1-2 Business DaysProduct Specifications- Other Name: Receiver & Dehydrator, A/C Refrigerant Drier; Desiccant Element; Accumulator; Drier; Receiver & Dehydrato, A/C Refrigerant

Buick Dehydrator Part Number: 88968523
$24.73 MSRP: $44.16You Save: $19.43 (44%)Ships in 1-2 Business DaysProduct Specifications- Other Name: Accumulator, Air Conditioner Refrigerant; Drier
- Replaced by: 02724930

Buick Drier Part Number: 2724276
$27.68 MSRP: $51.98You Save: $24.30 (47%)Ships in 1-3 Business DaysProduct Specifications- Other Name: Accumulator; Drier Desiccant Element; A/C Receiver Drier; A/C Accumulator
- Replaced by: 2724803

Buick Drier Dessicant Bag Part Number: 84377853
$105.00 MSRP: $215.75You Save: $110.75 (52%)Ships in 1-2 Business DaysProduct Specifications- Other Name: Receiver & Dehydrato, Air Conditioner Refrigerant; Drier Desiccant Element; A/C Receiver Drier; A/C Accumulator; Dehydrator; Drier; Receiver & Dehydrato, A/C Refrigerant
- Replaced by: 42858352
Buick Dehydrator Part Number: 2724683
$27.78 MSRP: $50.28You Save: $22.50 (45%)Ships in 1-2 Business DaysProduct Specifications- Other Name: Accumulator, A/C; Drier Desiccant Element; A/C Receiver Drier; A/C Accumulator; Drier; Accumulator, A/C Refrigerant
Buick Accumulator Part Number: 2724901
$26.29 MSRP: $46.94You Save: $20.65 (44%)Ships in 1-2 Business DaysProduct Specifications- Other Name: Accumulator Assembly-A/C; A/C Receiver Drier; A/C Accumulator
- Replaced by: 02724897

Buick Dehydrator Part Number: 84690764
$31.59 MSRP: $59.31You Save: $27.72 (47%)Ships in 1-3 Business DaysProduct Specifications- Other Name: Receiver & Dehydrato, Air Conditioner Refrigerant; Drier Desiccant Element; A/C Receiver Drier; A/C Accumulator; Drier; Receiver & Dehydrato, A/C Refrigerant
- Replaces: 23134223


Buick Dehydrator Part Number: 10316617
Product Specifications- Other Name: Receiver & Dehydrator, A/C Refrigerant Drier; Desiccant Element; Accumulator; Receiver; Drier; Receiver & Dehydrato, A/C Refrigerant
- Replaces: 10436833


Buick Dehydrator Part Number: 15951315
Product Specifications- Other Name: Receiver & Dehydrator, A/C Refrigerant Drier; Desiccant Element; Accumulator; Drier; Receiver & Dehydrato, A/C Refrigerant
Buick Dehydrator Part Number: 1132773
Product Specifications- Other Name: Accumulator; Drier Desiccant Element; A/C Receiver Drier; A/C Accumulator; Drier; Accumulator, A/C Refrigerant
Buick Dehydrator Part Number: 2724806
Product Specifications- Other Name: Accumulator; Drier Desiccant Element; A/C Receiver Drier; A/C Accumulator; Drier; Accumulator, A/C Refrigerant

Buick Filter Part Number: 21999762
Product Specifications- Other Name: Filter, Air Conditioner Compressor; A/C Receiver Drier; Cabin Air Filter; A/C Accumulator; Filter, A/C Refrigerant Lines; Filter, A/C Compressor
| Page 1 of 3 |Next >
1-20 of 47 Results
Buick A/C Accumulator
Choose OEM A/C Accumulator, you're making the optimal decision for superior quality and perfect performance. You can feel confident because each component goes through stringent quality checks. Every part is carefully built to comply with Buick's factory specifications. You'll enjoy a smooth, worry-free installation that fits just right. At ChevyPartsGiant.com, you'll find it easy to get top-quality OEM Buick A/C Accumulator. You can shop at highly competitive prices and protect your budget. All our genuine Buick parts include a dependable manufacturer's warranty. You'll also appreciate our straightforward return policy and swift delivery services for extra convenience.
Buick A/C Accumulator Parts and Q&A
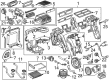
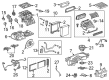
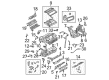
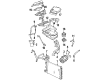
- Q: How to replace the A/C Accumulator in the HVAC system on Buick LeSabre?A:In order to replace the accumulator in the hvac system, first, use the a/c refrigerant recovery, recycling and recharging (ACR4) system (J 39500-8) to retrieve refrigerant from an a/c system. Remove the nut and cable of the positive Battery Cable from under the hood fuse block. Remove the negative Battery Cable. Then disconnect the hose of the evaporator from the cover of the accumulator and park it aside, then remove the cover of the accumulator. Then, pull the a/c compressor hose and the evaporator hose from the accumulator, and finally, pull the accumulator out of the housing. For installation, it is recommended to fill the new accumulator with the right quantity of refrigerant oil, then fitting it into the housing. Check the seal washers for damage before reinstalling the a / c lines and hoses and replace any damaged seals as needed. Mount the evaporator hose and nut to the accumulator and tighten the nut with 20 n.m (15 lb ft) and a/c compressor hose and nut with 20 n.m (15 lb ft). Connect the accumulator cover, and also the hose of the evaporator into retainer. Connect a jumper cable to another, properly charged and running automobile (other color) positive (red) one to the positive (red) battery post, jumper cable negative (black) one to battery post of the bad vehicle. Start the working automobile by turning the key to on without starting. The bad automobile should start and then be driven to a shop for diagnostics. Remove the jump cables after the car starts. 20-30 min will give the battery a 90% boost. Lastly, add charge to e-c system and check for leaks with electronic halogen leak detector (J 39400-A).
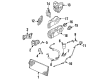
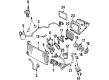
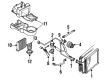
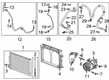
- Q: How to install the A/C Accumulator between the condenser and evaporator on the A/C evaporator tube on Buick Regal?A:Before installing the A/C Accumulator which has ac p/n 15-1696 between condenser and Evaporator on the a/c Evaporator tube it is necessary to perform a leak test with the halogen leak detector (J 39400-A) on each fitting after completion. Start by extracting the refrigerant before removing the Evaporator tube from the motor vehicle to proceed. Use a tubing cutter to cut the Evaporator tube at 110 mm (4.3 in) distance from the condenser block fitting end while making sure metal shavings stay outside of the tube. Cut the tube again at 60 mm (2.4 in) while properly removing all burrs from the cut surfaces. When preparing to fit ferrules to the Evaporator tube remove the o-ring that was inside the A/C Accumulator. Fit one flare nut along with one ferrule to the Evaporator tube so the tapered end faces the flare nut before fully seating the A/C Accumulator to the tube by directing it towards the Evaporator with proper tightening to 15 n.m (11 lb ft). Seal the second half of the Evaporator tube by applying torque to both parts just like the first side. Reinstall the accumulator after the flare nuts are loosened while properly aligning the arrow marker towards the Evaporator and tightening both flare nuts to 15 n.m (11 lb ft). Installation of the Evaporator tube to the condenser tube must be done before you remove the air cleaner assembly and execute evacuation and recharging of the a/c system.


Related Buick Parts
 Buick Blend Door Actuator
 Buick Blower Motor
 Buick Cabin Air Filter
 Buick A/C Expansion Valve
 Buick A/C Hose
 Buick A/C Idler Pulley
 Buick A/C Service Cap
 Buick A/C Switch
 Buick Air Temperature Sensor
 Buick Blower Control Switches
 Buick HVAC Pressure Switch
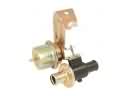 Buick Heater Control Valve