ChevyParts
My Garage
My Account
Cart
OEM Buick Rainier Pinion Bearing
Transmission Pinion Bearing- Select Vehicle by Model
- Select Vehicle by VIN
Select Vehicle by Model
orMake
Model
Year
Select Vehicle by VIN
For the most accurate results, select vehicle by your VIN (Vehicle Identification Number).
7 Pinion Bearings found


Buick Rainier Side Bearings Part Number: 11505123
$57.30 MSRP: $169.58You Save: $112.28 (67%)Ships in 1-2 Business Days

Buick Rainier Pinion Bearings Part Number: 9439879
$35.47 MSRP: $105.01You Save: $69.54 (67%)
Buick Rainier Pinion Bearings Part Number: 9417784
$24.86 MSRP: $68.16You Save: $43.30 (64%)Ships in 1-2 Business Days


Buick Rainier Pinion Bearings Part Number: 9413427
$56.84 MSRP: $109.76You Save: $52.92 (49%)Ships in 1-2 Business Days

Buick Rainier Side Bearings, Front Part Number: 26046759
$36.01 MSRP: $106.64You Save: $70.63 (67%)Ships in 1-2 Business Days

Buick Rainier Side Bearings Part Number: 25824250
$73.65 MSRP: $142.94You Save: $69.29 (49%)Ships in 1-2 Business Days


Buick Rainier Pinion Bearings Part Number: 23243839
$72.64 MSRP: $142.22You Save: $69.58 (49%)Ships in 1-2 Business Days
Buick Rainier Pinion Bearing
Want to cut long-term maintenance and repair costs? Choose OEM Pinion Bearing. Those parts deliver top durability you can trust. On our site, you'll find a huge catalog of genuine Buick Rainier parts. Prices are unbeatable, so you can keep more in your pocket. Every OEM Buick Rainier Pinion Bearing includes a manufacturer's warranty. You can also get an easy return policy that keeps buying risk free. Fast delivery, get your car on the road quickly. It's simple to search, compare, and order. Stop guessing about quality or fit. Order today and save with parts that last.
Buick Rainier Pinion Bearing Parts Questions & Experts Answers
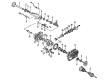
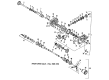
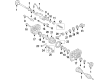
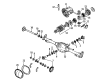
- Q: How to replace the drive pinion bearings on Buick Rainier?A:The replacement of drive pinion bearings starts with vehicle lifting followed by Differential and drive pinion extraction from the axle. You should use split-plate bearing puller (J 22912-01) to unpack the bearing from the pinion before you delete the shim. A hammer and brass drift should extract the outer Pinion Bearing cup from the axle housing in an even fashion before removing the inner Pinion Bearing cup. The Pinion Bearing installation requires the outer bearing race installer (J 7817) for 8.0 inch axles while the rear Pinion Bearing race installer (J 8611-01) works with 8.6 inch axles and both tools must be used with the universal driver handle (J 8092). Apply the rear Pinion Bearing race installer (J 8608) together with universal driver handle (J 8092) to install the inner bearing cup in place. The operator needs to select the needed shim thickness which they will position between the inner Pinion Bearing and gear shoulder. Use the pinion cone and side bearing installer (J 24433) with proper technique to install the inner Pinion Bearing by pressing it until the cone seats on the pinion shim. Use a new collapsible spacer followed by application of appropriate axle lubricant to the pinion bearings. After axial positioning of the pinion slot inside the housing you must place the outer Pinion Bearing on it. The 8.0 inch pinion oil seal installation requires use of the pinion oil seal installer (J 33782) while the 8.6 inch installation demands the extension housing oil pump/seal installer (J 38694). Once the new seal is in position, apply gm p/n 12346004 (Canadian P/N 10953480) as sealant to the pinion yoke splines. Guide the removal marks while pressing the pinion yoke onto its pinion shaft with a soft-faced hammer until several threads become visible through the yoke. Screw the washer onto the newly installed pinion nut followed by the flange and pulley holding tool (J 8614-01) fastened to the pinion yoke. The technician should tighten the pinion nut with the holding tool in position before rotating the pinion while it sits against the bearing for complete seating. An inch-pound torque wrench should measure the rotating torque at 1.0 - 2.8 nm (10 - 25 inch lbs.) for used bearings while new bearings require 1.7 - 3.4 nm (15 - 30 inch lbs.) torque measurement. The technician must perform additional small nut rotations until the torque measurement reaches its intended specifications. When the specific torque value is reached you should turn the pinion multiple times to verify proper bearing seating before another torque measurement and potential adjustment. Reinstall the Differential followed by brake rotors, Brake Calipers, tire and wheel assemblies before filling the axle with the correct lubricant when lowering the vehicle.


