ChevyParts
My Garage
My Account
Cart
OEM Cadillac Catera Coil Springs
Strut Spring- Select Vehicle by Model
- Select Vehicle by VIN
Select Vehicle by Model
orMake
Model
Year
Select Vehicle by VIN
For the most accurate results, select vehicle by your VIN (Vehicle Identification Number).
3 Coil Springs found


Cadillac Catera Coil Spring Part Number: 90542359


Cadillac Catera Coil Spring Part Number: 9192921
Cadillac Catera Coil Spring Part Number: 90295666
Cadillac Catera Coil Springs
Want to cut long-term maintenance and repair costs? Choose OEM Coil Springs. Those parts deliver top durability you can trust. On our site, you'll find a huge catalog of genuine Cadillac Catera parts. Prices are unbeatable, so you can keep more in your pocket. Every OEM Cadillac Catera Coil Springs includes a manufacturer's warranty. You can also get an easy return policy that keeps buying risk free. Fast delivery, get your car on the road quickly. It's simple to search, compare, and order. Stop guessing about quality or fit. Order today and save with parts that last.
Coil springs are essential parts that play a major role in improving the dependability and dynamism of the Cadillac Catera, a car model sold by Cadillac from 1996 to 2001. These coil springs have the role of supporting the weight of the vehicle and at the same time to dampen the vibration from the roads, so that the passengers can have a smooth ride. When the coil springs are worn out, the drivers may develop some complications such as saggings and strange tire wearing issues, this is why it is extremely necessary to maintain these critical parts of a vehicle. A Cadillac Catera uses linear rate, progressive and dual rate coil springs all of which have distinct recipes to suit a variety of driving traditions. The Cadillac Catera vehicle is always associated with rear wheels drive and has coil springs that are relatively strong and help to makes the vehicle even more efficient and safe for any driver that wants to feel the comfort of Cadillac vehicle while driving. In the meantime, when it comes to adjustable coilovers, as well as height-adjustable springs, these are present, thus giving even more uniqueness to the Cadillac Catera in the described automotive niche. Powering the Caddy Catera is a V6 engine and has all the luxury features to help Cadillac penetrate the luxury car segment. All in all, it can be ascertained that Cadillac Catera Coil Springs are quite important for this vehicle to maintain the required levels of quality along with high expectations of the riders regarding the comfort and suspension performance, thus making this car a perfect symbol of luxury and reliability.
Cadillac Catera Coil Springs Parts and Q&A
- Q: How to service and repair the front coil springs and shock absorber on Cadillac Catera?A:The suspension strut requires removal from the vehicle before starting any service or repair procedures. Assume the strut assembly in the strut spring compressor (J34013-B) with the strut compressor adapter (J34013-88) before compressing the spring. Unglue the upper bearing support nut from the strut piston then gently remove the bearing plate assembly. Decompress the spring then remove all components starting with the upper spring support plate followed by upper insulator followed by strut bumper and ending with the strut cover. Remove the spring first from the strut and then separate the lower insulator from the strut . After you put the lower insulator onto the strut you should place the spring on it. Proceed with component installation beginning with upper spring support plate then upper insulator then strut bumper and finally the strut cover. Following spring position between upper and lower rubber isolation rings compress the spring before attaching bearing and plate assembly. Torque the upper bearing support nut to 70 nm (52 ft. Lbs.) when assembling the bearing. After achieving this torque value remove the spring tension from the spring compressor. Use the strut spring compressor (J34013-B) to remove the strut assembly properly positioning the spring between insulators and reinstall the strut into the vehicle.
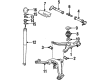
- Q: How to replace the coil springs on Cadillac Catera?A:The coil spring replacement process starts by properly supporting the vehicle through appropriate elevation and additional stabilizing support at the vehicle's opposite end. Detach lower Control Arm retainers before removing brake pipes as part of retaining brake system enclosure. First detach the link bolts from the stabilizer shaft then extract the link from the lower control arms. The exhaust system rubber components must be removed to allow the exhaust to drop before using support to prevent damage. Support each lower Control Arm while disconnecting rear Wheel Speed Sensor electrical connections and removing shock absorber lower mount bolts to control spring pressure. Start by disconnecting both shock absorber lower mount bolts together with the support bracket on the lower control arms. A transmission jack must support the rear Differential as vehicle body bolts securing the rear axle cradle are removed to extract the rear springs which remain attached to spring seats. Separate the spring seats from each spring. When installing spring seats place them on the springs while maintaining proper spring leg alignment to minimize noise generation. Position the rear springs onto the lower Control Arm before securing them to the body structure. Afterward, raise and position the rear Differential to line up its protective shields. Secure the rear Differential with cradle mount bolts while tightening vehicle body bolts to 65 nm (48 ft. Lbs.). Place the support beneath the left-side lower Control Arm before lifting it into position to bolt in and tighten the shock absorber mount at 110 nm (81 ft. Lbs.). Keep this process running for the installation of the right side lower Control Arm. After installing the stabilizer shaft link to the lower control arms reconnect the rear Wheel Speed Sensor electrical connections and support the exhaust system with rubber insulators. Secure all link bolts with 20 nm (15 ft. Lbs.) torque. After securing the brake pipes to lower control arms with retainers the vehicle is lowered for finaltoe specifications adjustments.


Related Cadillac Catera Parts
 Cadillac Catera Axle Beam Mount
 Cadillac Catera Axle Support Bushings
 Cadillac Catera Ball Joint
 Cadillac Catera Coil Spring Insulator
 Cadillac Catera Control Arm Bolt
 Cadillac Catera Control Arm Bushing
 Cadillac Catera Lateral Link
 Cadillac Catera Steering Knuckle
 Cadillac Catera Sway Bar Link
 Cadillac Catera Trailing Arm
 Cadillac Catera Trailing Arm Bushing
 Cadillac Catera Wheel Bearing