ChevyParts
My Garage
My Account
Cart
OEM Cadillac DeVille Control Arm
Suspension Arm- Select Vehicle by Model
- Select Vehicle by VIN
Select Vehicle by Model
orMake
Model
Year
Select Vehicle by VIN
For the most accurate results, select vehicle by your VIN (Vehicle Identification Number).
37 Control Arms found


Cadillac DeVille Control Arm, Driver Side Part Number: 25766511
$195.81 MSRP: $317.79You Save: $121.98 (39%)
Cadillac DeVille Lower Control Arm, Front Passenger Side Part Number: 25554671
$48.00 MSRP: $79.07You Save: $31.07 (40%)Ships in 1-2 Business Days
Cadillac DeVille Control Arm, Passenger Side Part Number: 19149203
$48.00 MSRP: $79.07You Save: $31.07 (40%)Ships in 1-2 Business Days


Cadillac DeVille Control Arm, Driver Side Part Number: 10232819


Cadillac DeVille Control Arm, Rear Driver Side Part Number: 25820031
Cadillac DeVille Lower Control Arm, Driver Side Part Number: 22156605


Cadillac DeVille Control Arm, Rear Part Number: 10000887

Cadillac DeVille Control Arm, Rear Part Number: 10000334
Cadillac DeVille Control Arm, Passenger Side Part Number: 10232820

Cadillac DeVille Control Arm, Passenger Side Part Number: 12524201
Cadillac DeVille Control Arm, Driver Side Part Number: 19149204


Cadillac DeVille Upper Control Arm, Driver Side Part Number: 25671728

Cadillac DeVille Control Arm, Rear Driver Side Part Number: 22156335
| Page 1 of 2 |Next >
1-20 of 37 Results
Cadillac DeVille Control Arm
Want to cut long-term maintenance and repair costs? Choose OEM Control Arm. Those parts deliver top durability you can trust. On our site, you'll find a huge catalog of genuine Cadillac DeVille parts. Prices are unbeatable, so you can keep more in your pocket. Every OEM Cadillac DeVille Control Arm includes a manufacturer's warranty. You can also get an easy return policy that keeps buying risk free. Fast delivery, get your car on the road quickly. It's simple to search, compare, and order. Stop guessing about quality or fit. Order today and save with parts that last.
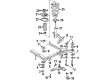
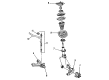
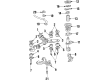
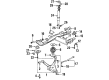
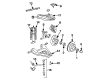
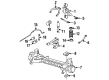
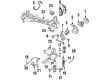
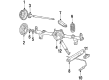
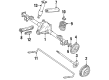
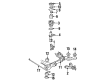
The Control Arm of Cadillac DeVille is a connecting link between the frame and the wheels and holds other suspension components such as shocks and springs. These arms rotate in response to the road status; the wheels are moved up and down. Despite the numerous control arms, all have bushings at the point where it fastens to the frame, and use ball joints at the site of connection to the knuckle or axle. From the Cadillac DeVille vehicles used through the years, the control arms made use of have evolved from stamped steel to stronger cast iron or aluminum. Such sturdy shooting branches may need attention as a result of wearing out the bushings and ball joints for the steel arms mainly vice the impact of rust. There are several other s performance control arms which are useful when using high powered cars and dynamic steering adjustments.
Cadillac DeVille Control Arm Parts and Q&A
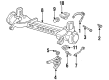
- Q: How to replace the lower control arm with RPO FE7 on Cadillac DeVille?A:To replace the lower Control Arm with rpo fe7, first, lift the vehicle and support by the frame so that the control arms are free to move. Remove the wheel and tire, then unbolt stabilize link's Control Arm from the stabilizer link. Then, take out the cotter pin and hex nut from the ball joint stud. Remove the ball joint using the ball joint separator (J 39549) then extract the nuts and bolts off the Control Arm mounting and remove it. For installation, position the Control Arm to the frame without mounting the Control Arm nuts, ensure that the weight of the vehicle is carried by the control arms so as to bring about a design trim height followed by fixing the mounting nuts. Install the Control Arm bolts, washers, and nuts, before inserting the stabilizer link in the Control Arm. Install ball joint nut into position on the lower Control Arm and the ball joint stud. Tighten the stabilizer shaft link nut to 23 nm (17 ft. Lbs.) and the ball joint stud nut to 30 nm (22 inch lbs.), this should be done by adding another 190°. Install the cotter pin and replace the wheel and tire, tightening the wheel nuts all the way to 125 nm (80 ft. Lbs.). Adjust the vehicle lower, jounce it and then tighten the lower Control Arm nuts with rear lower Control Arm nut being the specification of 146 nm (108 ft. Lbs.) and front lower Control Arm nut being 162 nm (120 ft. Lbs).

Related Cadillac DeVille Parts
 Cadillac DeVille Axle Beam Mount
 Cadillac DeVille Axle Pivot Bushing
 Cadillac DeVille Coil Springs
 Cadillac DeVille Control Arm Bracket
 Cadillac DeVille Control Arm Bushing
 Cadillac DeVille Crossmember Bushing
 Cadillac DeVille Shock And Strut Mount
 Cadillac DeVille Sway Bar Bracket
 Cadillac DeVille Sway Bar Bushing
 Cadillac DeVille Trailing Arm Bushing
 Cadillac DeVille Wheel Hub
 Cadillac DeVille Wheel Seal