ChevyParts
My Garage
My Account
Cart
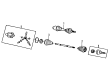
OEM Cadillac DTS CV Boot
Axle Boot- Select Vehicle by Model
- Select Vehicle by VIN
Select Vehicle by Model
orMake
Model
Year
Select Vehicle by VIN
For the most accurate results, select vehicle by your VIN (Vehicle Identification Number).
6 CV Boots found


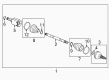
Cadillac DTS Outer CV Joint Boot, Front Part Number: 19210864
$39.87 MSRP: $68.46You Save: $28.59 (42%)Ships in 1-2 Business Days
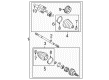
Cadillac DTS Inner Boot, Front Part Number: 26075585
$43.16 MSRP: $105.31You Save: $62.15 (60%)

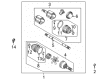
Cadillac DTS Boot Kit, Front Part Number: 20984614
$36.52 MSRP: $92.67You Save: $56.15 (61%)Ships in 1-2 Business Days

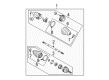
Cadillac DTS Boot Kit, Front Part Number: 15269918

Cadillac DTS Inner Boot, Front Part Number: 26075586
Cadillac DTS Outer Boot, Front Part Number: 19149657
Cadillac DTS CV Boot
Want to cut long-term maintenance and repair costs? Choose OEM CV Boot. Those parts deliver top durability you can trust. On our site, you'll find a huge catalog of genuine Cadillac DTS parts. Prices are unbeatable, so you can keep more in your pocket. Every OEM Cadillac DTS CV Boot includes a manufacturer's warranty. You can also get an easy return policy that keeps buying risk free. Fast delivery, get your car on the road quickly. It's simple to search, compare, and order. Stop guessing about quality or fit. Order today and save with parts that last.
The CV Boot in Cadillac DTS cars addresses a very vital part that protects the Constant Velocity (CV) Joint, which is used to transfer the power in both, front-wheel-drive (FWD) and all-wheel-drive (AWD) cars. The CV Boot is another component usually made of rubber or plastic that hold the required amount of grease for the CV Joint while stopping dust and other materials from getting in. There are several types of CV Joints; the former usually being fixed while the latter being integrated into 'plunging' on the inboard end of the axle to account for movement from the suspension. Routine checks on the CV Boot is critical since it protects the CV Joint, which if fails will result in a number of symptoms including odd noises or vibrations on the vehicle's system.
Cadillac DTS CV Boot Parts and Q&A
- Q: What Tools Are Required to Service and Repair the CV Boot and CV Joint for the Wheel Drive Shaft Outer Joint and Boot Replacement (FE1/FE3) on Cadillac DTS?A:A technician requires snap ring pliers (J 8059) drive axle seal clamp pliers (J 35910) and drive axle swage ring clamp (J 41048) for wheel drive shaft outer joint and boot replacement (FE1/FE3) service and repair work on the constant velocity joint boot. Three tools are necessary for this procedure including snap ring pliers (J 8059) alongside drive axle seal clamp pliers (J 35910) and drive axle swage ring clamp (J 41048). First cut off the large and small boot retaining clamps on the cv joint and halfshaft bar using a side cutter before discarding the clamps. The outboard boot needs removal from the cv joint outer race as you pull it away from the bar. First wipe away joint grease from the inner race then utilize snap ring pliers (J 8059) to open the retaining ring's ears before extracting the cv joint assembly from the bar. Using the bar as a base gently tap the cv joint cage so the chrome alloy balls emerge one by one until all six balls are extracted. Use cleaning solvent to completely clean the inner and outer races together with the cv joint cage before drying all parts until free of old grease and contaminants. First position a new swage ring to the small end of the joint boot then insert both ends onto the halfshaft bar. Install the boot into its designated groove followed by a vise-mount of the drive axle swage ring clamp (J 41048) to align the outboard halfshaft end and boot neck. Use hand tension to tighten the bolts before checking for any unwanted pinching action that could harm the boot assembly. Use a ratchet wrench to tighten each bolt on the drive axle swage ring clamp (J 41048) by 180 degrees after you align it with the halfshaft outboard boot and boot grooves and swage ring. Put a small amount of service kit grease on the ball grooves of both inner and outer races before inserting the inner race into the cage while maintaining correct alignment. Set the cage and inner race into the outer race before carefully putting in all chrome balls. Combine grease into the cv joint following cv joint installation while sliding the joint onto the halfshaft bar until the retaining ring clicks into position and shape the outboard boot correctly. Use the drive axle seal clamp pliers (J 35910) with a breaker bar and torque wrench to secure the large boot diameter over the cv joint outer race by crimping the retaining clamp at 176 n.m (130 lb ft) torque while verifying the clamp gap dimension meets specification.

Related Cadillac DTS Parts
 Cadillac DTS Axle Shaft
 Cadillac DTS CV Joint
 Cadillac DTS Crankshaft Seal
 Cadillac DTS Crankshaft Thrust Washer Set
 Cadillac DTS Cylinder Head
 Cadillac DTS Drive Shaft
 Cadillac DTS Engine Mount Bracket
 Cadillac DTS Lash Adjuster
 Cadillac DTS Motor And Transmission Mount
 Cadillac DTS Oil Pan
 Cadillac DTS Oil Pump
 Cadillac DTS Piston