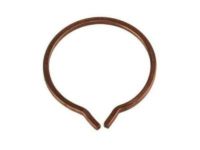
Make sure this part fits

GM 20984614
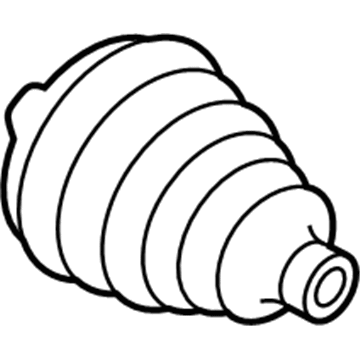
Boot Kit, Front

2000-2011 GM

Customer Questions & Expert Answers (13)
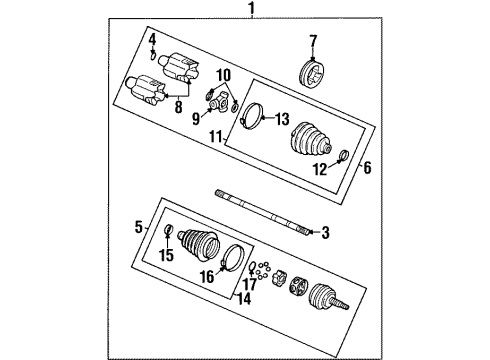
GM 20984614 Boot Kit, Front
  • Part Description
    Boot Kit, Front Wheel Drive Axle Shaft; CV Boot
  • Position
    Front
  • Manufacturer
    General Motors
Make sure this part fits
$36.52 MSRP: $92.67
You Save: $56.15 (61%)
Ships in 1-2 Business Days
1
ADD TO CART
  • Related Parts
  • Product Specifications
  • Vehicle Fitment
  • Customer Questions & Expert Answers
  • Product Specifications

    BrandGenuine GM
    Manufacturer Part Number20984614
    Part DescriptionBoot Kit, Front Wheel Drive Axle Shaft; CV Boot
    Other NamesInner CV Joint Boot; Inner Boot; Boots
    Item Dimensions7.8 x 7.1 x 7.0 inches
    Item Weight1.70 Pounds
    PositionFront
    ConditionNew
    Fitment TypeDirect Replacement
    ManufacturerGeneral Motors
    SKU20984614
    Shipping & ReturnShipping Policy Return Policy
    Warning: California's Proposition 65
  • Vehicle Fitment

    Year Make Model Trim Engine
    2006-2011 Buick LucerneCXL, CXS, Super8 Cyl 4.6 L GAS
    2000-2005 Buick Park AvenueBase, Ultra6 Cyl 3.8 L GAS
    2004 Buick RendezvousCXL, Ultra6 Cyl 3.6 L GAS
    2006-2011 Cadillac DTSBase, Livery, Luxury, Platinum, Premium8 Cyl 4.6 L GAS
    2000-2004 Cadillac DeVilleBase, DHS, DTS, Protection Series8 Cyl 4.6 L GAS
    2000-2002 Cadillac EldoradoESC, ETC8 Cyl 4.6 L GAS
    2000-2004 Cadillac SevilleSLS, STS8 Cyl 4.6 L GAS
    2001-2003 Oldsmobile AuroraBase6 Cyl 3.5 L GAS, 8 Cyl 4.0 L GAS
    2000-2003 Pontiac BonnevilleSSEi6 Cyl 3.8 L GAS
  • Customer Questions & Expert Answers

    Q:
    Can you help me check if this 20984614 is the right part for my car? Posted by ChevyPartsGiant Specialist
    A:
    Please Select Your Vehicle model to see if part number 20984614 is suitable before ordering.
    Posted by ChevyPartsGiant Specialist
    Q:
    How to replace the outer CV Boot and CV Joint of the axle shaft assembly on Buick Park Avenue? Posted by Customer
    A:
    To replace the outer joint and boot of the Axle Shaft assembly, first using snap ring pliers (J 8059), take out the large boot retaining clamp from the cv joint and get rid of it, then the small boot retaining clamp from the halfshaft bar. My hind leg boots began to give out after about two weeks. They kept falling off, which slowed me down. Although my boots were new, the material and workmanship on them left much to be desired. Remove the cv joint assembly from the bar by wiping off the grease from the cv joint inner race and spreading the ears on the race retaining ring using the snap ring pliers (J 8059). Take away the boot from the bar and strike delicately on cv joint cage with a brass drift & hammer to take out all six chrome alloy balls from it. Clean out the inner and outer race assemblies, cv joint cage, balls, deeply with cleaning solvent, to ensure all the old grease and contaminants are expelled from the parts, and then dry the parts out. Desana - assemble by placing a new swage ring onto the small end of the joint boot and slide them onto to half shaft bar. Use the earred clamp tool (J 35910) and small swage tool (J 41048) to secure the boot and avoid pinch points. Assemble the small swage tool (J41048) bolts and tighten them alternately till snug and grease the ball grooves of the inner and outer races with grease from the service kit. Mount the inner race in the cage while making sure it is aligned correctly and then instal the cage and inner race into the outer race. Install the chrome balls, pack the cv joint with grease and drive the cv joint onto the halfshaftbar until the retaining ring is in place. Slide the big diameter of outboard boot over the cv-joint outer race and apply the boot retaining clamp with an earred clamp tool (J 35910), breaker bar , and a torque wrench to a spec 176 nm (130 Ft. Lbs), verify gap dimension of clamp ear for correct spec.
    Posted by ChevyPartsGiant Specialist
    Q:
    What tools are required to service and repair the front outer CV Boot and seal replacement on Buick Rendezvous? Posted by Customer
    A:
    A front wheel drive shaft outer joint and seal replacement requires these specific tools: the tool set for CV Joint seal work includes drive shaft seal clamp pliers (Part Number J 42572). Drive shaft seal clamp pliers (J 42572). The first step requires laying down a shop towel on the Axle Shaft followed by mounting the wheel drive shaft horizontally into a vise. Use either a side cutter or suitable tool to remove outer joint seal retaining clamps after cutting them off with the tool. Discard all removed components. To remove the seal from the outer joint race first separate it from the race while wiping away existing grease on the inner race before compressing the Axle Shaft retaining clip using a hammer and wood block to detach the outer joint from the shaft. Pick out the Axle Shaft retaining ring and seal from the shaft and cleanse all pieces with a solvent before they dry naturally. Assemble the system by correctly positioning the cage and inner race before you insert the inner race into the cage and adjust all components to fit with the outer race. Begin installing the balls step-by-step until their position matches perfectly with the inner race ball track while lubricating the joint using service kit grease. Insert the new Axle Shaft retaining clamp before placing the seal and its new retaining ring. Press the pre-flared ends of the Axle Shaft splines through the inner race splines before compressing the retaining ring while you use a wood block and hammer to ensure a full joint contact with the Axle Shaft. Use the drive shaft seal clamp pliers (J 42572) to crimp both small and large seal retaining clamps to 136 nm (100 ft. Lbs.) torque then check the gap width is between 2 to 3 mm (0.079 to 0.118 inch) before inspecting the seal for presence and extent of damage.
    Posted by ChevyPartsGiant Specialist
    Q:
    How to replace the outer CV Boot and CV Joint of the axle shaft assembly on Cadillac Eldorado? Posted by Customer
    A:
    For outer joint and boot replacement in Axle Shaft assemblies obtain the following tools: snap ring pliers (J 8059), earred clamp tool (J 35910), small swage tool (J 41048) and a breaker bar and torque wrench. The toolkit for this job includes snap ring pliers (J 8059), earred clamp tool (J 35910), small swage tool (J 41048) as well as a breaker bar and a torque wrench. Start by cutting both the large boot retaining clamp on the cv joint with a side cutter before discarding it along with the small boot retaining clamp on the halfshaft bar. First separate the outboard boot from the cv joint outer race then move the boot away from the joint across the bar. After wiping the grease from the cv joint inner race you should use snap ring pliers (J 8059) to open the retaining ring's ear before extracting the cv joint assembly from the bar. Gently use a brass drift and hammer to tap the cv joint cage while it remains on the bar until the chrome alloy balls are successfully removed. Thorough cleaning with solvent will prepare the inner and outer race assemblies along with the cv joint cage and balls for inspection. All old grease and contaminants must be eliminated before starting the drying process. You should start assembly by setting a new swage ring onto the joint boot's small end then guide both onto the halfshaft bar. Position the boot within the boot groove before using the small swage tool (J 41048) mounted in a vise to align the halfshaft bar's outboard end. The boot needs to be completely pinch point-free while you install the bolts before tightening them to a snug grip. Use a ratchet wrench to tighten each bolt of the small swage tool (J 41048) while rotating it 180 degrees throughout its sequence. Use grease from the service kit to coat ball grooves of the inner race and out race before placing the inner race into the cage with maintained alignment accuracy. Begin by putting the cage together with the inner race then feed chrome balls inside before filling the cv joint with grease. Push the cv joint onto the halfshaft bar while ensuring the outboard boot maintains its correct shape until the retaining ring properly seats. Then crimp the boot retaining clamp using the earred clamp tool (J 35910) with the breaker bar to tighten the clamp to 176 nm (130 ft. Lbs). Tighten the clamp ear when its gap dimension meets specifications.
    Posted by ChevyPartsGiant Specialist
    Q:
    How to replace the CV Boot and CV Joint on the Wheel Drive Shaft Inner (FE7) on Cadillac DTS? Posted by Customer
    A:
    First to remove the wheel drive shaft inner joint and boot, the wheel drive shaft inboard and outboard boot should not be cut through during the removal past the sealing surface hence allowing the entrance of water and dirt resulting in quick wearing of the constant velocity joint the constant velocity joint. First, cut with a hand grinder the small swage ring away, or remove the small seal retaining clamp with side cutters and throw it. Next, disengage the large seal retaining clamp from the tripot joint by using side cutters then throw it away with the same trigger. Remove the inboard seal from the trilobal tripot bushing at the large diameter and pull the seal from the joint off the halfshaft bar. Disassemble the housing from the tripot joint spider and the halfshaft bar. Your replacement surefire gunmetal twist original 2c rail mount tripod black for la firearm went their bank way so now i can don't buy one if your assortment was expensive that the same station. Shear the halfshaft bar with wire brush to remove rust in the boot mounting and gauge needle rollers, needle bearings, and trunnion for wear or distress and change identified harmed parts with the fitting pack. Suitable for installation, place the halfshaft in a vise with a towel to support the shaft. Mount the new small eared clamp onto the small end of the joint seal and slide both onto halfshaft bar ensuring that the small end of the joint seal is tucked in the groove of the halfshaft bar. Crimp the clamp of the eared clamp using j35910, a torque wrench, and a breaker bar. If available, install the spacer ring to the groove of halfshaft bar using j 8059 and then slide the tripot joint spider assembly onto the halfshaft bar. Fill half of the grease from the service kit into the half shaft inboard seal and the rest into the housing making sure that the trilobal tripot bushing is flush against the face of the housing. Mount the trilobal tripot bushing onto the housing and fit the larger new seal retaining clamp on the halfshaft inboard seal. Slip the housing over the tripot joint spider assembly and find the groove for the lip of the large diameter halfshaft inboard seal. Position the joint assembly with proper vehicle dimension of 106 mm (4.00 in) and slowly slide in a thin flat blunt object between the large seal opening and the trilobal tripot bushing to equalize the pressure before retracting the object. Somehow align the halfshaft inboard seal, tripot housing, and large seal retaining clamp, then crimp the seal retaining clamp giving the j 35910 of 176 nm (130 lb ft) to it using the breaker bar with a torque wrench where necessary. The gap dimension on the clamp ear should be checked and tighten until the gap dimension is equal to 2.6mm (0.102in) if it is greater. Finally, fully stroke the joint several times as the distribution of the grease.
    Posted by ChevyPartsGiant Specialist
    Q:
    How to replace the inner CV Boot and CV Joint on Cadillac DeVille? Posted by Customer
    A:
    To replace the wheel's drive shaft inner joint and the boot, first, gather necessary tools for the procedure: snap ring pliers (J8059), seal clamp designed tool (J35910) and earless seal clamp tool (J35566). Examine the sealing surface of the halfshaft transmission after its removal for corrosion; clean any corrosion with 320 grit cloth or equivalent a using transmission fluid as needed and ensure that the surface is dry before you re-install the half-shaft. If you don't damage the sealing surface of the outer housing or of the trilobal tripot bushing, remove and throw away the boot retainer clamp as well as the large boot retaining clamp from the halfshaft bar and tripot joint, respectively. Detach the halfshaft inboard boot from the trilobal tripot bushing and slide the boot from the joint and remove the housing from the tripot joint spider and half shaft-bar. Clean the tripot balls, needle rollers, and housing with a solvent, eliminating all old grease and contaminants, and check out the half shaft inboard boot, tripot joint spider assembly, housing, trilobal tripot bushing, and needle rollers for damages or wear. Put the small boot retaining clamp on the inboard boot with no crimping and slide the boot on to the halfshaft bar and position it in the boot groove. Tighten the boot retaining clamp using the seal clamp tool (J35910) to 136 nm (100 ft. Lbs.) and measure the gap dimension. Mount the spacer ring over the halfshaft bar and push the tripot joint spider assembly back onto it. Use snap ring pliers (J8059) to install the halfshaft bar retaining ring and slide the spider assembly toward the end of the bar and re-seat the first spacer ring. Put a half of the grease from the service kit in the boot and leave the other half for re-packing the housing. Mount the trilobal tripot bushing to the housing flush, and mount the larger new clamp on the boot. Slip the housing onto the spider assembly, ensuring the boot is shaped and sitting in the groove. Align the boot, housing, and the large clamp by latching it, and finally, latch the boot retaining clamp using the earless seal clamp tool (J35566).
    Posted by ChevyPartsGiant Specialist
    Q:
    How do you separate the outboard seal from the CV joint for the 2009 Buick Lucerne? Posted by Customer
    A:
    Separate the outboard seal from the CV joint outer race and slide it away from the bar.
    Posted by ChevyPartsGiant Specialist
    See expert answers on similar CV Boot
    Q:
    How do you separate the outboard seal from the CV joint for the 2010 Buick Lucerne? Posted by Customer
    A:
    Separate the outboard seal from the CV joint outer race and slide it away from the bar.
    Posted by ChevyPartsGiant Specialist
    See expert answers on similar CV Boot
    Q:
    How do you separate the halfshaft inboard boot from the trilobal tripot bushing for the 2000 Buick Park Avenue? Posted by Customer
    A:
    Carefully separate the boot from the bushing and slide it away from the joint.
    Posted by ChevyPartsGiant Specialist
    See expert answers on similar CV Boot
    Q:
    What should be done after wiping grease from the CV joint inner race for the 2008 Cadillac DTS? Posted by Customer
    A:
    Use the Snap Ring Pliers (J 8059) to spread the ears on the race retaining ring and remove the CV joint assembly from the bar.
    Posted by ChevyPartsGiant Specialist
    See expert answers on similar CV Boot
    Q:
    What should be checked after crimping the boot retaining clamp for the 2009 Cadillac DTS? Posted by Customer
    A:
    Check the clamp gap dimension on the clamp ear, tightening further if the gap exceeds 1.9 mm.
    Posted by ChevyPartsGiant Specialist
    See expert answers on similar CV Boot
    Q:
    What should be inspected and cleaned before starting the replacement for the 2000 Cadillac Eldorado? Posted by Customer
    A:
    Inspect the transmission sealing surface of the halfshaft for corrosion and clean it with 320 grit cloth if necessary.
    Posted by ChevyPartsGiant Specialist
    See expert answers on similar CV Boot
    Q:
    How do you ensure the CV joint is properly seated on the halfshaft bar for the 2000 Cadillac DeVille? Posted by Customer
    A:
    Push the CV joint onto the halfshaft bar until the retaining ring is seated, ensuring the outboard boot is correctly shaped.
    Posted by ChevyPartsGiant Specialist
    See expert answers on similar CV Boot
    If you have any questions about this product, please don't hesitate to ask us. We will be happy to help you!

OEM GM 20984614, Excellent Performance and Perfect Fitment

To ensure reliability, purchase GM part # 20984614 Boot Kit, Front. It is sometimes referred to as GM CV Boot. Choosing OEM parts is the optimal decision for guaranteeing superior quality and perfect performance. These components undergo stringent quality checks and are carefully constructed to comply with GM's factory specifications, ensuring a smooth installation process.

ChevyPartsGiant.com is a leading supplier of genuine GM parts such as GM 20984614 Boot Kit, Front. Our website boasts an extensive inventory of OEM GM parts, available at highly competitive prices in the market. Should you require any new genuine GM parts, rest assured we will deliver them swiftly and efficiently to your doorstep. Furthermore, all our parts come with the assurance of a manufacturer's warranty. For detailed Cadillac parts information, click here.
Choose ChevyPartsGiant for discounted prices, exceptional service and fast delivery