ChevyParts
My Garage
My Account
Cart
OEM Cadillac Escalade EXT Brake Disc
Disc Rotor- Select Vehicle by Model
- Select Vehicle by VIN
Select Vehicle by Model
orMake
Model
Year
Select Vehicle by VIN
For the most accurate results, select vehicle by your VIN (Vehicle Identification Number).
4 Brake Discs found


Cadillac Escalade EXT Brake Rotor Part Number: 25757802
$143.40 MSRP: $274.21You Save: $130.81 (48%)Ships in 1-2 Business Days


Cadillac Escalade EXT Rotor, Front Part Number: 22950036
$131.59 MSRP: $257.65You Save: $126.06 (49%)Ships in 1-3 Business Days


Cadillac Escalade EXT Rotor, Front Part Number: 19210603
$94.27 MSRP: $182.96You Save: $88.69 (49%)Ships in 1-2 Business Days


Cadillac Escalade EXT Rotor, Rear Part Number: 22968231
Cadillac Escalade EXT Brake Disc
Want to cut long-term maintenance and repair costs? Choose OEM Brake Disc. Those parts deliver top durability you can trust. On our site, you'll find a huge catalog of genuine Cadillac Escalade EXT parts. Prices are unbeatable, so you can keep more in your pocket. Every OEM Cadillac Escalade EXT Brake Disc includes a manufacturer's warranty. You can also get an easy return policy that keeps buying risk free. Fast delivery, get your car on the road quickly. It's simple to search, compare, and order. Stop guessing about quality or fit. Order today and save with parts that last.
Cadillac Escalade EXT Brake Disc Parts and Q&A
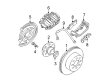
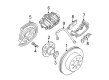
- Q: How to replace the rear brake disc on a 2500 Series on Cadillac Escalade EXT?A:Before working on the rear Brake Disc of a 2500 series vehicle you must release the parking brake first then check the brake fluid level in the reservoir and drain excess fluid if needed up to the middle span between highest and lowest marks. Lift the car up and secure it in place before taking out the tire wheel assembly to set the disc position against the hub. Press the brake caliper pistons in with a large j 41013 c-clamp applied over the caliper unit until all pistons are compressed fully. Secure the brake caliper through heavy mechanical wire to safeguard the hydraulic flexible brake hose. Use appropriate tools to take out Brake Caliper Bracket bolts first then disconnect the bracket-caliper unit as one system without disconnecting the hydraulic hose. You should take off the Brake Disc retaining push nuts first. Afterwards, use a deadblow hammer to hit and separate the hub or disc when this step is required. Use the wheel hub resurfacing kit and disc resurfacing kit to eliminate all rust and contamination from both hub flange and Brake Disc surfaces. Put the disc back in its proper alignment before installing it by rotating and pressing it towards the axle. Check and adjust the assembled lateral runout measurement for brake system applications if results exceed defined specs. Put back the caliper and bracket system and take off the old adhesive from bolt threads then wipe with brake parts cleaner before applying threads gm p/n 12345493 (Canada 10953488) and bolt down to 148 lb ft torque. Reattach the tire while lowering the vehicle and exercise the brake pedal gently while avoiding the engine. Top up the master cylinder only when needed with brake fluid.
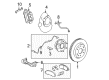
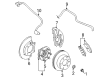
- Q: How to replace the front brake disc on Cadillac Escalade EXT?A:Before starting you must lift your vehicle then take off its tire and wheel parts together. Make any necessary marks on the disc to its connection with the hub before using a c-clamp to compress the brake caliper pistons for removal. You must suspend the caliper on mechanic's wire to shield the hydraulic brake hose from damage. First take out the complete brake caliper assembly including its bracket. Then detach the disc holding push nuts depending on the vehicle design. When corrosion makes the disc difficult to detach use penetrating oil to clean both parts before inserting m10x1.5 bolts through the disc threaded holes and tightening them to separate the disc from the hub. Before fitting clean the hub flange with wheel hub resurfacing kit (J42450-A) and clean the inside Brake Disc diameter using rotor resurfacing kit (J41013). Surface cleaning comes first then position the disc back where it belongs. When fitting the disc to a brake system repair check lro assembly and fix if it is off standard. Fix the caliper and bracket together by cleaning all bolt threads first then applying threadlocker gm p/n 12345493 (Canadian P/N 10953488) before tightening bracket mounting bolts using the correct torque. After installing the wheel and tire set down the vehicle. Apply and release the brake pedal to position the caliper pistons correctly and fill the brake fluid reservoir with fresh brake fluid.


Related Cadillac Escalade EXT Parts
 Cadillac Escalade EXT ABS Control Module
 Cadillac Escalade EXT ABS Sensor
 Cadillac Escalade EXT Brake Backing Plate
 Cadillac Escalade EXT Brake Caliper Bracket
 Cadillac Escalade EXT Brake Caliper Piston
 Cadillac Escalade EXT Brake Caliper Repair Kit
 Cadillac Escalade EXT Brake Drum
 Cadillac Escalade EXT Brake Dust Shields
 Cadillac Escalade EXT Brake Pad
 Cadillac Escalade EXT Brake Proportioning Valve
 Cadillac Escalade EXT Wheel Hub Bolt
 Cadillac Escalade EXT Wheel Speed Sensor