ChevyParts
My Garage
My Account
Cart
OEM Cadillac Seville Coil Springs
Strut Spring- Select Vehicle by Model
- Select Vehicle by VIN
Select Vehicle by Model
orMake
Model
Year
Select Vehicle by VIN
For the most accurate results, select vehicle by your VIN (Vehicle Identification Number).
5 Coil Springs found


Cadillac Seville Coil Spring, Front Part Number: 22197295


Cadillac Seville Coil Spring, Rear Part Number: 22076935

Cadillac Seville Coil Spring, Front Part Number: 22197216

Cadillac Seville Leaf Spring Part Number: 1631142

Cadillac Seville Coil Spring, Rear Part Number: 25655473
Cadillac Seville Coil Springs
Want to cut long-term maintenance and repair costs? Choose OEM Coil Springs. Those parts deliver top durability you can trust. On our site, you'll find a huge catalog of genuine Cadillac Seville parts. Prices are unbeatable, so you can keep more in your pocket. Every OEM Cadillac Seville Coil Springs includes a manufacturer's warranty. You can also get an easy return policy that keeps buying risk free. Fast delivery, get your car on the road quickly. It's simple to search, compare, and order. Stop guessing about quality or fit. Order today and save with parts that last.
The Cadillac Seville come in production from 1975 until 2004 and is recognized as one of the luxurious vehicles and innovative achievements, mounted by the coil springs. These are Cadillac Seville coil springs that are part of the vehicle's suspension system whose main role is to bear the weight of the car and at the same time, give in slightly to the irregularities of the road. It also optimizes the ride level and the alignment of the wheels that are important in preventing problems such as rattle and stratten or irregular wearing of tires. The Cadillac Seville has employed different kinds of the coil springs and they include the linear rate, progressive and the dual rate springs, which cannot be compared since they possess different rate of stiffness depending on the need of the driver. First of all, the coils can be adjusted, these enable various wheel and tyre changes, making the vehicle smoother to handle, more efficient, and safe. This event was a true growth of Cadillac Seville showing that it can easily transform to become a mid-size luxury model, with the addition of such extra features as dual-zone automatic climate control system and traction control system among others. Coil springs in Cadillac Seville are exceptional in helping the automotive firm to deliver a steady and comfortable ride to their clients, and therefore sets them apart. The Cadillac Seville is one of the finest creations of Cadillac, as it perfectly blended luxury, performance, and reliability; the coil springs go on to show Cadillac's dedication of delivering the prime.
Cadillac Seville Coil Springs Parts and Q&A
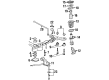
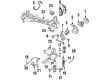
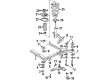
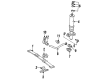
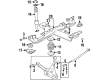
- Q: How to Replace Coil Springs on Cadillac Seville?A:The replacement process of a coil spring begins with vehicle lifting and proper suspension methods. Start by taking off tires and wheels before you support the lower Control Arm with the proper jack. The automatic level control air tube needs detachment from the Shock Absorber before removing both the Shock Absorber lower retaining bolt and the adjustment link retaining nut. The universal steering linkage puller (J24319-B) should be used to detach the adjustment link from the lower Control Arm. Lower the Control Arm gradually while letting it settle onto the rear support. Use a pry bar to do the following steps: detach coil spring lower insulator and extract coil spring and insulator before pulling down to remove upper insulator. Start by installing the upper insulator to the body while simultaneously placing the lower insulator onto the lower Control Arm. Set the coil spring correctly in the lower Control Arm while making sure the insulator snaps into position. Put the lower Control Arm in a raised position before installing Shock Absorber retaining bolts at 25 nm torque (18 ft. Lbs.). You should install the adjustment link to the lower Control Arm then lock it in place using a 75 nm (55 ft. Lbs.) torque setting on the adjustment link retaining nut. The alc system requires a 45-second active running control phase to fill shock absorbers with residual pressure before moving forward with wheel placement. Begin this phase by engaging the ignition. Attach the automatic level control air tube to the shock before installing tires and wheels while lowering the vehicle into position.
- Q: How to service and repair the front coil springs and shock absorber on Cadillac Seville?A:The suspension strut servicing and repair process requires several necessary tools which include Holding Fixture Base Assembly (J 3289-20) and Damper Rod Clamp (J 34013-B) and Strut Spring Compressor (J 34013-20) and Strut Alignment Rod (J 34013-38). The required tools for the suspension strut service include Holding Fixture Base Assembly (J 3289-20), Damper Rod Clamp (J 34013-B), Strut Spring Compressor (J 34013-20), and Strut Alignment Rod (J 34013-38). Protect the suspension coil spring's coating during strut removal because damage to this protective layer may shorten the strut's lifespan. The Strut Spring Compressor (J 34013-20) requires installing the strut assembly followed by screwing the compressor to create slight spring compression. Use a Strut Alignment Rod (J 34013-38) to guide the strut shaft out of the strut assembly while you loosen the compressor screw while holding the strut shaft. Keep turning the screw until you can remove the strut and spring. Begin your installation by installing the Damper Rod Clamp (J 34013-B) together with Strut Spring Compressor (J 34013-20) onto the strut shaft in the strut compressor. When installing the strut assembly into the compressor position the spring correctly over the strut and upright the assembly before installing the locking pin but ensure that the tab points inward and the bearing remains properly oriented when removed. Thread the Strut Alignment Rod (J 34013-38) through the strut shaft then slowly turn the compressor screw in a clockwise direction until the strut shaft centerlines properly with the assembly while showing thread visibility. Fasten the washer onto the strut shaft followed by stripping the Damper Rod Clamp (J 34013-B) out of position then torque the strut mount nut to 75 Nm (55 ft. lbs.). Put the strut assembly back into your vehicle after you remove it from the compressor.


Related Cadillac Seville Parts
 Cadillac Seville Axle Pivot Bushing
 Cadillac Seville Axle Support Bushings
 Cadillac Seville Control Arm
 Cadillac Seville Control Arm Bolt
 Cadillac Seville Crossmember Bushing
 Cadillac Seville Lateral Arm
 Cadillac Seville Spindle Nut
 Cadillac Seville Steering Knuckle
 Cadillac Seville Sway Bar Kit
 Cadillac Seville Trailing Arm
 Cadillac Seville Wheel Bearing
 Cadillac Seville Wheel Seal