ChevyParts
My Garage
My Account
Cart
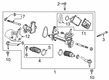
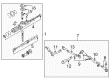
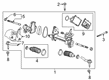
OEM Chevrolet Blazer Tie Rod
Steering Tie Rod- Select Vehicle by Model
- Select Vehicle by VIN
Select Vehicle by Model
orMake
Model
Year
Select Vehicle by VIN
For the most accurate results, select vehicle by your VIN (Vehicle Identification Number).
18 Tie Rods found


Chevrolet Blazer Outer Tie Rod, Passenger Side Part Number: 23214216
$44.05 MSRP: $75.63You Save: $31.58 (42%)Ships in 1-2 Business Days
Chevrolet Blazer Outer Tie Rod Part Number: 26041018
$24.65 MSRP: $49.51You Save: $24.86 (51%)
Chevrolet Blazer Inner Tie Rod Part Number: 26041016
$44.91 MSRP: $90.18You Save: $45.27 (51%)
Chevrolet Blazer Inner Tie Rod Part Number: 87853962
$44.24 MSRP: $69.27You Save: $25.03 (37%)Ships in 1-2 Business DaysChevrolet Blazer Outer Tie Rod, Driver Side Part Number: 87853956
$44.05 MSRP: $75.63You Save: $31.58 (42%)Ships in 1-2 Business Days

Chevrolet Blazer Outer Tie Rod Part Number: 26059033

Chevrolet Blazer Center Link Part Number: 26050592


Chevrolet Blazer Track Bar, Inner Part Number: 15629131

Chevrolet Blazer Inner Tie Rod Part Number: 26059036

Chevrolet Blazer Center Link Part Number: 26055302
Chevrolet Blazer Outer Tie Rod Part Number: 26054936
Chevrolet Blazer Inner Tie Rod Part Number: 26054934
Chevrolet Blazer Center Link Part Number: 26050590
Chevrolet Blazer Center Link Part Number: 26038989
Chevrolet Blazer Center Link Part Number: 26038980

Chevrolet Blazer Center Link Part Number: 26031952

Chevrolet Blazer Inner Tie Rod Part Number: 12471301

Chevrolet Blazer Outer Tie Rod Part Number: 12471300
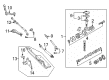
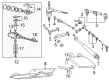
Chevrolet Blazer Tie Rod
Want to cut long-term maintenance and repair costs? Choose OEM Tie Rod. Those parts deliver top durability you can trust. On our site, you'll find a huge catalog of genuine Chevrolet Blazer parts. Prices are unbeatable, so you can keep more in your pocket. Every OEM Chevrolet Blazer Tie Rod includes a manufacturer's warranty. You can also get an easy return policy that keeps buying risk free. Fast delivery, get your car on the road quickly. It's simple to search, compare, and order. Stop guessing about quality or fit. Order today and save with parts that last.
Chevrolet Blazer Tie Rod Parts Questions & Experts Answers
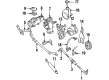
- Q: How to replace the tie rod on a 4WD on Chevrolet Blazer?A:The procedure to change a Tie Rod starts with vehicle lifting and suspension using safety stands. Start the replacement by removing the outer Tie Rod ball stud pin and continuing with both outer and inner Tie Rod ball stud nut removal. Steering linkage joints must not be detached by placing wedges between them and their attachment parts because these procedures will cause damage to the seals. You must utilize the j24319-b steering linkage and Tie Rod puller to separate the outer Tie Rod ball stud from its knuckle position while the j6627-a Tie Rod puller will remove the inner Tie Rod ball stud from the relay rod. Remove the Tie Rod ends from adjuster tube by unscrewing the assemblies while also loosening their clamp bolts. Thoroughly examine Tie Rod ends alongside their seals and threads along with their adjuster tube for any sign of damage while checking for severe wear. The ball stud threads, ball stud nut and all tapered components need to undergo cleaning operations. A chassis lubricant should be applied to the removed Tie Rod ends while maintaining their thread count within three threads. Install the Tie Rod ends to the adjuster tube then mount the inner Tie Rod ball stud onto the relay rod with its seal in position and tighten a new nut until it reaches 47 nm (35 ft. Lbs.). Mount the outer Tie Rod ball stud to the Steering Knuckle while ensuring the presence of the seal and tighten the nut to 53 nm (39 ft. Lbs.). Then advance the nut to line up with the cotter pin hole. The replacement pin needs proper spreading before the vehicle is lowered to the floor. First adjust the front toe then place both clamps between the locating dimples located at the adjuster tube's end points while avoiding alignment between clamp slots and adjuster tube slots. Keep the Tie Rod ends in place before clamp tightening actions according to specification guidelines or let their ends make contact if necessary. Secure the adjuster tube clamp bolts by tightening them to 21 nm (16 ft. Lbs.).

Related Chevrolet Blazer Parts
 Chevrolet Blazer Power Steering Pump
 Chevrolet Blazer Steering Wheel
 Chevrolet Blazer Center Link
 Chevrolet Blazer Drag Link
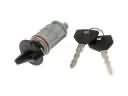 Chevrolet Blazer Ignition Lock Cylinder
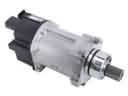 Chevrolet Blazer Power Steering Assist Motor
 Chevrolet Blazer Power Steering Control Valve
 Chevrolet Blazer Power Steering Hose
 Chevrolet Blazer Power Steering Reservoir
 Chevrolet Blazer Steering Column
 Chevrolet Blazer Steering Column Seal
 Chevrolet Blazer Upper Steering Column Bearing