ChevyParts
My Garage
My Account
Cart
OEM Chevrolet Corvette Rocker Arm
Engine Rocker Arm- Select Vehicle by Model
- Select Vehicle by VIN
Select Vehicle by Model
orMake
Model
Year
Select Vehicle by VIN
For the most accurate results, select vehicle by your VIN (Vehicle Identification Number).
6 Rocker Arms found


Chevrolet Corvette Rocker Arms Part Number: 10214664
$14.44 MSRP: $23.79You Save: $9.35 (40%)Ships in 1-2 Business Days

Chevrolet Corvette Rocker Arms Part Number: 12619829
$15.74 MSRP: $25.93You Save: $10.19 (40%)Ships in 1-2 Business Days


Chevrolet Corvette Rocker Arms Part Number: 12579617
$17.44 MSRP: $28.75You Save: $11.31 (40%)Ships in 1-3 Business Days

Chevrolet Corvette Rocker Arms Part Number: 12579615
$16.68 MSRP: $26.12You Save: $9.44 (37%)Ships in 1-3 Business Days

Chevrolet Corvette Rocker Arms Part Number: 10089648
$27.98 MSRP: $43.85You Save: $15.87 (37%)Ships in 1-2 Business Days
Chevrolet Corvette Rocker Arms Part Number: 12557779
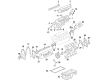
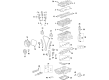
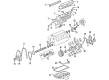
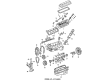
Chevrolet Corvette Rocker Arm
Want to cut long-term maintenance and repair costs? Choose OEM Rocker Arm. Those parts deliver top durability you can trust. On our site, you'll find a huge catalog of genuine Chevrolet Corvette parts. Prices are unbeatable, so you can keep more in your pocket. Every OEM Chevrolet Corvette Rocker Arm includes a manufacturer's warranty. You can also get an easy return policy that keeps buying risk free. Fast delivery, get your car on the road quickly. It's simple to search, compare, and order. Stop guessing about quality or fit. Order today and save with parts that last.
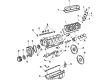
The Rocker Arm in Chevrolet Corvette automobiles is a crucial component of the valvetrain system It rotates the motion of the pushrod to the valves of both, intake and of the exhaust. Customarily made of stamped steel or aluminum, the Rocker Arm translates the oscillatory movement of the pushrod vertically into the required amount of force needed to lift the valves. In high RPM applications, aluminum is incorporated owing to its lightweight, while CI or forged carbon steel is implemented in other applications. Chevrolet Corvette models have adopted different Rocker Arm designs: conventional and roller types. Overhead valve as well as overhead camshaft engines benefit with roller rockers that include needle bearings for decreasing friction. The rocker ratio known to vary between 1.5 to 1.8 in modern engines escalates the camshaft lift to improve on performance. Sintered fulcrum bearings are also used in the version of the fast-rotating Corvettes to increase its durability and performance when subjected to greater loads.
Chevrolet Corvette Rocker Arm Parts Questions & Experts Answers
- Q: How to replace the valve rocker arm and push rods on Chevrolet Corvette?A:Starting the valve Rocker Arm and push rod replacement requires the removal of valve Rocker Arm covers first. Set a rack to hold the valve rocker arms and valve Pushrods along with their supportive pivot until their original positions become ready for use. Start by uninstalling the valve Rocker Arm bolts after which you should remove the valve rocker arms and valve Rocker Arm pivot support and then pull out the pushrods. The mechanic must clean the valve rocker arms before conducting an inspection of both components. Valve lash remains at a net build during installation therefore no adjustment should be made since all components must be positioned exactly as they were before removal. Clean engine oil should be used for lubrication on valve rocker arms and pushrods with additional application on the bolt flange of the valve Rocker Arm. The valve Rocker Arm pivot support requires installation at this point where the pushrods should correctly enter the valve lifter sockets before the pushrods can be installed into the rocker arms while leaving the Rocker Arm bolts untightened for now. Attach the rockers followed by installing their bolts. The technician needs to rotate the Crankshaft while keeping the number one Piston at top dead center of the compression stroke to achieve several objectives: the cylinder number one rocker arms should be off lobe lift and the Crankshaft sprocket key needs to reach the 1:30 position with alignment marks exactly at 12 o'clock. The technician should torque the exhaust valve Rocker Arm bolts 1, 2, 7, and 8 to 30 n.m (22 lb ft) simultaneously with the intake valve Rocker Arm bolts 1, 3, 4, and 5. After rotating the Crankshaft by 360 degrees the technician must tighten exhaust valve Rocker Arm bolts 3, 4, 5, 6 together with intake valve Rocker Arm bolts 2, 6, 7, 8 at 30 n.m (22 lb ft). The installation of the valve Rocker Arm covers must complete the process.

Related Chevrolet Corvette Parts
 Chevrolet Corvette Cam Gear
 Chevrolet Corvette Coolant Filter
 Chevrolet Corvette Crankshaft
 Chevrolet Corvette Drain Plug
 Chevrolet Corvette Engine Mount Bracket
 Chevrolet Corvette Head Gasket
 Chevrolet Corvette Oil Pan Baffle
 Chevrolet Corvette Oil Pan Gasket
 Chevrolet Corvette Rod Bearing
 Chevrolet Corvette Timing Belt Tensioner
 Chevrolet Corvette Timing Chain
 Chevrolet Corvette Timing Chain Guide