ChevyParts
My Garage
My Account
Cart
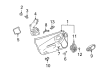
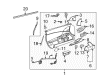
OEM Chevrolet Corvette Window Regulator
Electric Power Window Regulator- Select Vehicle by Model
- Select Vehicle by VIN
Select Vehicle by Model
orMake
Model
Year
Select Vehicle by VIN
For the most accurate results, select vehicle by your VIN (Vehicle Identification Number).
14 Window Regulators found


Chevrolet Corvette Window Regulator, Front Driver Side Part Number: 84216130
$147.74 MSRP: $289.26You Save: $141.52 (49%)Ships in 1-2 Business Days
Chevrolet Corvette Window Regulator, Front Passenger Side Part Number: 86584227
$124.60 MSRP: $223.50You Save: $98.90 (45%)Ships in 1-2 Business DaysChevrolet Corvette Window Regulator, Front Driver Side Part Number: 86584222
$105.30 MSRP: $188.04You Save: $82.74 (44%)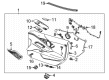
Chevrolet Corvette Window Regulator, Front Passenger Side Part Number: 85524025
$124.60 MSRP: $223.50You Save: $98.90 (45%)Ships in 1-3 Business DaysChevrolet Corvette Window Regulator, Front Driver Side Part Number: 85524024
$105.30 MSRP: $188.04You Save: $82.74 (44%)Chevrolet Corvette Window Regulator, Front Passenger Side Part Number: 84216131
$145.47 MSRP: $284.82You Save: $139.35 (49%)Ships in 1-2 Business Days


Chevrolet Corvette Window Regulator, Front Driver Side Part Number: 22895755
$609.13 MSRP: $1097.54You Save: $488.41 (45%)
Chevrolet Corvette Window Regulator, Front Part Number: 20914968

Chevrolet Corvette Window Regulator, Front Part Number: 22895753
Chevrolet Corvette Window Regulator, Front Passenger Side Part Number: 22895756
$463.09 MSRP: $834.40You Save: $371.31 (45%)Chevrolet Corvette Window Regulator, Front Passenger Side Part Number: 22063224
$170.15 MSRP: $305.20You Save: $135.05 (45%)
Chevrolet Corvette Window Regulator
Want to cut long-term maintenance and repair costs? Choose OEM Window Regulator. Those parts deliver top durability you can trust. On our site, you'll find a huge catalog of genuine Chevrolet Corvette parts. Prices are unbeatable, so you can keep more in your pocket. Every OEM Chevrolet Corvette Window Regulator includes a manufacturer's warranty. You can also get an easy return policy that keeps buying risk free. Fast delivery, get your car on the road quickly. It's simple to search, compare, and order. Stop guessing about quality or fit. Order today and save with parts that last.
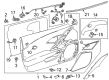
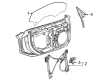
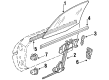
Chevrolet CORVETTE WINDOW REGULATOR The Window Regulator plays an important role in operation of the Chevrolet Corvette car while it enhances the window opening and closing services. Mainly, the Chevrolet Corvette Window Regulator is an electric vehicle component that is operated using a mechanism that assists in the effortless movement of the car's windows every time a button is pressed. This system is very useful to the passengers and contributes highly to the security of vehicles since individuals cannot gain access to the vehicles via the windows. Through the years several different types of Window Regulators have been employed in Chevrolet Corvette models including Electric Regulation and Manual Regulation. Electric window regulators that are more familiar in today's Corvettes are easier to use and very dependable. Preferably, manual window cranks were employed in the prior models as these needed mechanical force to be applied on the crank in order to open or close the window. Regardless of the type, the main function of the Chevrolet Corvette Window Regulator remains consistent: to safely support the window glass so that it can be slid across as at the same time offer support to the glass itself.
Chevrolet Corvette Window Regulator Parts Questions & Experts Answers
- Q: How to replace the front door window regulator on Chevrolet Corvette?A:The procedure for front door Window Regulator replacement starts by removing door trim panel together with water deflector and radio speaker assembly through disconnecting electrical/audio connector and unscrewing speaker retaining screws. Move the plugs out of the access holes from the window clamp sight and the door window. Rephrase the front door Window Regulator replacement procedure by first disconnecting the regulator motor electrical connector then removing the front plug under the door's bottom part followed by careful marking of the regulator placement for reinstallation. Remove the nuts from regulator lower channel studs together with regulator motor studs and upper regulator channel studs before folding the regulator for removal through the door inner opening. Adjust the regulator jack screws to fit the previous regulator configuration unless you are performing a replacement then fold the regulator and insert it through the door opening while orienting the motor toward the front. Insert the motor studs through the door inner panel before installing the nuts on them to a torque of 10 n.m (89 lb in). Secure the regulator channel studs by passing them through the door holes and tighten all nuts according to this sequence: upper forward and lower forward followed by upper rearward and lower rearward to 10 n.m (89 lb in). After attaching the regulator rose bud clip to its position on the door and hooking the electrical connector to the motor you must pull the regulator to its uppermost extent before reconnecting the window switch. You should put back the window while readjusting it until it matches the door opening then put back the plugs in the window clamp sight access holes. Enplace and tighten the top speaker assembly screw initially before applyingroups of screws using a criss-cross pattern to 3 n.m (27 lb in) torque. Complete the connection of electric audio wiring before you re-install the water defender and door outer panel. The process concludes by verifying window alignment and making corrections before inserting the access plugs into the door bottom.

Related Chevrolet Corvette Parts
 Chevrolet Corvette Emblem
 Chevrolet Corvette Body Mount Hole Plug
 Chevrolet Corvette Door Handle
 Chevrolet Corvette Door Latch Assembly
 Chevrolet Corvette Door Latch Cable
 Chevrolet Corvette Door Lock
 Chevrolet Corvette Door Lock Actuator
 Chevrolet Corvette Door Lock Cylinder
 Chevrolet Corvette Door Moldings
 Chevrolet Corvette Door Seal
 Chevrolet Corvette Lift Support
 Chevrolet Corvette Tailgate Latch