ChevyParts
My Garage
My Account
Cart
OEM Chevrolet Impala A/C Expansion Valve
Air Conditioning Expansion Valve- Select Vehicle by Model
- Select Vehicle by VIN
Select Vehicle by Model
orMake
Model
Year
Select Vehicle by VIN
For the most accurate results, select vehicle by your VIN (Vehicle Identification Number).
4 A/C Expansion Valves found


Chevrolet Impala Expansion Valve, Green Line Part Number: 52495729
$85.31 MSRP: $175.32You Save: $90.01 (52%)Ships in 1-2 Business Days


Chevrolet Impala Expansion Valve Part Number: 19259241
$101.18 MSRP: $190.03You Save: $88.85 (47%)Ships in 1-2 Business Days
Chevrolet Impala Expansion Valve Part Number: 23473612
$86.87 MSRP: $163.12You Save: $76.25 (47%)Ships in 1-2 Business Days
Chevrolet Impala Expansion Valve Part Number: 22972091
$78.50 MSRP: $161.32You Save: $82.82 (52%)Ships in 1-2 Business Days
Chevrolet Impala A/C Expansion Valve
Want to cut long-term maintenance and repair costs? Choose OEM A/C Expansion Valve. Those parts deliver top durability you can trust. On our site, you'll find a huge catalog of genuine Chevrolet Impala parts. Prices are unbeatable, so you can keep more in your pocket. Every OEM Chevrolet Impala A/C Expansion Valve includes a manufacturer's warranty. You can also get an easy return policy that keeps buying risk free. Fast delivery, get your car on the road quickly. It's simple to search, compare, and order. Stop guessing about quality or fit. Order today and save with parts that last.
A/C Expansion Valve is used in performing and reliable Chevrolet Impala cars to enhance its air conditioning system. This A/C Expansion Valve perfectly controls the refrigerant passing through it and boosts the cooling ability of the Impala's interior. Several years ago, Chevrolet produced numerous types of A/C Expansion Valves with respect to the Impala generation, including the first one and the latest, the tenth one. Every A/C Expansion Valve is fitted to allow the right measure of refrigerant flow that is indispensable when it comes to the APC of the vehicle's climate control system as well as the safety of the operation. This A/C Expansion Valve is valued in the market because of its durability and universality for the Impala series that makes it a go-to product for those seeking for quality performance. Moreover, the A/C Expansion Valve gives much contribution to the total efficiency of the vehicle's energy usage for cooling and proper distribution of refrigerant. The special specs, for example, the high-quality materials and design of the A/C Expansion Valve provide assurance to the need for this car part as a significant component of the Impala's air conditioning system. Therefore, it is worthy to conclude that, air conditioning system is a vital part of the every car and particularly Chevrolet Impala due to its importance in enforcing comfort, safety, and an efficiency of the car in general.
Chevrolet Impala A/C Expansion Valve Parts and Q&A
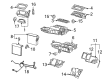
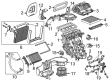
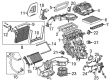
- Q: How to replace the A/C Expansion Valve in an A/C system on Chevrolet Impala?A:Recovery of the refrigerant from the a/c system should start any thermal expansion valve (TXV) replacement work. The first step involves removing the Evaporator tube nut which enables disconnecting the Evaporator outlet and inlet tubes from the txv. Sealing washers will be discarded before immediately stopping each pipe opening with an Evaporator cap to stop refrigerant system contamination. Remove the txv to Evaporator bolts from the Evaporator core and extract the txv from its place before discarding the sealing washers. When installing the txv into the Evaporator core position the new sealing washers and fasten them with txv to Evaporator bolts which require tightening up to 7 n.m (62 lb in). Remove devices from the Evaporator inlet and outlet ports then install new sealing washers on each tube before uniting the Evaporator outlet with inlet to the txv. Install the Evaporator tube nut before tightening it to 17 n.m (13 lb ft). The system should receive an evacuation and recharging process in addition to halogen leak detector (J 39400-A) testing of component fittings.

Related Chevrolet Impala Parts
 Chevrolet Impala Blower Motor Resistor
 Chevrolet Impala A/C Accumulator
 Chevrolet Impala A/C Compressor
 Chevrolet Impala A/C Compressor Cut-Out Switches
 Chevrolet Impala A/C Condenser
 Chevrolet Impala A/C Hose
 Chevrolet Impala A/C Orifice Tube
 Chevrolet Impala A/C Service Cap
 Chevrolet Impala A/C System Valve Core
 Chevrolet Impala Air Temperature Sensor
 Chevrolet Impala Ambient Temperature Sensor
 Chevrolet Impala Evaporator