ChevyParts
My Garage
My Account
Cart
OEM Chevrolet Metro Drive Belt
Serpentine Belt- Select Vehicle by Model
- Select Vehicle by VIN
Select Vehicle by Model
orMake
Model
Year
Select Vehicle by VIN
For the most accurate results, select vehicle by your VIN (Vehicle Identification Number).
4 Drive Belts found

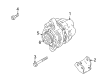
Chevrolet Metro Serpentine Belt Part Number: 30016435
$26.14 MSRP: $59.84You Save: $33.70 (57%)
Chevrolet Metro Serpentine Belt Part Number: 30005514
$13.55 MSRP: $31.02You Save: $17.47 (57%)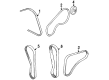
Chevrolet Metro A/C Belt Part Number: 30005359
$19.16 MSRP: $43.88You Save: $24.72 (57%)Chevrolet Metro A/C Belt Part Number: 30014091
Chevrolet Metro Drive Belt
Want to cut long-term maintenance and repair costs? Choose OEM Drive Belt. Those parts deliver top durability you can trust. On our site, you'll find a huge catalog of genuine Chevrolet Metro parts. Prices are unbeatable, so you can keep more in your pocket. Every OEM Chevrolet Metro Drive Belt includes a manufacturer's warranty. You can also get an easy return policy that keeps buying risk free. Fast delivery, get your car on the road quickly. It's simple to search, compare, and order. Stop guessing about quality or fit. Order today and save with parts that last.
Chevrolet Metro Drive Belt Parts and Q&A
- Q: How to inspect and replace the drive belt, and How to install the power steering and generator drive belts on Chevrolet Metro?A:Examine the Drive Belt for fractures in its ribs and replace the belt if performance-related cracks appear or if the belt contains any damaged rib area. The pulleys need to have a correct belt alignment before tightening. Adjustments should be made when misalignment is detected. Verify the proper tension of the Drive Belt simultaneously. The vehicle requires support at height before workers can begin their task. They need to remove first the right front tire and wheel assembly and then detach 6 push clips and the right front lower splash shield. Begin by removing the Drive Belt from the pulleys after disconnecting the tension pulley retaining nut and tension bolt. The Drive Belt needs to be routed properly onto the Power Steering Pump pulley and compressor pulley before installation while aligning all elements within the system. Check the pulley tension through thumb pressure before tightening the tension bolt at proper specifications and fastening the tension pulley lock nut with a torque of 45 nm (33 ft.lbs). You should reinstall the right front lower splash shield through its six push clips after installing the right front tire and wheel assembly followed by lowering the vehicle. Before installing the generator Drive Belt, disconnect the negative Battery Cable first and remove both the Power Steering Pump and compressor Drive Belt. First loosen the upper adjuster bolt and lower mounting bolt of the generator Drive Belt then pivot the generator before removing the accessory Drive Belt. The generator Drive Belt installation should be performed by adjusting the tension to obtain 6 - 8 mm (0.24 - 0.31 inch) bending when applying 10 kg (22 lbs.) of force on used belts or 5 - 7 mm (0.20 - 0.27 inch) bending for new belts. After adjusting, the adjuster bolt and mounting bolt should be tightened to 23 nm (17 ft. Lbs.). Install the power steering and compressor Drive Belt before reconnecting the negative Battery Cable by tightening the Battery Cable bolt to 15 nm (11 ft. Lbs.).

Related Chevrolet Metro Parts
 Chevrolet Metro Coolant Pipe
 Chevrolet Metro Coolant Reservoir Cap
 Chevrolet Metro Fan Blade
 Chevrolet Metro Fan Motor
 Chevrolet Metro Front Cross-Member
 Chevrolet Metro Radiator
 Chevrolet Metro Radiator Hose
 Chevrolet Metro Radiator fan
 Chevrolet Metro Thermostat Gasket
 Chevrolet Metro Thermostat Housing
 Chevrolet Metro Water Pump
 Chevrolet Metro Water Pump Gasket