ChevyParts
My Garage
My Account
Cart
OEM Chevrolet Silverado 1500 Classic Brake Pad
Disc Brake Pad Set- Select Vehicle by Model
- Select Vehicle by VIN
Select Vehicle by Model
orMake
Model
Year
Select Vehicle by VIN
For the most accurate results, select vehicle by your VIN (Vehicle Identification Number).
5 Brake Pads found

Chevrolet Silverado 1500 Classic Brake Pads, Front Part Number: 19432941
$131.12 MSRP: $271.71You Save: $140.59 (52%)


Chevrolet Silverado 1500 Classic Brake Pads Part Number: 19210705


Chevrolet Silverado 1500 Classic Brake Pads Part Number: 18048083
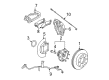
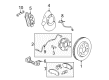
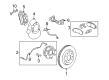
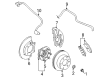
Chevrolet Silverado 1500 Classic Brake Pad
Want to cut long-term maintenance and repair costs? Choose OEM Brake Pad. Those parts deliver top durability you can trust. On our site, you'll find a huge catalog of genuine Chevrolet Silverado 1500 Classic parts. Prices are unbeatable, so you can keep more in your pocket. Every OEM Chevrolet Silverado 1500 Classic Brake Pad includes a manufacturer's warranty. You can also get an easy return policy that keeps buying risk free. Fast delivery, get your car on the road quickly. It's simple to search, compare, and order. Stop guessing about quality or fit. Order today and save with parts that last.
Chevrolet Silverado 1500 Classic Brake Pad Parts Questions & Experts Answers
- Q: How to replace the front disc brake pads on a 1500 Series on Chevrolet Silverado 1500 Classic?A:Before replacing 1500 series front brake pads inspect the brake master cylinder reservoir fluid. Keep the fluid level at midway between maximum and minimum if possible. Put the vehicle on stands then take out tire and wheel pieces. Push the brake caliper pistons completely back with two big c-clamps set above the housing then into the back of the outside pad. Use hand tools to work on the guide pin bolts while applying an open end wrench to support the caliper guide pin as you unscrew its lower bolt. Manual braking during rotor and caliper removal harms the system's components. After raising the caliper take the brake pads off the bracket and drop the anti-rattle clips. Insert fresh anti-rattle clips onto the caliper bracket before placing new brake pads onto it. Also install one indicator wear equipped inner pad. Lower the caliper back into its original position. Wrench-free tools help install the lower brake caliper guide pin bolt until it reaches 100 nm (74 ft. Lbs.) of torque. Make sure the brake caliper guide pin seal fits properly and make sure the guide pin slides without any hindrance through the caliper bracket. Install the tire and wheel unit and take out the safety stands before lowering the vehicle. Once the engine is shut down you should start pressing the brake until it reaches around two-thirds of travel and then let off gradually. Continue this sequence until you feel a solid brake pedal which presses the brake pistons and pads into the correct position. Complete the master cylinder reservoir using clean brake fluid when needed before performing pad and rotor surface polishing.

Related Chevrolet Silverado 1500 Classic Parts
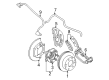
 Chevrolet Silverado 1500 Classic ABS Sensor
 Chevrolet Silverado 1500 Classic Brake Backing Plate
 Chevrolet Silverado 1500 Classic Brake Caliper Bracket
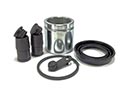 Chevrolet Silverado 1500 Classic Brake Caliper Repair Kit
 Chevrolet Silverado 1500 Classic Brake Calipers
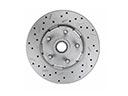 Chevrolet Silverado 1500 Classic Brake Disc
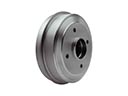 Chevrolet Silverado 1500 Classic Brake Drum
 Chevrolet Silverado 1500 Classic Brake Dust Shields
 Chevrolet Silverado 1500 Classic Brake Line
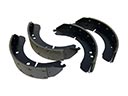 Chevrolet Silverado 1500 Classic Brake Shoe
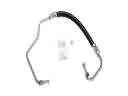 Chevrolet Silverado 1500 Classic Hydraulic Hose
 Chevrolet Silverado 1500 Classic Wheel Bearing