ChevyParts
My Garage
My Account
Cart
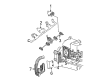
OEM Chevrolet Silverado 1500 Fuel Pressure Regulator
Fuel Tank Pressure Regulator- Select Vehicle by Model
- Select Vehicle by VIN
Select Vehicle by Model
orMake
Model
Year
Select Vehicle by VIN
For the most accurate results, select vehicle by your VIN (Vehicle Identification Number).
6 Fuel Pressure Regulators found


Chevrolet Silverado 1500 Fuel Pressure Regulator Part Number: 97728979
$368.14 MSRP: $579.25You Save: $211.11 (37%)


Chevrolet Silverado 1500 Fuel Pressure Regulator Part Number: 19245530
$92.92 MSRP: $188.72You Save: $95.80 (51%)Ships in 1-3 Business Days
Chevrolet Silverado 1500 Fuel Pressure Regulator Part Number: 19210686
$77.57 MSRP: $157.56You Save: $79.99 (51%)Ships in 1-2 Business Days
Chevrolet Silverado 1500 Fuel Pressure Regulator Part Number: 52373074

Chevrolet Silverado 1500 Fuel Pressure Regulator Part Number: 52372836
Chevrolet Silverado 1500 Fuel Pressure Regulator Part Number: 52372245
Chevrolet Silverado 1500 Fuel Pressure Regulator
Want to cut long-term maintenance and repair costs? Choose OEM Fuel Pressure Regulator. Those parts deliver top durability you can trust. On our site, you'll find a huge catalog of genuine Chevrolet Silverado 1500 parts. Prices are unbeatable, so you can keep more in your pocket. Every OEM Chevrolet Silverado 1500 Fuel Pressure Regulator includes a manufacturer's warranty. You can also get an easy return policy that keeps buying risk free. Fast delivery, get your car on the road quickly. It's simple to search, compare, and order. Stop guessing about quality or fit. Order today and save with parts that last.
Chevrolet Silverado 1500 Fuel Pressure Regulator Parts Questions & Experts Answers
- Q: How to replace the fuel pressure regulator on Chevrolet Silverado 1500?A:The first step to replace the Fuel Pressure Regulator requires removal of the upper Intake Manifold before the retaining clip of the Fuel Pressure Regulator can be extracted. Using a shop towel to minimize fuel spillage you should twist and pull the Fuel Pressure Regulator from its housing. Constructive disposal of the Fuel Pressure Regulator o-ring seal and the regulator filter and then the regulator o-ring along with the regulator back up ring should take place. Protect the Fuel Pressure Regulator housing with a covering material to avoid contamination. The filter screen in the Fuel Pressure Regulator should be checked for contaminants after which a replacement may be needed for the regulator if required. The new back up ring and regulator seal o-ring should receive engine oil lubrication before getting assembled onto the Fuel Pressure Regulator with the new regulator and regulator seal o-ring. Fitting the Fuel Pressure Regulator requires you to point the vacuum tube downwards before using the retainer clip to secure it while reinstalling the upper manifold. After reconnecting the negative Battery Cable you should tighten the fuel fill cap. End the procedure by testing for fuel leaks through a diagnostic process of turning ignition on for 2 seconds then off for 10 seconds before turning it on again. Check that no leaks occur during this test.

Related Chevrolet Silverado 1500 Parts
 Chevrolet Silverado 1500 Fuel Injector
 Chevrolet Silverado 1500 Gas Cap
 Chevrolet Silverado 1500 Air Intake Coupling
 Chevrolet Silverado 1500 Fuel Injection Pump
 Chevrolet Silverado 1500 Fuel Injector O-Ring
 Chevrolet Silverado 1500 Fuel Pressure Sensor
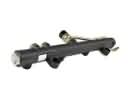 Chevrolet Silverado 1500 Fuel Rail
 Chevrolet Silverado 1500 Fuel Tank Sending Unit
 Chevrolet Silverado 1500 Idle Control Valve
 Chevrolet Silverado 1500 Intake Manifold Gasket
 Chevrolet Silverado 1500 Throttle Body
 Chevrolet Silverado 1500 Throttle Cable