ChevyParts
My Garage
My Account
Cart
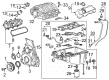
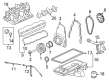
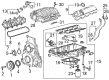
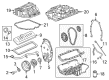
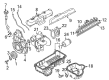
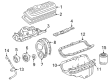
OEM Chevrolet Silverado 1500 Intake Manifold
Engine Intake Manifold- Select Vehicle by Model
- Select Vehicle by VIN
Select Vehicle by Model
orMake
Model
Year
Select Vehicle by VIN
For the most accurate results, select vehicle by your VIN (Vehicle Identification Number).
18 Intake Manifolds found


Chevrolet Silverado 1500 Intake Manifold Part Number: 12639087
$153.81 MSRP: $261.86You Save: $108.05 (42%)Ships in 1-2 Business Days

Chevrolet Silverado 1500 Intake Manifold Part Number: 12630859
$171.48 MSRP: $291.94You Save: $120.46 (42%)Ships in 1-3 Business Days

Chevrolet Silverado 1500 Intake Manifold Part Number: 12623417
$245.09 MSRP: $420.93You Save: $175.84 (42%)Ships in 1-2 Business Days


Chevrolet Silverado 1500 Intake Manifold Part Number: 12620308
$216.35 MSRP: $351.12You Save: $134.77 (39%)

Chevrolet Silverado 1500 Intake Manifold Part Number: 40009057
$126.75 MSRP: $215.75You Save: $89.00 (42%)Ships in 1-3 Business Days
Chevrolet Silverado 1500 Intake Manifold Part Number: 12698870
$47.51 MSRP: $74.41You Save: $26.90 (37%)Ships in 1-3 Business Days
Chevrolet Silverado 1500 Intake Manifold Part Number: 12698169
$235.99 MSRP: $371.30You Save: $135.31 (37%)Ships in 1-2 Business Days
Chevrolet Silverado 1500 Intake Manifold Part Number: 12654946
$217.06 MSRP: $344.62You Save: $127.56 (38%)Ships in 1-2 Business Days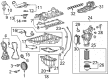
Chevrolet Silverado 1500 Intake Manifold Part Number: 12638038
$224.44 MSRP: $382.10You Save: $157.66 (42%)Ships in 1-2 Business Days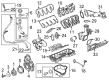
Chevrolet Silverado 1500 Intake Manifold Part Number: 12597600
$161.11 MSRP: $388.46You Save: $227.35 (59%)Ships in 1-2 Business Days
Chevrolet Silverado 1500 Intake Manifold Part Number: 12595827
$87.57 MSRP: $144.26You Save: $56.69 (40%)Ships in 1-2 Business Days


Chevrolet Silverado 1500 Manifold Part Number: 17113697


Chevrolet Silverado 1500 Intake Manifold Part Number: 17113542


Chevrolet Silverado 1500 Intake Manifold Part Number: 12580420
$187.90 MSRP: $295.65You Save: $107.75 (37%)Chevrolet Silverado 1500 Intake Manifold Part Number: 89017365
Chevrolet Silverado 1500 Intake Manifold, Lower Part Number: 88894294

Chevrolet Silverado 1500 Intake Manifold Part Number: 19418186
Chevrolet Silverado 1500 Intake Manifold, Lower Part Number: 17113342
Chevrolet Silverado 1500 Intake Manifold
Want to cut long-term maintenance and repair costs? Choose OEM Intake Manifold. Those parts deliver top durability you can trust. On our site, you'll find a huge catalog of genuine Chevrolet Silverado 1500 parts. Prices are unbeatable, so you can keep more in your pocket. Every OEM Chevrolet Silverado 1500 Intake Manifold includes a manufacturer's warranty. You can also get an easy return policy that keeps buying risk free. Fast delivery, get your car on the road quickly. It's simple to search, compare, and order. Stop guessing about quality or fit. Order today and save with parts that last.
Chevrolet Silverado 1500 Intake Manifold Parts Questions & Experts Answers
- Q: How to replace the lower intake manifold on Chevrolet Silverado 1500?A:You should start the lower Intake Manifold replacement by draining coolant from the system. Extract the fuel hoses/lines and the Ignition Coil assembly and the evap canister tube from the system. First detach heater hoses and set them aside before disconnecting the engine wiring harness electrical connector from both the Throttle Body and designated electrical connections. First remove the engine harness clamp and oil pressure sensor connector with the engine wiring harness bracket bolt before relocating the wiring harness. Turn off your positive crankcase ventilation (PCV) valve hose in addition to the power Brake Booster Vacuum Hose while also removing the radiator inlet hose and water pump inlet hose. The first step to access the front Intake Manifold bolt requires Drive Belt removal followed by loose power steering (P/S) pump rear bracket nut and subsequent forward sliding of the p/s pump bracket. Rip the bolts from the lower end of the Intake Manifold then take out both the manifold and its gaskets for disposal. Thoroughly examine and clean the lower Intake Manifold according to need. Each end of the Intake Manifold Gasket needs a 4.0 mm adhesive patch applied to the cylinder head side while keeping the gasket properly seated during the adhesive's wet stage. Start by applying a 5 mm adhesive bead across the front and rear block tops which should reach up to the Intake Manifold gaskets before installing the manifold. Reused fasteners require threadlock application to lower Intake Manifold bolts followed by a stepwise bolting process according to torque specifications. Finally, the p/s pump bracket should be reattached while the Drive Belt installs and water pump inlet hose and radiator inlet hose should be reconnected. Reconnect the power Brake Booster Vacuum Hose along with the PCV Valve Hose before you put the engine wiring harness and its components in their proper positions and secure them. To finish the process add coolant into the cooling system.

Related Chevrolet Silverado 1500 Parts
 Chevrolet Silverado 1500 Air Filter
 Chevrolet Silverado 1500 Air Filter Box
 Chevrolet Silverado 1500 Air Intake Coupling
 Chevrolet Silverado 1500 Fuel Pressure Sensor
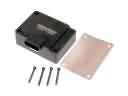 Chevrolet Silverado 1500 Fuel Pump Driver Module
 Chevrolet Silverado 1500 Fuel Pump Gasket
 Chevrolet Silverado 1500 Fuel Pump Seal
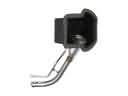 Chevrolet Silverado 1500 Fuel Tank Filler Neck
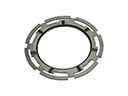 Chevrolet Silverado 1500 Fuel Tank Lock Ring
 Chevrolet Silverado 1500 Intake Manifold Gasket
 Chevrolet Silverado 1500 Mass Air Flow Sensor
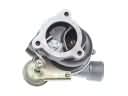 Chevrolet Silverado 1500 Turbocharger