ChevyParts
My Garage
My Account
Cart
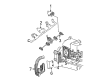
OEM Chevrolet SSR Fuel Rail
Engine Fuel Rail- Select Vehicle by Model
- Select Vehicle by VIN
Select Vehicle by Model
orMake
Model
Year
Select Vehicle by VIN
For the most accurate results, select vehicle by your VIN (Vehicle Identification Number).
6 Fuel Rails found


Chevrolet SSR Fuel Rail Part Number: 17113695
$104.95 MSRP: $327.45You Save: $222.50 (68%)Ships in 1-2 Business Days


Chevrolet SSR Fuel Rail Part Number: 17113696


Chevrolet SSR Fuel Rail Part Number: 12592187

Chevrolet SSR Fuel Rail Part Number: 12592186
Chevrolet SSR Fuel Rail Part Number: 12580914
Chevrolet SSR Fuel Rail Part Number: 12580913
Chevrolet SSR Fuel Rail
Want to cut long-term maintenance and repair costs? Choose OEM Fuel Rail. Those parts deliver top durability you can trust. On our site, you'll find a huge catalog of genuine Chevrolet SSR parts. Prices are unbeatable, so you can keep more in your pocket. Every OEM Chevrolet SSR Fuel Rail includes a manufacturer's warranty. You can also get an easy return policy that keeps buying risk free. Fast delivery, get your car on the road quickly. It's simple to search, compare, and order. Stop guessing about quality or fit. Order today and save with parts that last.
Chevrolet SSR Fuel Rail Parts and Q&A
- Q: How to replace the fuel rail assembly on Chevrolet SSR?A:The replacement process starts with engine sight shield removal followed by compressed filter air cleaning of the Fuel Injector area until it is fully clear of any fragments or particles. Use compressed filter air to clean the Intake Manifold where the upper engine harness connects before detaching it from the manifold and reducing pressure in the fuel system. After removing the necessary Fuel Rail crossover pipe as well as o-rings and retaining screws and tabs follow by disconnecting the evaporative emission (EVAP) purge valve harness connector and relocating the engine wiring harness. Mark the electrical connector to the Fuel Injector before using the following procedure to disconnect it properly. Push the lower part of the connector to release the Fuel Injector. Pull the top piece of the connector forward without overextending the white section. Utilize the tab located on the lower connector section to push it then break off the fuel feed line connection. Swing the Fuel Rail assembly out while avoiding electrical connector terminal breakage and keeping contaminants from the spray tips with careful support of the rail assembly. Also install protective caps on exposed fittings. The procedure begins with removing mounting bolts from the Fuel Rail followed by the Fuel Rail and then proceeding to remove fuel injectors. Apply gm p/n 12345382 (Canadian P/N 10953489) threadlock to Fuel Rail bolts as a 5 mm (0.20 in) band before installation then fasten bolts to 10 n.m (89 lb in). Install the Fuel Rail crossover pipe by placing o-rings first then securing it with retaining bolts and tabs while tightening the screws to 3.8 n.m (34 lb in). The fuel feed pipe should be connected with the electrical connectors for fuel injectors while using proper alignment methods that generate a clicking sound or feeling when everything is correct. After positioning the engine wiring harness onto the Intake Manifold you must reinstall the evap purge valve harness before installing the engine sight shield mounting bracket and tightening the bolts to 5.5 n.m (49 lb in). The last procedure involves connecting the negative Battery Cable in addition to leak inspection by operating the ignition twice (ON for 2 seconds followed by 10 seconds of OFF time then once more to ON) to verify no leaks persist before reinstallation of the engine sight shield.

Related Chevrolet SSR Parts
 Chevrolet SSR Air Filter Box
 Chevrolet SSR Air Intake Coupling
 Chevrolet SSR Fuel Injector
 Chevrolet SSR Fuel Pressure Regulator
 Chevrolet SSR Fuel Pressure Sensor
 Chevrolet SSR Fuel Tank
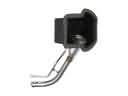 Chevrolet SSR Fuel Tank Filler Neck
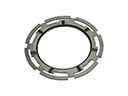 Chevrolet SSR Fuel Tank Lock Ring
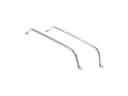 Chevrolet SSR Fuel Tank Strap
 Chevrolet SSR Gas Cap
 Chevrolet SSR Intake Manifold Gasket
 Chevrolet SSR Mass Air Flow Sensor