ChevyParts
My Garage
My Account
Cart
OEM Chevrolet Tracker A/C Switch
Air Conditioning Switch- Select Vehicle by Model
- Select Vehicle by VIN
Select Vehicle by Model
orMake
Model
Year
Select Vehicle by VIN
For the most accurate results, select vehicle by your VIN (Vehicle Identification Number).
5 A/C Switches found


Chevrolet Tracker Heater Control Part Number: 30021241


Chevrolet Tracker Dash Control Unit Part Number: 30007399

Chevrolet Tracker On/Off Switch Part Number: 30026050

Chevrolet Tracker Control Panel Part Number: 30021245

Chevrolet Tracker Control Switch Part Number: 30007405
Chevrolet Tracker A/C Switch
Want to cut long-term maintenance and repair costs? Choose OEM A/C Switch. Those parts deliver top durability you can trust. On our site, you'll find a huge catalog of genuine Chevrolet Tracker parts. Prices are unbeatable, so you can keep more in your pocket. Every OEM Chevrolet Tracker A/C Switch includes a manufacturer's warranty. You can also get an easy return policy that keeps buying risk free. Fast delivery, get your car on the road quickly. It's simple to search, compare, and order. Stop guessing about quality or fit. Order today and save with parts that last.
Chevrolet Tracker A/C Switch Parts and Q&A
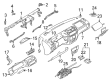
- Q: How to replace the A/C Switch control assembly on Chevrolet Tracker?A:Begin control assembly replacement by detaching the mode control cable at the heater case along with defroster switch disconnection if present followed by removing two screws for the defroster switch. Start by taking out the temperature control cable at the heater case then open the instrument panel (IP) compartment using the left and right side levers to bring it down. Disconnect the fresh/recirc control cable at the blower case then separate the A/C Switch connector if present while removing the ip cluster trim bezel. Push the heater control fascia off the control assembly with gentle pressure followed by twisting the bulb socket to break loose. First disconnect the blower switch electrical connector and remove the three screws. Then pull the heater control unit through the ip as you tilt it to one side. Note how the cables route through the unit before removing the heater control assembly with its connected cables intact. The blower switch and A/C Switch must be removed from the heater control unit when needed. Process the heater control unit control cables by sliding the temperature control sheath from the unit and unhooking it from lever arms. To attach control cables to the heater control unit simply slide their ends into lever arm holes then pull sheaths back and dock retainers before securing them by snapping them into place. Position the cables and tilt the heater control unit to one side while installing it to the ip after you place the A/C Switch and blower switch to the heater control unit when necessary. Complete the blower switch electrical connection before adding the bulb socket and heater control fascia and the three screws. Place the ip cluster trim bezel first along with knobs back on control levers and connect the A/C Switch connector when a/c functionality is available. Attach the fresh/recirc control cable to its specific pin on the fresh/recirc door then lock it into position on the heater case clip. Before continuing close the ip compartment so you can install the temperature control cable and mode control cable at the heater case. Finish the installation by connecting the defroster switch if necessary followed by reinstalling it to the mounting points using two screws simultaneously. Make adjustments to the control cables if required.

Related Chevrolet Tracker Parts
 Chevrolet Tracker A/C Accumulator
 Chevrolet Tracker A/C Clutch
 Chevrolet Tracker A/C Compressor
 Chevrolet Tracker A/C Compressor Cut-Out Switches
 Chevrolet Tracker A/C Condenser
 Chevrolet Tracker A/C Expansion Valve
 Chevrolet Tracker A/C Hose
 Chevrolet Tracker A/C Orifice Tube
 Chevrolet Tracker Blower Control Switches
 Chevrolet Tracker Cabin Air Filter
 Chevrolet Tracker Evaporator
 Chevrolet Tracker HVAC Pressure Switch