ChevyParts
My Garage
My Account
Cart
OEM Chevrolet Uplander Fuse Box
Fuse Holder Box- Select Vehicle by Model
- Select Vehicle by VIN
Select Vehicle by Model
orMake
Model
Year
Select Vehicle by VIN
For the most accurate results, select vehicle by your VIN (Vehicle Identification Number).
2 Fuse Boxes found


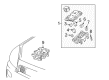
Chevrolet Uplander Junction Block Part Number: 25906446
$214.35 MSRP: $337.26You Save: $122.91 (37%)Ships in 1-3 Business Days
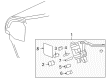
Chevrolet Uplander Junction Block Part Number: 15209933
Chevrolet Uplander Fuse Box
Want to cut long-term maintenance and repair costs? Choose OEM Fuse Box. Those parts deliver top durability you can trust. On our site, you'll find a huge catalog of genuine Chevrolet Uplander parts. Prices are unbeatable, so you can keep more in your pocket. Every OEM Chevrolet Uplander Fuse Box includes a manufacturer's warranty. You can also get an easy return policy that keeps buying risk free. Fast delivery, get your car on the road quickly. It's simple to search, compare, and order. Stop guessing about quality or fit. Order today and save with parts that last.
The Chevrolet Uplander Fuse Box operates as a vital system which reinforces both reliability and performance of the 2005-2009 Chevrolet Uplander minivan production range. The Fuse Box acts as a vital protection mechanism in the Chevrolet Uplander electronics because it stores automotive fuses for circuit safeguarding and equipment protection against rated voltage overload. The Engine Compartment and Dashboard respectively house the Fuse Box that improves Chevrolet Uplander efficiency alongside its safety features while different model versions rely on Integrated Power Modules (IPM) for electrical system management. A specific IOD fuse within the Fuse Box helps protect Chevy Uplander batteries from draining when the vehicle is unpowered. The Chevrolet Uplander depends on regular Fuse Box inspections together with possible replacements to ensure its electrical reliability as well as optimal operational performance. Different automobile models can use this component which demonstrates its critical importance in the automotive market because reliability remains essential there. The Chevrolet car Fuse Box represents both functional capabilities and driving reliability factors which make the model a trustworthy vehicle solution for all types of automotive users. The car Fuse Box features a durable structure alongside strategic engineering that demonstrates the automaker's dedication to comfort and security in automotive products.
Chevrolet Uplander Fuse Box Parts Questions & Experts Answers
- Q: How to replace the instrument panel Fuse Box on Chevrolet Uplander?A:Starting the instrument panel electrical center or junction block replacement procedure requires disconnecting the negative Battery Cable. First step involves removing both the instrument panel right side endcap cover alongside the i/p compartment. The procedure starts by unfastening the i/p accessory wiring junction block assembly from the i/p carrier through the removal of its 2 forward screws. Then remove the 2 nuts that secure the assembly bracket to the i/p carrier. Lower the bracket that contains electrical centers from the instrument panel before swinging the junction block inside the compartment area. You should press and release the retaining tabs from the shroud/base before disconnecting the electrical connector from the i/p wiring harness then extract the i/p accessory wiring junction block assembly from the connector. Before installing the new i/p wiring harness junction block always re-stage all the connectors into the lower i/p accessory wiring junction block assembly base/shroud while making sure the main harness is locked in position at the lower shroud/base. To install the harness connectors should be firmly attached to retention tabs before positioning the connector to the i/p wiring harness junction block and gently pushing the connector against the base until both external locking tabs secure. Secure the extra i/p connectors after positioning the bracket and bracket studs on the carrier then install the nuts before tightening them to 10 n.m (89 lb in). Secure the 2 screws at the i/p endcap by tightening them to 2 n.m (18 lb in). The i/p compartment and i/p right side end cap cover installation must be completed before reattaching the negative Battery Cable. The power sliding door re-initialization process should be completed last.

Related Chevrolet Uplander Parts
 Chevrolet Uplander Antenna
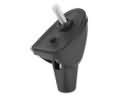 Chevrolet Uplander Antenna Base
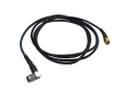 Chevrolet Uplander Antenna Cable
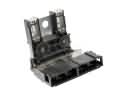 Chevrolet Uplander Battery Fuse
 Chevrolet Uplander Body Control Module
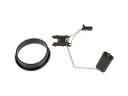 Chevrolet Uplander Fuel Level Sensor
 Chevrolet Uplander Fuel Pump Relay
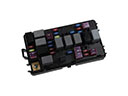 Chevrolet Uplander Fuse
 Chevrolet Uplander Headlight Relay
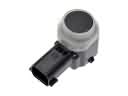 Chevrolet Uplander Parking Assist Distance Sensor
 Chevrolet Uplander Relay
 Chevrolet Uplander Seat Heater Pad