ChevyParts
My Garage
My Account
Cart
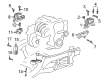
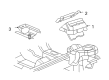
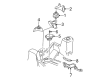
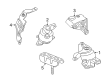
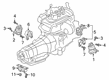
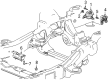
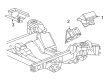
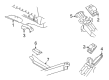
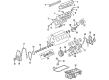
OEM GMC Engine Mount Bracket
Engine Mount- Select Vehicle by Model
- Select Vehicle by VIN
Select Vehicle by Model
orMake
Model
Year
Select Vehicle by VIN
For the most accurate results, select vehicle by your VIN (Vehicle Identification Number).
169 Engine Mount Brackets found


GMC Front Mount Bracket Part Number: 15115368
$49.04 MSRP: $76.83You Save: $27.79 (37%)Ships in 1-3 Business DaysProduct Specifications- Other Name: Bracket, Engine Mounting
- Position: Front


GMC Mount Bracket, Driver Side Part Number: 15113852
$78.81 MSRP: $123.45You Save: $44.64 (37%)Ships in 1-2 Business DaysProduct Specifications- Other Name: Bracket, Engine Mounting; Engine Mount Bracket; Motor Mount
- Position: Driver Side

GMC Mount Bracket Part Number: 23463094
$48.23 MSRP: $75.53You Save: $27.30 (37%)Ships in 1-3 Business DaysProduct Specifications- Other Name: Bracket-Engine Mount Engine Side; Bracket, Engine Mounting

GMC Mount Bracket Part Number: 84182610
$38.89 MSRP: $60.91You Save: $22.02 (37%)Ships in 1-3 Business DaysProduct Specifications- Other Name: Bracket-Engine Mount Engine Side; Engine Mount Bracket; Motor Mount; Bracket, Engine Mounting


GMC Motor Mount, Passenger Side Part Number: 84118702
$88.64 MSRP: $146.02You Save: $57.38 (40%)Product Specifications- Other Name: Mount Assembly-Engine; Engine Mount Bracket; Front Mount; Mount; Mount, Engine Mounting
- Position: Passenger Side

GMC Motor Mount Brace Part Number: 23463116
$4.00 MSRP: $6.27You Save: $2.27 (37%)Ships in 1-3 Business DaysProduct Specifications- Other Name: Brace, Engine Mounting; Engine Mount Bracket; Motor Mount; Support

GMC Motor Mount Part Number: 84884385
$90.83 MSRP: $142.28You Save: $51.45 (37%)Ships in 1-3 Business DaysProduct Specifications- Other Name: Mount, Engine Mounting; Engine Mount Bracket
- Replaces: 84377289

GMC Adapter, Passenger Side Part Number: 25758852
$28.04 MSRP: $43.93You Save: $15.89 (37%)Ships in 1-3 Business DaysProduct Specifications- Other Name: Bracket, Engine Mounting; Engine Mount Bracket
- Position: Passenger Side

GMC Mount Brace, Passenger Side Part Number: 23444266
$42.12 MSRP: $65.98You Save: $23.86 (37%)Ships in 1-3 Business DaysProduct Specifications- Other Name: Brace, Engine Mounting; Engine Mount Torque Strut; Engine Mount Bracket; Transmission Mount; Motor Mount; Motor Mount Support; Motor Mount Brace; Bracket
- Position: Passenger Side


GMC Motor Mount Part Number: 84979743
$65.98 MSRP: $103.33You Save: $37.35 (37%)Ships in 1-3 Business DaysProduct Specifications- Other Name: Mount Assembly-Engine; Engine Mount Bracket; Front Mount; Mount, Engine Mount Dampening; Mount, Engine Mounting
- Replaced by: 85043423

GMC Motor Mount Bracket Part Number: 88964338
$92.01 MSRP: $144.12You Save: $52.11 (37%)Ships in 1-3 Business DaysProduct Specifications- Other Name: Bracket, Engine Mounting; Engine Mount Bracket; Motor Mount
- Replaces: 15079401

GMC Mount Bracket, Driver Side Part Number: 23247708
$72.43 MSRP: $113.45You Save: $41.02 (37%)Product Specifications- Other Name: Bracket-Engine Mount Engine Side; Engine Mount Bracket; Motor Mount; Bracket, Engine Mounting
- Position: Driver Side
- Replaces: 23195926

GMC Mount Bracket Part Number: 85511549
$61.61 MSRP: $96.49You Save: $34.88 (37%)Ships in 1-3 Business DaysProduct Specifications- Other Name: Bracket-Engine Mount Engine Side; Bracket, Engine Mounting
- Replaces: 84618128, 23463095


GMC Motor Mount, Passenger Side Part Number: 86812789
$63.08 MSRP: $98.79You Save: $35.71 (37%)Product Specifications- Other Name: Mount, Engine Mounting; Side Mount
- Position: Passenger Side

GMC Mount Bracket, Driver Side Part Number: 85126007
$45.94 MSRP: $71.96You Save: $26.02 (37%)Ships in 1-3 Business DaysProduct Specifications- Other Name: Bracket-Engine Mount Engine Side; Bracket, Engine Mounting
- Position: Driver Side
- Replaces: 23353402

GMC Mount Bracket, Driver Side Part Number: 23353404
$17.26 MSRP: $27.03You Save: $9.77 (37%)Ships in 1-3 Business DaysProduct Specifications- Other Name: Bracket-Engine Mount Engine Side; Engine Mount Bracket; Motor Mount
- Position: Driver Side
- Replaced by: 85126630

GMC Mount Bracket, Driver Side Part Number: 20886359
$115.59 MSRP: $181.86You Save: $66.27 (37%)Ships in 1-3 Business DaysProduct Specifications- Other Name: Bracket, Engine Mounting; Engine Mount Bracket; Motor Mount
- Position: Driver Side
- Replaces: 25752967

GMC Mount Bracket, Driver Side Part Number: 15969185
Product Specifications- Other Name: Bracket, Engine Mounting; Engine Mount Bracket; Motor Mount
- Position: Driver Side

GMC Mount Bracket, Passenger Side Part Number: 84193765
$42.54 MSRP: $66.64You Save: $24.10 (37%)Product Specifications- Other Name: Bracket-Engine Mount Heat Shield; Engine Mount Bracket; Motor Mount
- Position: Passenger Side

GMC Motor Mount, Front Driver Side Part Number: 15788794
$179.37 MSRP: $282.21You Save: $102.84 (37%)Product Specifications- Other Name: Front Mount; Engine Mount Bracket; Mount
- Position: Front Driver Side
| Page 1 of 9 |Next >
1-20 of 169 Results
GMC Engine Mount Bracket
Choose OEM Engine Mount Bracket, you're making the optimal decision for superior quality and perfect performance. You can feel confident because each component goes through stringent quality checks. Every part is carefully built to comply with GMC's factory specifications. You'll enjoy a smooth, worry-free installation that fits just right. At ChevyPartsGiant.com, you'll find it easy to get top-quality OEM GMC Engine Mount Bracket. You can shop at highly competitive prices and protect your budget. All our genuine GMC parts include a dependable manufacturer's warranty. You'll also appreciate our straightforward return policy and swift delivery services for extra convenience.
GMC Engine Mount Bracket Parts and Q&A
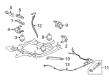
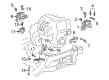
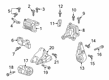
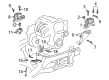
- Q: How to replace the LH engine mount and engine mount bracket on GMC Envoy?A:The replacement process of left engine mount and bracket begins with disconnecting the negative Battery Cable followed by cooling fan removal. Start by disconnecting the manifold absolute pressure (MAP) sensor electrical connector together with its retainer and subsequently remove the MAP Sensor. The left shock module should be taken out before removing the frame mount. Raising the vehicle while removing the right and left upper engine mount nuts will then require the removal of both right and left lower engine mount nuts. Place a jack on the Oil Pan while cautioning against striking the oil level sender to avoid damage. The first step involves using a floor jack together with wood block to elevate the engine until it reaches a position where the engine mount stud can be cleared. Proceed with the removal of the left engine mount from its bracket and then uninstall the left engine mount bracket bolts and left engine mount bracket sequentially. The technician should remove the left frame engine mount bracket bolts and its bracket only if it becomes necessary. Before reattaching the left frame engine mount bracket users must install it with proper bolts which require a torque of 110 nm (81 ft. Lbs.). The left engine mount bracket needs installation by securing it using bolts which should be tightened to 50 nm (37 ft. Lbs.). After placing the left engine mount onto the bracket position the engine on its mounts then install the right and left upper engine mount nuts with a torque of 70 nm (52 ft. Lbs.). Draw up the vehicle after taking out the jack to put on the engine protection shield which needs bolt installation. Lower the vehicle after installing right and left lower engine mount nuts which should be torqued to 70 nm (52 ft. Lbs.). The service technician should install the left shock module together with the MAP Sensor and MAP Sensor retainer and its electrical connector. Before completion install the cooling fan hub nut to the water pump shaft while placing the cooling fan and reconnecting the negative Battery Cable.
- Q: How to replace the Engine Mount Bracket on GMC Terrain?A:To remove the Engine Mount Bracket, begin by removing the Engine Mount. Next, remove the Engine Mount Bracket (to engine bolts) to then remove the Engine Mount Bracket itself. For installation, place the Engine Mount Bracket to the engine and insert the Engine Mount Bracket bolts and use long bolts in the forward and lower rear holes and use short bolts in the upper rear hole. Make sure to adhere to the fastener caution to prevent vehicle damage. Lastly, tighten the Engine Mount Bracket bolts in the described pattern to 100 nm (74 lb ft) and reinstall the Engine Mount.


Related GMC Parts
 GMC Coolant Filter
 GMC Dipstick Tube
 GMC Drain Plug
 GMC Lash Adjuster
 GMC Oil Filler Cap
 GMC Oil Pan Baffle
 GMC Oil Pan Gasket
 GMC Oil Pump Gasket
 GMC Rocker Arm
 GMC Rod Bearing
 GMC Timing Cover
 GMC Valve Cover Gasket
Browse GMC Engine Mount Bracket by Models
Acadia Sierra 1500 Yukon Canyon Sierra 2500 HD Terrain Envoy Sonoma Typhoon Syclone Caballero C1500 Envoy XL Envoy XUV Jimmy K1500 S15 S15 Jimmy Safari Savana 2500 Savana 3500 Sierra 2500 Sierra 3500 Yukon XL Acadia Limited C2500 C3500 G2500 K2500 K3500 P3500 Savana 1500 Yukon XL 1500 C1500 Suburban C2500 Suburban G1500 G3500 K1500 Suburban K2500 Suburban P2500 R1500 R1500 Suburban R2500 R2500 Suburban R3500 Sierra 1500 Classic Sierra 1500 HD Sierra 1500 HD Classic Sierra 2500 HD Classic Sierra 3500 Classic Sierra 3500 HD V1500 V1500 Suburban V2500 V2500 Suburban V3500 Yukon XL 2500