ChevyParts
My Garage
My Account
Cart
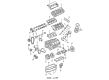
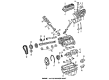
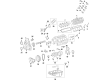
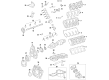
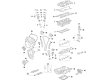
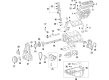
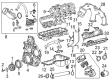
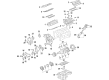
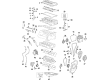
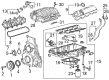
OEM GMC Timing Cover
Engine Timing Cover- Select Vehicle by Model
- Select Vehicle by VIN
Select Vehicle by Model
orMake
Model
Year
Select Vehicle by VIN
For the most accurate results, select vehicle by your VIN (Vehicle Identification Number).
72 Timing Covers found


GMC Timing Cover, Front Part Number: 14090022
$95.20 MSRP: $149.13You Save: $53.93 (37%)Product Specifications- Other Name: Cover, Engine Front; Front Cover; Cover, Engine Front Cover
- Position: Front


GMC Timing Cover Part Number: 89017261
$77.27 MSRP: $121.03You Save: $43.76 (37%)Product Specifications- Other Name: Cover, Engine Front Cover; Front Cover
- Position: Front
- Replaces: 12554557

GMC Timing Cover, Front Part Number: 12688896
$60.56 MSRP: $94.86You Save: $34.30 (37%)Product Specifications- Other Name: Cover-Engine Front (Machining); Front Cover; Cover, Engine Front Cover
- Position: Front

GMC Timing Cover Part Number: 12687775
$95.42 MSRP: $149.47You Save: $54.05 (37%)Ships in 1-3 Business DaysProduct Specifications- Other Name: Cover Assembly-Engine Front; Front Cover; Cover, Engine Cover Front; Cover, Engine Front Cover
- Replaced by: 12739836
- Replaces: 12687776


GMC Front Cover Part Number: 55512356
$15.93 MSRP: $24.96You Save: $9.03 (37%)Ships in 1-3 Business DaysProduct Specifications- Other Name: Cover, Engine Front Cover
- Position: Front

GMC Front Cover, Upper Part Number: 55514491
$24.72 MSRP: $38.72You Save: $14.00 (37%)Ships in 1-2 Business DaysProduct Specifications- Other Name: Cover-Timing Belt Upper Front; Timing Cover; Cover, Engine Front Cover
- Position: Front Upper
- Replaces: 55506518

GMC Timing Cover, Front Part Number: 12691696
$59.85 MSRP: $93.75You Save: $33.90 (37%)Ships in 1-3 Business DaysProduct Specifications- Other Name: Cover-Engine Front (Machining); Front Cover; Cover, Engine Front Cover
- Position: Front
- Replaces: 12688895
GMC Rear Cover, Lower Part Number: 55515618
$68.88 MSRP: $107.89You Save: $39.01 (37%)Ships in 1-3 Business DaysProduct Specifications- Other Name: Cover Assembly-Timing Chain Lower; Crankshaft Seal; Timing Cover; Rear Main Seal Retainer; Rear Main Seal Housing; Housing
- Position: Lower
- Replaced by: 40009071

GMC Timing Cover Part Number: 12671403
$83.78 MSRP: $131.22You Save: $47.44 (37%)Ships in 1-3 Business DaysProduct Specifications- Other Name: Cover Assembly-Engine Front; Front Cover; Cover, Engine Front Cover
- Replaces: 12671402

GMC Timing Cover, Front Part Number: 12704639
$338.90 MSRP: $533.25You Save: $194.35 (37%)Ships in 1-3 Business DaysProduct Specifications- Other Name: Cover Assembly-Engine Front (W/Water Pump); Front Cover; Cover, Engine Front Cover
- Position: Front
- Replaces: 12681228, 12673689, 12690496
GMC Rear Cover Part Number: 12731559
$39.55 MSRP: $61.95You Save: $22.40 (37%)Ships in 1-2 Business DaysProduct Specifications- Other Name: Housing Assembly, Crankshaft Rear Oil Seal; Housing
- Position: Rear
- Replaces: 12687463, 12707673

GMC Front Cover Part Number: 12716029
$35.40 MSRP: $58.32You Save: $22.92 (40%)Ships in 1-3 Business DaysProduct Specifications- Other Name: Cover Assembly-Engine Front; Timing Cover; Lower Timing Cover
- Replaced by: 12731560


GMC Front Cover Part Number: 55489569
$442.86 MSRP: $696.80You Save: $253.94 (37%)Product Specifications- Other Name: Cover Assembly-Engine Front; Timing Cover; Cover, Engine Front Cover
- Position: Front

GMC Timing Cover, Front Part Number: 12690012
$129.63 MSRP: $203.97You Save: $74.34 (37%)Product Specifications- Other Name: Cover, Engine Front Cover; Front Cover
- Position: Front
- Replaces: 12633638, 12664882, 12658164, 12662952, 12659833, 12654043
GMC Front Cover Part Number: 12728654
$43.95 MSRP: $68.82You Save: $24.87 (37%)Product Specifications- Other Name: Cover Assembly-Timing Chain Upper; Upper Timing Cover; Cover, Engine Cover Front; Cover, Engine Front Cover
- Replaces: 12689670
GMC Timing Cover, Front Part Number: 12691693
$60.01 MSRP: $144.68You Save: $84.67 (59%)Ships in 1-2 Business DaysProduct Specifications- Other Name: Cover-Engine Front (Machining); Front Cover; Cover, Engine Front Cover
- Position: Front
- Replaces: 12693268, 12632808

GMC Timing Cover, Front Part Number: 12624280
$503.81 MSRP: $796.28You Save: $292.47 (37%)Ships in 1-3 Business DaysProduct Specifications- Other Name: Cover, Engine Front Cover; Front Cover
- Position: Front

GMC Timing Cover, Front Part Number: 12652364
$88.20 MSRP: $138.11You Save: $49.91 (37%)Ships in 1-3 Business DaysProduct Specifications- Other Name: Cover-Engine Front (Machining)
- Position: Front
- Replaces: 12688705

GMC Water Pump, Front Part Number: 12693557
$358.60 MSRP: $564.10You Save: $205.50 (37%)Ships in 1-3 Business DaysProduct Specifications- Other Name: Cover Assembly-Engine Front (W/Water Pump); Timing Cover; Front Cover; Cover, Engine Front Cover
- Position: Front
- Replaced by: 12732627
GMC Rear Cover Part Number: 55512224
$14.73 MSRP: $23.07You Save: $8.34 (37%)Ships in 1-3 Business DaysProduct Specifications- Other Name: Cover Assembly-Timing Chain Upper; Timing Cover; Cover, Engine Front Cover
- Replaces: 55490633
| Page 1 of 4 |Next >
1-20 of 72 Results
GMC Timing Cover
Choose OEM Timing Cover, you're making the optimal decision for superior quality and perfect performance. You can feel confident because each component goes through stringent quality checks. Every part is carefully built to comply with GMC's factory specifications. You'll enjoy a smooth, worry-free installation that fits just right. At ChevyPartsGiant.com, you'll find it easy to get top-quality OEM GMC Timing Cover. You can shop at highly competitive prices and protect your budget. All our genuine GMC parts include a dependable manufacturer's warranty. You'll also appreciate our straightforward return policy and swift delivery services for extra convenience.
GMC Timing Cover Parts and Q&A
- Q: How to replace the engine front timing cover on GMC Sierra 1500?A:To replace engine front cover, ensure that the Water Pump, crankshaft balancer, and Oil Pan are removed and then removed the engine shield bolts and shield. Remove the clip of the engine wire harness from the front cover and remove the crankshaft position (CKP) electric connector . Take off the bolt attached to the ckp sensor and the sensor itself, dispose of the ckp sensor o-ring seal. Unplug the engine wiring harness electrical connector from the camshaft position (CMP) sensor wiring harness jumper, then, take off the cmp sensor bolt and take out the cmp sensor and the wiring harness jumper from the engine front cover. Unplug the cmp sensor's wiring harness jumper from the cmp sensor, take cmp sensor off the wiring harness jumper. Next, take off front cover bolts and dispose of the front cover while removing front cover carefully to clean all sealing surfaces before installing a new covering. Replace the front cover bolts, fastening it to 12 n.m (106 lb in), do not reuse the original o-ring seal. If the old cmp sensor is to be reinstalled; install a new o-ring seal onto the sensor and install the cmp sensor on the wire harness jumper and connect the cmp sensor wire harness jumper to the cmp sensor. Apply clean engine oil to the o-ring seal and then mount the cmp sensor and wiring harness jumper to the engine front cover, tight in place the cmp sensor bolt by 10 n.m (89 lb in). Join the engine wiring harness transformer from the cmp sensor wiring harness jumper. Make sure not to use the original ckp sensor angle wire seal again. Fresh engine oil to lubricate a new ckp sensor o-ring seal and fit it to the ckp sensor with the bolt to 8 n.m (71 lb in) tight. Ensure that the sensor is fully seated before tightening the bolt to 8 n.m (71 lb in). Connect the ckp sensor electrical connector and the engine wire harness clip to the front cover. Lastly, the engine shield and bolts should be installed and tightened to 20 n. M (15 lb ft), then the Oil Pan, crankshaft balancer and Water Pump.
- Q: How to replace the engine front timing cover on GMC Yukon?A:If you are to change the engine front cover, remove the Water Pump and crankshaft balancer first. Unplug the cmp sensor wire harness from cmp actuator magnet and the engine harness from cmp sensorarness. The next step is to remove Oil Pan to front cover bolts and front cover bolts (501), after which the front cover (502) should be removed along with its gasket (503) which should be discarded. Strip the crankshaft front oil seal off it and in case of changing the engine front cover take off the cmp sensor wire harness and bolts and disconnecting it from the cmp sensor off and besides taking off the cmp sensor wire harness and the cmp sensor (703) and cmp actuator magnet bolts (751) and magnet (752) but discarding cmp actuator magnet gasket (753). For installation, do not use the reused crankshaft oil seal or the front cover gasket and do not apply the sealant to the front cover gasket in the absence of instructions. Use the en-48853 front cover alignment tool which will adjust the crankshaft front oil seal properly. Install a new cmp actuator magnet gasket (753), put the cmp actuator magnet (752) and bolts (751) on and tighten them to 12 nm (106 lb in) check the cmp sensor o-ring seal (704) for damage, lubricate its o-ring with clean engine oil and install the cmp sensor (703). Mount the cmp sensor wire harness to the front cover, attach it to the compressor pressure sensor, tighten the cmp sensor wire harness bolts to 12 nm (106 lb in), and apply gasket between the wire harness and the front cover. Put a 5 mm, 20 mm 0.20in,0.80in length bead of sealant on the Oil Pan, the Oil Pan to engine block junction ,and then to position the new engine front cover gasket (503) and front cover (502) on the engine. Putting in front cover bolts (501) until snug in sequence avoiding overtightening, oil pan to front cover bolts in finger-tight sequence. Install the crank shaft balancer bolt partially tight then tighten the Oil Pan to front cover at 25 nm (18 lb ft) then tighten the engine front cover bolts at 25 nm (18 lb ft). Unplug the tools, place the cmp sensor, and connect the engine harness electrical connector to the cmp sensor wire harness electrical connector and the Camshaft Position Sensor wire harness electrical connector to the cmp actuator magnet. Finally, seal a new crankshaft front oil seal and also the Water Pump.


Related GMC Parts
 GMC Oil Filter
 GMC Cam Gear
 GMC Crankshaft Pulley
 GMC Cylinder Head
 GMC Dipstick
 GMC Dipstick Tube
 GMC Drain Plug
 GMC Oil Drain Plug Gasket
 GMC Piston Ring
 GMC Rocker Arm
 GMC Rocker Shaft Spring Kit
 GMC Timing Chain Tensioner
Browse GMC Timing Cover by Models
Acadia Sierra 1500 Yukon Canyon Sierra 2500 HD Terrain Envoy Sonoma Typhoon Syclone Caballero C1500 Envoy XL Envoy XUV Jimmy K1500 S15 S15 Jimmy Safari Savana 2500 Savana 3500 Sierra 2500 Sierra 3500 Yukon XL Acadia Limited C2500 C3500 G2500 K2500 K3500 P3500 Savana 1500 Yukon XL 1500 C1500 Suburban C2500 Suburban G1500 G3500 K1500 Suburban K2500 Suburban P2500 R1500 R1500 Suburban R2500 R2500 Suburban R3500 Sierra 1500 Classic Sierra 1500 HD Sierra 1500 HD Classic Sierra 1500 Limited Sierra 2500 HD Classic Sierra 3500 Classic Sierra 3500 HD V1500 V1500 Suburban V2500 V2500 Suburban V3500 Yukon XL 2500